Unsupported browser
This site was designed for modern browsers and tested with Internet Explorer version 10 and later.
It may not look or work correctly on your browser.
- Presentations

What Are the Right Dimensions (Size) for Your PowerPoint PPT Slides? (+ Video)
- Bahasa Indonesia
How important are PowerPoint slide dimensions? Consider the following. Ever plugged your laptop in, and your slides didn't look quite right? Were they cut off on the edges, or boxed in on the screen, like this? Changing PowerPoint slide size can avoid this.

You've spent time doing research, crafting your message and creating visuals. Now you're ready to give a PowerPoint presentation. In PowerPoint, changing slide size ensures that you maximize your screen space.
Knowing your PowerPoint slide dimensions helps your presentation look right on the screen. In this tutorial, I'll teach you how to choose the right PowerPoint dimensions. I'll also share some top PowerPoint slide designs from Envato Elements. These have slide designs and dimensions already set for you!
Learn More About Presentations
Before you dig into this tutorial, be sure to download our free eBook: The Complete Guide to Making Great Presentations . It'll help you master the complete presentation process.

What Are the Right Dimensions (Size) for Your PowerPoint Slides? (Video)
Are you unsure of how to set up PowerPoint dimensions? The wrong dimensions can have a very real impact on the success of your presentation. Before you connect to a big screen monitor or projector to share your hard work, check the size and aspect ratio of your presentation.
Watch the video below for a quick walk-through on how to set up PPT slide size:

Continue reading to learn even more about PowerPoint size. Discover which sizes to use for which screens, and more.
Jump to content in this section:
What's the Right Size for Your PowerPoint?
- How to Change the Size of Your PowerPoint
Top PowerPoint Templates (With Ready-Made Slide Dimensions)
5 quick powerpoint presentation format tips, find more great powerpoint templates: 5 top designs, more powerpoint slide size templates (for 2023 slide designs), learn more about using microsoft powerpoint, make great presentations (free ebook download).
Choosing PowerPoint slide size is a key part of your presentation setup. It ensures that your content looks its best in the way that you want to share it.
You might present PowerPoint presentations on a variety of screens, such as:
- laptop screens
- conference room projectors
- iPads and tablets
- widescreen, large format displays
Each of these displays has a different shape or aspect ratio. The aspect ratio is a measure that describes the width versus height of a screen. The same PowerPoint slides will appear differently on each device. That's because the aspect ratio can vary.

This brings us to the first step. Begin by choosing a size for PPT slide layouts by deciding what device your slides are most likely to appear on. This drives the slide size in PPT that you’ll want to use for best results.
The specific setting depends on the device you'll use. Here are rules of thumb for which one to choose:
| Laptops | 16:9 (MacBooks are 16:10) |
| Projectors | 4:3 or 16:9 |
| Large-screen displays | 16:9 |
| Tablets | 4:3 |
These aren't the only options, of course. PowerPoint slide size change features like Letter Paper or Ledger Paper are also available. These are meant for printed slides, so that they fit perfectly on different sizes of paper.
The key is to choose the size that works for your audience. It's how to change slide size in PPT in a way that works best for you and your work.
How to Change the Size of Your PowerPoint
We've learned the basic rules for slide size in PPT. Now, let's put this knowledge to work. Read on to learn how PowerPoint slide size change works. We'll work through it step-by-step. In moments, you'll know how to change slide size in PPT.
1. How to Change the Size of PowerPoint Slides
You've chosen the screen you'll present on. And you've chosen the right size for your PowerPoint presentation. Now, it's time to change your PowerPoint file to match.
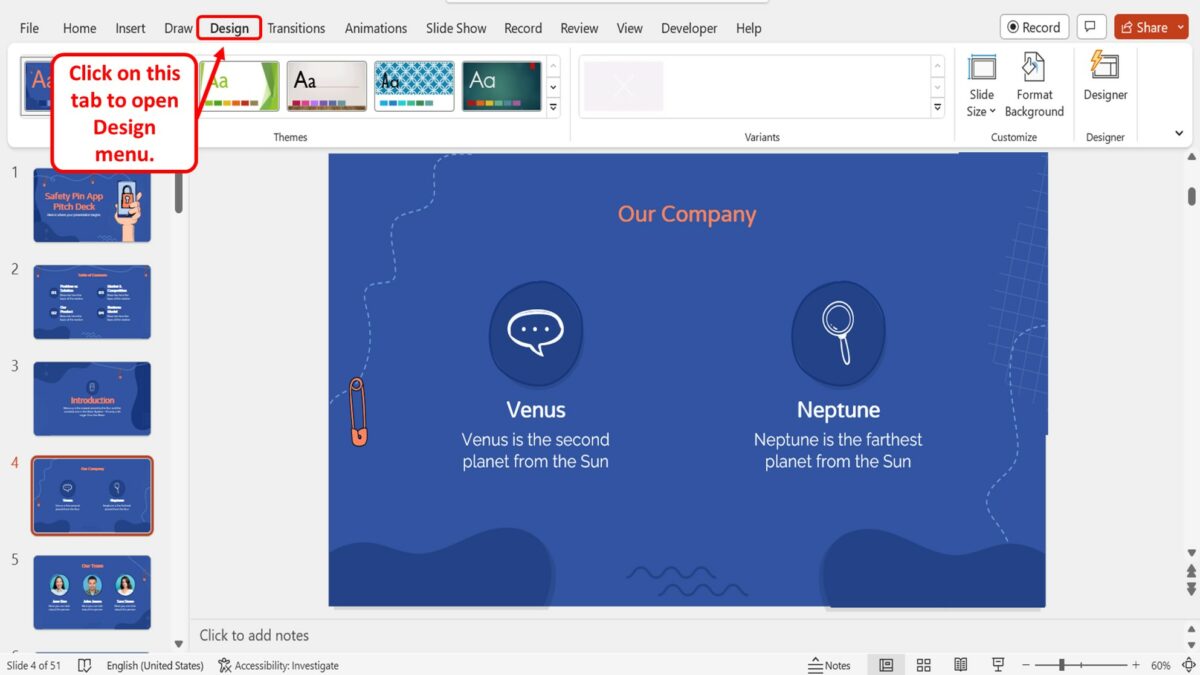
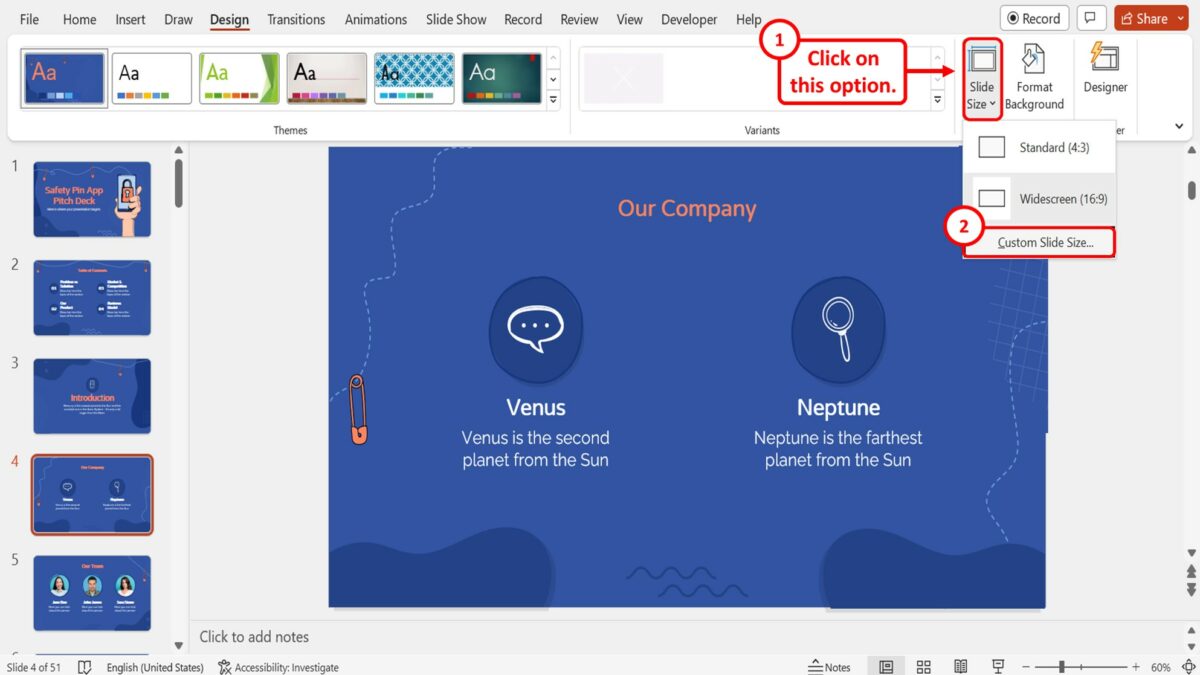
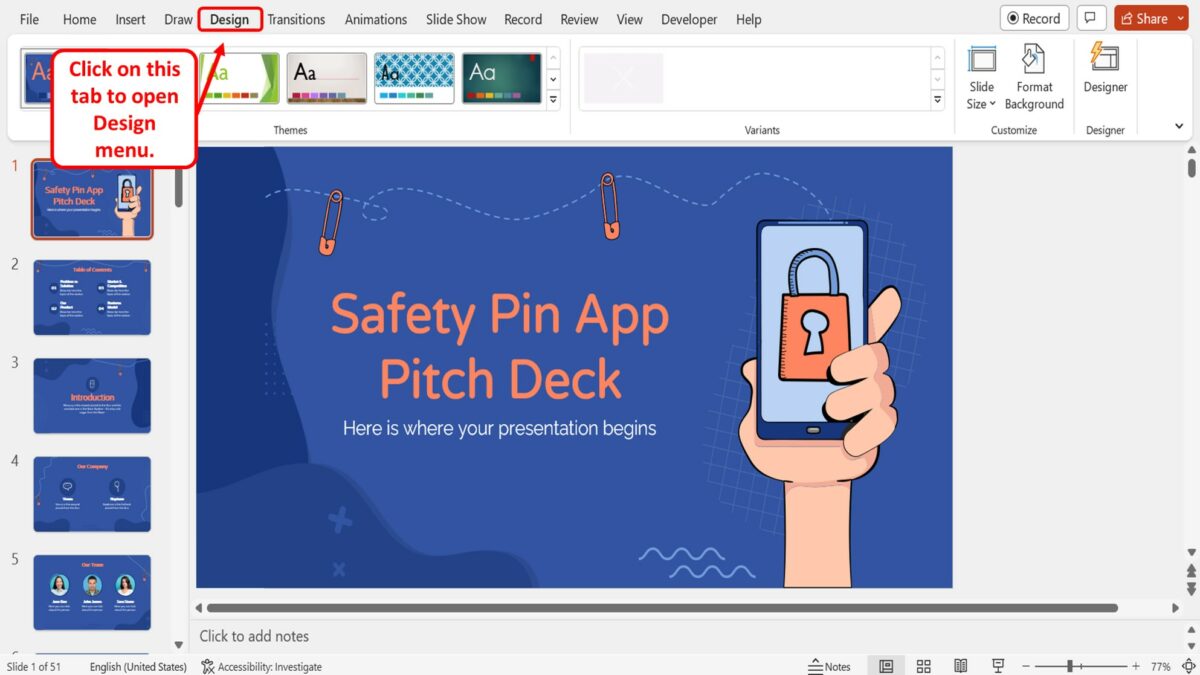
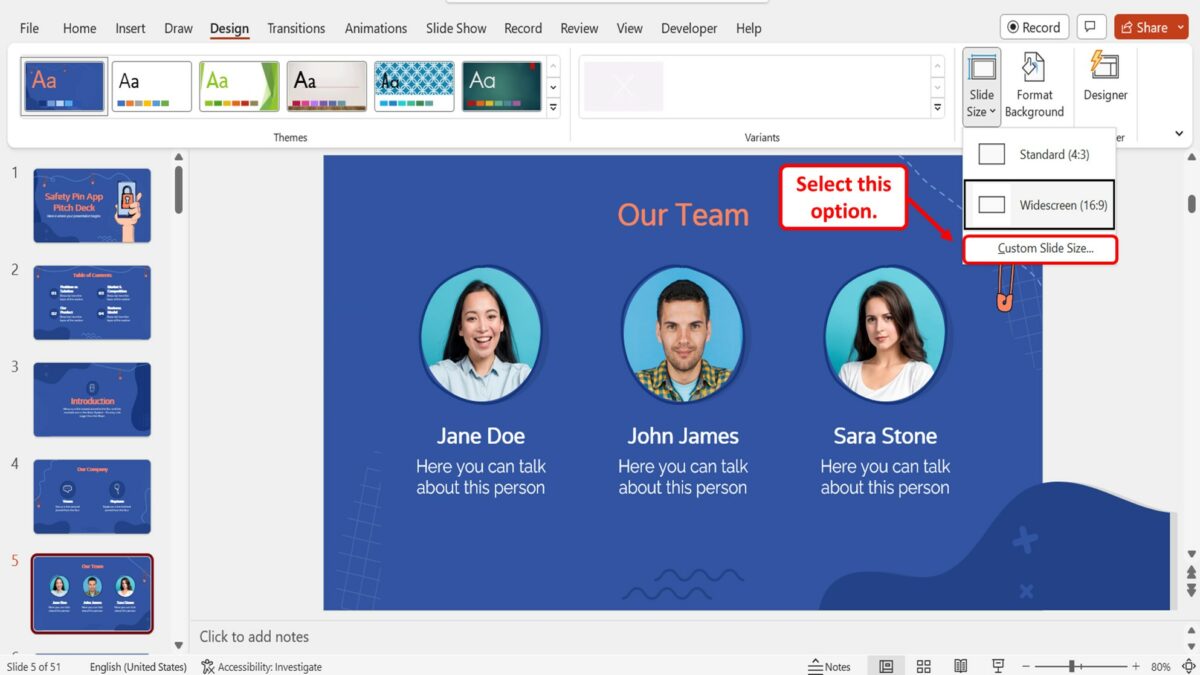
Click on the Design tab on PowerPoint's ribbon. The available options will change on the ribbon. Find the Customize section on the ribbon and click on the Slide Size icon.
A drop-down menu opens with several options. Click on Custom Slide Size to open the Slide size menu and change your presentation's dimensions.
The Slide Size menu opens, and now we can change the PPT slide size using the dropdown options.

It may not always be possible to choose the perfect size for your presentation. If you send and share your presentation, then you can't control the device that your audience will open your presentation on.
You can optimize the presentation for most viewers. Let’s look at the process for PowerPoint changing slide size.
2. Setting Slide Size in PPT (Quickly and Easily)
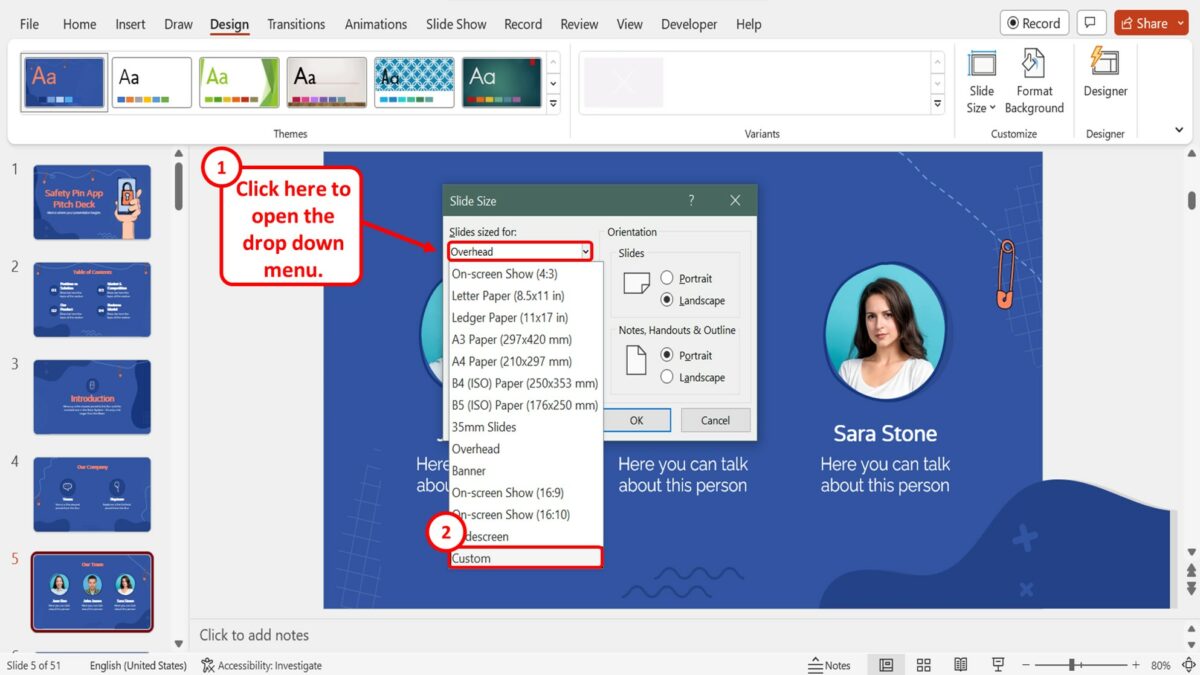
Let's see how to PPT change slide size. Start by clicking on the drop-down box under the Slides sized for: option. The slide size in PPT you choose should be based upon the screen it'll appear on.
There are several choices on this drop-down menu. The most common choices that I use are On-screen Show (4:3) , On-screen Show (16:9) , and On-screen Show (16:10). Think of these as the choices for PPT size of slides.

I use each of these settings often. That's because they match the most common devices PowerPoint presentations are shown on. Refer to our handy table earlier in the tutorial to decide which to use.
After you select a slide size in PPT, press OK on this menu. PowerPoint will show a new menu that gives you a choice of how to change slide size in PPT. Let's take a closer look at which PPT change slide size option will be right for you.
PowerPoint Slide Settings: "Maximize" Versus "Ensure Fit"
When we size for PPT slides, PowerPoint presents us with two unique options. These are drastically differing options for changing PowerPoint slide size. We already have content on our slide, so it makes sense that we need to think about how to handle changing the slide.
The menu shows two options for PPT change slide size:
- Ensure Fit
Choose one of these PPT size of slide options. They've got different approaches for PowerPoint slide size changes.

- Choosing Maximize zooms in on the slide so that the content fills the slide. The downside to this approach is that some content may be clipped off if you've got elements on the slides' edge.
- Ensure fit makes sure that everything stays on the slide after you adjust the slide size in PPT. But it might leave horizontal bars above and below your content.
When you use a PowerPoint slide size change, give your presentation a thorough look. This is to make sure the content hasn't been altered after the PPT change slide size.
I typically choose to Maximize Slides . But it might take some re-working of the slides to fit properly. Learning how to change slide size in PPT requires reviewing your deck after this adjustment.
When to Use Special Case Sizes
The Slide Size options window can change your presentation size for practically any situation.
Imagine that presentation will be viewed on a portrait orientation device. Portrait orientation implies that a screen is taller than it's wide. Maybe the viewer is viewing it on a tablet in portrait mode, or on a monitor that's rotated in portrait mode.

To change a PowerPoint presentation to Portrait orientation, change the Slides option to Portrait as shown above.
You may not use these options often but remember that they exist. PowerPoint truly accommodates.
3. Remember to Test
The success of a presentation comes down to the preparation behind it. Giving a presentation to an audience is daunting. But doing a " dry run " (practice presentation) reduces surprises.
This is especially key when you've changed PowerPoint slide size. The PowerPoint slide size may make unexpected adjustments. They're easy to correct, but you can't fix them until you find them! You never want to first see issues in the real production.
Doing a dry run of your presentation will ensure two things:
- That you've got all the cables and connections you need to display your presentation.
- It's a great time to compare the dimensions of your file to the screen you'll use. That way, you can re-work your slides dimensions as needed. You can also rearrange content in case you find something out of place.
Don't forget to include testing your PowerPoint file on the display you'll use for your pitch. It's another variable you can control for while preparing. This helps reduce the uncertainty of your presentation.
What if you didn't have to worry about the dimensions of your PowerPoint slide? You know how to change slide size in PPT, but you can avoid the adjustment altogether. Instead of guessing at the PowerPoint slide size , you can use a pre-built template from Envato Elements.
Not only does it feature templates with the perfect PowerPoint slide sizes, but it also does so with excellent designs. Many of the templates contain more than one PowerPoint slide size so that you always have what you need.

What's even better is that Envato Elements helps you keep costs low. That's thanks to an unlimited download model. With one subscription, you unlock everything. Not only does that include perfectly sized PowerPoint slides, but stock photos, graphics, and more.

Many Envato Elements PowerPoint slide size templates have many aspect ratios built in. So, you can work with great slide designs at the common sizes you're likely to need for your presentation. They make it even easier to use PPT change size slide options.
Other presentation designs are made at Full HD (16:9) aspect ratio, which is a popular display size. Or they come with extra dimensions supported. Discover more in our curated selection of the best below, and then continue with this tutorial:

No matter your skill level in PowerPoint, it always helps to have a few extra tips. Let's check out five more top tips for PowerPoint slide sizes, including PowerPoint dimensions.
1. Edit the PowerPoint Dimensions First
Earlier in this tutorial, you worked with PowerPoint slide dimensions. But the most important part of doing so is the order of your steps.
Make sure your first step is Design > Slide Size. When you set the size of your PPT as soon as you open the presentation, you won't clip or stretch your slides.

This is the best way to avoid re-work while working with PowerPoint slide sizes. Set your PowerPoint dimensions first!
2. Use the PowerPoint Rulers
Many presenters (myself included) use PowerPoint to create printed, products too. And the size of your PowerPoint slide really matters when you're trying to fit them to a printed page.
That's why it helps to check your PPT slide size with rulers (in inches.) To view them, go to the View > Ruler menu option.

Of course, you can scale the PowerPoint slide size while you're printing to match the paper. Check out our guide to printing, no matter the size of your PowerPoint slides.

3. Edit the Slide Master
Slide masters control several slide designs at the same time. Instead of setting layouts and PPT dimensions on each slide, consider editing the slide. Set the PPT slide size and dimension on the master on the View > Slide Master menu.
Learn more about editing slide masters and presentation slide sizes in the tutorial below:

4. Simulate a Preview
Earlier in this tutorial, I recommended checking your presentation as a rehearsal. Ideally, you check your PowerPoint slide size on the exact display you'll use for the real thing.
Unfortunately, you won't always have the option to rehearse in the presentation room. But you can check it on your computer screen. You can preview your PowerPoint presentation and see how it uses the screen real estate.
Go to the Slide Show > From Beginning menu option to preview your presentation. Then, review if you can see any bars or lines on your screen.

Most computer screens are 16:9 or 16:10. If you know your final screen has the same dimensions, this is a good check for PowerPoint dimensions.
5. Use Slide Layouts
You shouldn't have to set the PowerPoint slide size on each slide. You can set the dimensions of your PowerPoint presentation, but the presentation slide size matters too. Set the PowerPoint slide size with layouts that position elements perfectly.
In a template like The X Note , every slide layout carefully considers the size of the PPT. Use a layout for the size of PowerPoint slides on the Home > Layout menu.

Use the Layout drop-down to select the dimensions of your PowerPoint slide.
Here's an even better way to nail your PowerPoint dimensions . Start with a template. Most PowerPoint templates from Envato Elements have several versions of PowerPoint dimensions.
These are five of the best PowerPoint templates on Elements. Check them out to create a presentation with perfect PowerPoint dimensions:
1. Style Multipurpose PowerPoint Template

This template is packaged with two colors and one PowerPoint slide size, but I find it easily adjustable in my testing. It features the 16:9 aspect ratio that's the classic PowerPoint slide size. Use the 100 unique designs, each with perfect PPT slide sizes.

Agio is a clean and minimal PowerPoint template. You'll find that the 16:9 PPT slide sizes are perfect for most screens. Not only are the presentation slide sizes set nicely, but the designs are also simply stunning. Fill out these slide blueprints for a professional presentation.
3. Ever PowerPoint Template

When you open this presentation, you'll find two PowerPoint dimension options: 4:3 and 16:9. It's these two PPT size options that give this template extra value. There are beautiful slide designs for both PowerPoint slide sizes. Use the hand-designed infographics for business-friendly illustrations.
4. Sprint PowerPoint Template

Life might be a marathon instead of a sprint but designing a presentation shouldn't be. The aptly named Sprint presentation is a 4:3 design with a bright orange color scheme. Choose this if your PPT slide size should be in the more traditional 4:3 size.

Rounding out our options, MaxMax is a 16:9 PowerPoint dimension template. With 234 unique slide designs, there are options for practically every design you could need. The size of your PPT is already set and you can use the free icons for a bit of extra flair.
Need the perfect PPT size of slide? Premium templates from Envato Elements are perfect for you. Here are several collections of the very best available now:

In this tutorial, we learned how to set the right size for PowerPoint files. It all comes down to how and where your recipient will view the presentation.
You may not be able to perfectly format your PowerPoint for every screen. But sticking to the PowerPoint standard sizes will work most of the time. You can also save time by working with a great PowerPoint template that's already set up with the PPT slide dimensions you need.
At Envato Tuts+, we've put together a deep resource of PowerPoint tutorials. Make sure to check out our guide, How to Use PowerPoint (Ultimate Tutorial Guide.) This single resource is comprehensive to learn the app, including PowerPoint sizes.
To keep learning more PowerPoint, check the helpful tutorials below:

For another helpful resource, be sure to grab this helpful eBook:

We've got the perfect complement to this tutorial. It'll walk you through the complete presentation process.
Download our eBook: The Complete Guide to Making Great Presentations . It's available for free with a subscription to the Tuts+ Business Newsletter.
Learn how to write your presentation, design it like a pro, and prepare it to present powerfully.
Design a Presentation With Perfect PowerPoint Slide Size Today
This tutorial showed you how to set your PowerPoint slide size. With the proper dimensions for your PowerPoint slide, your slides will look stunning as they fill the screen. Set your slide size before you start designing to avoid costly re-work.
Also, don't forget that you can save hours of design work. Envato Elements features unlimited downloads with the perfect PowerPoint slide size .
With these tips in mind, design confidently today! You now know how to set the dimensions of a PowerPoint slide to make the best use of the screen space.
Editorial Note : This post was originally published in June of 2017. It's been comprehensively revised to make current, accurate, and up-to-date by our staff—with special help and a video from Andrew Childress .

Your current User-Agent string appears to be from an automated process, if this is incorrect, please click this link:
How to Measure Length on a PowerPoint

If you are working on a Microsoft PowerPoint presentation, then you may want to determine the length of your presentation using a computer ruler, located on the toolbar. Your screen may or may not reveal the ruler when you open a new presentation screen, but you can make it appear with a few simple, quick steps. You also can set the viewing time of individual slides so that they advance after a pre-programmed number of seconds.
Advertisement
Open a new PowerPoint document by clicking on your "Start" menu. Then, click on "All Programs." Scroll down to "Microsoft Office." Click on "Microsoft Office," followed by "Microsoft Office PowerPoint." A new PowerPoint document will open up on your screen.
Video of the Day
Click on the "View" tab on your top toolbar.
Click the open box next to the "Ruler" category. A top and a side ruler will appear on your PowerPoint presentation.
Click on one of the default text boxes on your screen. The rulers will snap into shape. The rulers are English, 1/8-inch rulers. You will then see that the top ruler measures the length of your presentation at 8 1/4 inches.
If you're looking to set the viewing time for each of the slides in your presentation, click on the "Animations" tab on upper toolbar. Look to the end of the toolbar and locate the "Advance Slide" category. Type the number of seconds or minutes you would like for each slide to take before it automatically advances to the next one. For example, check the box next to the label "Automatically After" and then type in the number of minutes or seconds for viewing time in the box provided.
- Microsoft; PowerPoint
Critical PowerPoint Shortcuts – Claim Your FREE Training Module and Get Your Time Back!
How to Change Your PowerPoint Slide Size (16:9 vs. 4:3)
- PowerPoint Tutorials
- March 10, 2019
In this tutorial, you’ll learn how to change your slide size in PowerPoint.
That way you can create slides for any situation including on-screen presentations, printed documents, posters, postcards, handouts, etc.
First off, the two most used PowerPoint slide sizes are:
- 16:9 ratio for onscreen presentations and new overhead projectors. This is the default setting for the latest versions of PowerPoint.
- 4:3 ratio for printing slides on standard 8.5 x 11 pieces of paper as handouts.
When starting with a blank PowerPoint presentation, changing your slide size is super easy and straightforward. If not, there are a few issues you’ll need to deal with, each covered below.
That’s why it’s worth figuring out what slide size you need BEFORE you build your presentation. If you later convert your presentation to a different size, it can be painful!
It’s just like the old carpenter saying, “measure twice and cut once.” In PowerPoint, you’ll want to “ask twice (to double confirm the required size) and build once.”
Changing your PowerPoint slide size does not make your PowerPoint presentation larger or smaller. To reduce your PowerPoint file size, you need to learn how to compress a PowerPoint presentation .
Table of Contents
How to change your powerpoint slide size.
By default, new PowerPoint presentations start in the 16:9 slide size format.
This is the NEW standard for most modern overhead projects and monitors and is recommended for most presentations. That said, you can easily change your slide size to something else.

To change your slide size in PowerPoint, simply:
- Navigate to the Design tab
- Open the Slide Size drop down menu
- Select 4:3 , 16:9 or Custom Slide Size (see options below)
When starting with a blank presentation, you are now good to go. You will not have to worry about any of the conversion issues discussed below.
Notice too, how much wider the 16:9 slide size is versus the 4:3 slide size in the picture below. The new size gives you more room for the content on your slides.

When you are converting an existing presentation to a new slide size, you will additionally be given the following prompt:
“You are scaling to a new slide size. Would you like to maximize the size of your content, or scale it down to ensure it will fit on the new slide?
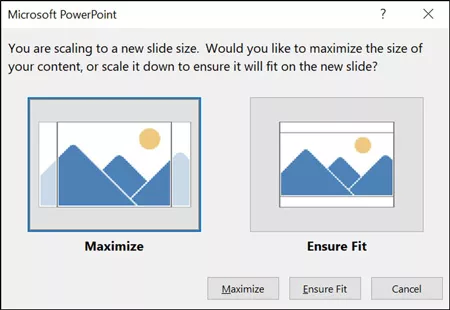
Maximize leaves all your content as is on your slide, even if it no longer fits on the new slide size that you selected.
Ensure Fit scales down your content in proportion to the new slide size you have selected. You will only see this option when moving from a larger slide size to a smaller one.
Custom PowerPoint slide sizes
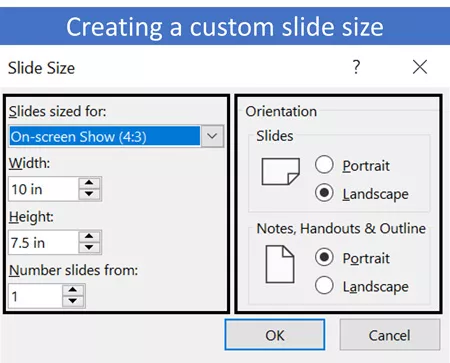
Choosing Custom for your slide size gives you additional options to work with. Inside the dialog box you can choose your size on the left and your orientation on the right.
On top of that, you can also input your own custom slide size. However, I recommend using one of the preset PowerPoint dimension options.
- On-screen show (4:3)
- Letter Paper (8.5×11 in)
- A3 Paper (297×420 mm)
- B4 (ISO) Paper (250×353 mm)
- B5 (ISO) Paper (176×250 mm)
- 35mm Slides
- On-screen Show (16:9)
- On-screen show (16:10)
For your orientation options on the right-hand side of the dialog box, you can choose between Landscape and Portrait .
In most situations, you will want one of the default settings. Best practice is Landscape for your presentation slides and Portrait for your printed notes, handouts and outlines.

Issues when converting 4:3 to the 16:9 slide size in PowerPoint
When converting an existing 4:3 presentation with content into the 16:9 format, you are not given any conversion options. Instead, PowerPoint simply does the conversion for you, which can create several problems.
There are two issues you will face in the new 16:9 slide size.

The first issue is that all the images on your slide master (including company logos) will be stretched to fit the new, larger slide size.
To fix the stretched images, you will need to fix those images (or reinsert them) on your slide master, as if you were creating a PowerPoint template from scratch.
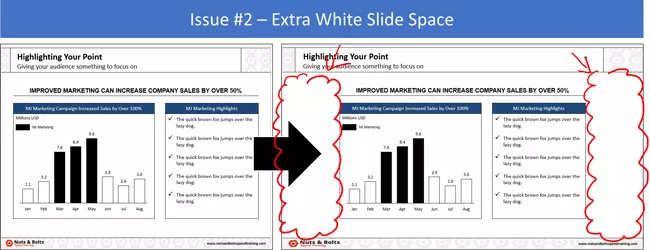
The second issue you will face in the larger 16:9 slide size is that you will have a lot of extra white space on your slides.
While you can leave the space blank, doing so will make your content look weird. Ideally you don’t want a lot of white empty space like that on your slides. Especially since all your font sizes will be so small.
That’s why if you have the time, I recommend resizing your content to fill in the white space. You can do this by either increasing the font size of your content, or adding additional visuals that support your message.
Issues when converting 16:9 to the 4:3 slide size in PowerPoint
When converting an existing 16:9 presentation to the 4:3 slide size, you are given the option to either Maximize or Ensure Fit (both covered below).
1. The Maximize option
This option means that the content on your slides will not be resized to fit the 4:3 slide size. The same is true if you move to any smaller slide size.

Maximize Issue #1: All the images on your slide master (including your company logo) will be distorted.
You might also have issues with other content placeholders, slide backgrounds or anything else that was built on your slide master. For these issues, you’ll first need to navigate to your Slide Master. Once you are there, you either adjust (or rebuild) your PowerPoint template so that everything fits properly.
Maximize Issue #2: Your content will not be scaled down to the smaller slide size. Instead, you’ll have overhanging content as pictured above.
For these kinds of spacing issues, you will need to work through your slides to adjust your content.
One recommendation as you move from the larger 16:9 slide size to 4:3, is to break up your slides. Take the contents from one larger slide and break it into two (or even three) separate slides.
Breaking up your content is preferable to just cramming more content on the smaller slide space. Doing so will make your content easier to read when presented on an overhead projector.
2. The Ensure Fit option
This option means that PowerPoint will scale down your content to fit the smaller slide size based on the size you selected.

Ensure Fit Issue #1: Distorted images, slide backgrounds and anything else that PowerPoint had to automatically resize on your slide master.
To fix these issues, you’ll need to navigate to your slide master and adjust (or rebuild) your template to make everything fit.
Ensure Fit Issue #2: Your content will be scaled down to fit your new slide size, leaving you with a lot of white space. In addition, all your font sizes will be smaller, making them hard to read.
For small content like this, you’ll need to work through your slides and resize your content accordingly. Keep in mind the people at the back of the room too when choosing a new font style and size.
Saving your custom slide size as a PowerPoint theme
If want to use your own custom slide size for all your future PowerPoint presentations, you can save and set it as a PowerPoint theme.
This is a two-step process as discussed below.
1. Save your custom slide size as a theme

To save your custom slide size (and settings) as your own custom PowerPoint theme, simply:
- Open the M ore options
- Click Save Current Theme
- Name your Theme (and don’t change the file location it saves to)
- Click Save
2. Set your custom theme as the default

To set a custom PowerPoint theme as the default for all your future presentations, simply:
- Open the More options
- Right-click your custom theme
- Select Set as Default Presentation
- Close out of PowerPoint (and do not save any presentations if it prompts you)
Once you’ve set your own custom theme as the Default Presentation, it will open every time you start PowerPoint. This saves you from always having to switch your slide sizes.
So that’s how you can change your PowerPoint slide size, either before or after you create your presentation.
And although you are given a lot of flexibility in the slide sizes you can choose from, I recommend using the default slide sizes as used by most people.
It’s also important to remember that switching slide sizes after you have built your presentation can be a total pain. So, to the extent possible, figure out your PowerPoint slide size first before you build out your presentation.
If you enjoyed the depth of this article, you’ll love our PowerPoint training courses and other free resources that you can learn more about here .
🔒 Unlock the PowerPoint Shortcuts Trusted by Industry Leaders KKR, American Express, HSBC, and More!
Join over 114,880 professionals from diverse fields including consulting, investment banking, advertising, marketing, sales, and business development who have supercharged their PowerPoint game with our proven methods.
✅ Customize compelling presentations effortlessly.
✅ Master time-saving techniques for faster deck creation.
✅ Boost your career prospects with top-notch PowerPoint skills.
Get FREE access to the Critical PowerPoint Shortcuts module of our premium training course by entering your name and email below.
DISCLAIMER: PC Users Only!
We respect your privacy and will keep your info safe and confidential.
Related Articles
About the author.

Popular Tutorials
- How to Strikethrough Text (l̶i̶k̶e̶ ̶t̶h̶i̶s̶) in Word, Excel & PowerPoint
- How to Make Animated Fireworks in PowerPoint (Step-by-Step)
- Strikethrough Shortcut (l̶i̶k̶e̶ ̶t̶h̶i̶s̶) for Word, Excel & PowerPoint
- How to Create a Flash Card Memory Game in PowerPoint (Like Jeopardy)
- Keyboard Shortcuts Not Working: Solved
PowerPoint Tutorial Categories
- Strategies & Opinions
- Shortcuts & Hacks
- Presentation Design
- Pictures, Icons, Videos, Etc.
- New Features
- Miscellaneous
- Charts & Data Viz
We help busy professionals save hours and gain peace of mind, with corporate workshops, self-paced courses and tutorials for PowerPoint and Word.
Work With Us
- Corporate Training
- Presentation & Template Design
- Courses & Downloads
- PowerPoint Articles
- Word Articles
- Productivity Resources
Find a Tutorial
- Free Training
- For Businesses
We help busy office workers save hours and gain peace of mind, with tips, training and tutorials for Microsoft PowerPoint and Word.
Master Critical PowerPoint Shortcuts – Secure Your FREE Training Module and Save Valuable Time!
⌛ Master time-saving expert techniques.
🔥 Create powerful presentations.
🚀 Propel your career to new heights.
We value your privacy – we keep your info safe.
Discover PowerPoint Hacks Loved by Industry Giants - KKR, AmEx, HSBC!
Over 114,880 professionals in finance, marketing and sales have revolutionized their PPT skills with our proven methods.
Gain FREE access to a full module of our premium PowerPoint training program – Get started today!
We hate spam too and promise to keep your information safe.
You are currently viewing a placeholder content from Facebook . To access the actual content, click the button below. Please note that doing so will share data with third-party providers.

Change the page layout
You might want to change the size, shape, or orientation of your slides for presentation or to simplify printing. You can choose landscape, portrait, or custom page setups as fits your needs.
(Currently it's not possible to mix landscape and portrait slides in the same presentation. For a suggested workaround, see Use portrait and landscape slide orientation in the same presentation .
If this is a feature you’d like to request, please send us your feedback to help us prioritize new features in future updates. See How do I give feedback on Microsoft 365 for more information.
Change the slide size
On the Design tab, in the Customize group at the far right end, click Slide Size .

Click Custom Slide Size .

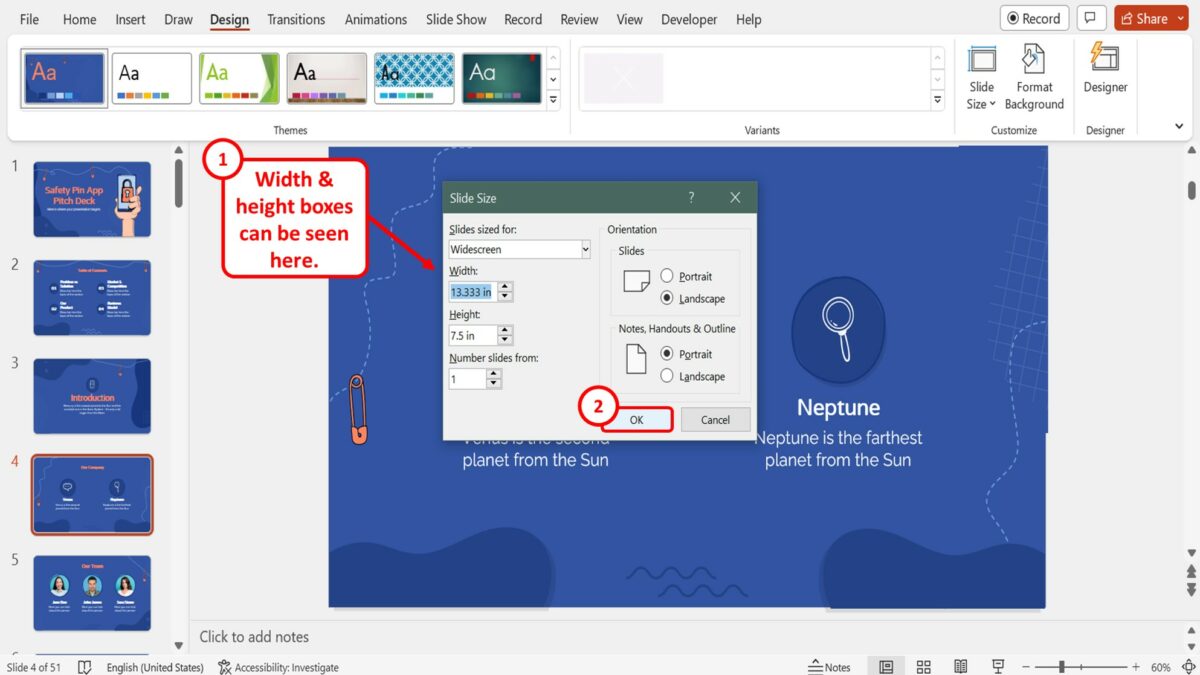
In the Slides sized for list , click the size you want to use, or use the Width and Height boxes to select custom sizes.

PowerPoint now asks you to choose between maximizing the size of your content on the new layout (to do this, click Maximize ) or scaling it down so that all of the content fits into the new layout (to do this, click Ensure Fit ).
Note: If you choose to maximize, some content might fall outside the print margins.

Note: Unlike Word document pages, PowerPoint slides don’t have margins that you can adjust to change the slide layout. Your slide stretches from edge to edge. When you print the slides, printer limitations can result in a white edge around the slides. However, you can change the margins inside Text Boxes and Shapes .
Change the slide orientation
Although wide format landscape presentations are most popular, you might find that your slides work better in vertical, portrait mode.
Note: You can change the orientation of the entire presentation only, not individual slides.
On the Design tab, in the Customize group, click Slide Size .

Change the orientation for the slides to Portrait or Landscape .

Note: You can also change the orientation of your notes, handouts, and outline.
Note: If you choose to maximize, some content might fall outside the slide.
Change the size of your slides
Change the margins between text and the edge of a text box or shape
Workaround for printing slides without white edges
Change a slide layout

Need more help?
Want more options.
Explore subscription benefits, browse training courses, learn how to secure your device, and more.

Microsoft 365 subscription benefits

Microsoft 365 training

Microsoft security

Accessibility center
Communities help you ask and answer questions, give feedback, and hear from experts with rich knowledge.

Ask the Microsoft Community

Microsoft Tech Community

Windows Insiders
Microsoft 365 Insiders
Was this information helpful?
Thank you for your feedback.
How to change the PowerPoint Slide Size: All you need to know

It’s always a good idea to know how to change Slide Size in PowerPoint, as you might have to adapt your presentation to different devices. Did you know that the default size of a PowerPoint slide depends on the version of the program you’re using? That’s another reason why the same content can look different on various devices, so it doesn’t hurt to be prepared for surprises and learn to scale your presentation properly in Microsoft PowerPoint. This tutorial illustrates how to change the PowerPoint Slide Size to match the screen of any device, using Windows 10, your iPhone, or Mac:
Skip to chapter
First things first: about powerpoint slide dimensions, how to change the powerpoint slide size in windows 10, how to change slide size in powerpoint on your mac, how to change slide size in powerpoint on your iphone, which powerpoint slide size did you end up using.
NOTE: This guide applies to Microsoft PowerPoint 2016 and 2019. If you’re not sure about your PowerPoint version, read What version of PowerPoint do I have? . You can download PowerPoint straight from Microsoft , but you must own the Microsoft Office suite or have an Office 365 subscription to use it. This tutorial covers only Windows 10, iOS, and macOS, because the option to change the PowerPoint Slide Size is not available on Android.
You’ve done your research, practiced your speech, and spent time adding visual aids for your audience. However, it can all be ruined if you created a presentation in Microsoft PowerPoint 2019, whose default slide size is Widescreen (16:9) , and you now have to use an old projector with the Standard (4:3) size. Your slides look different from what you originally intended and need to be adjusted to fit the screen you’re currently using.
To avoid any mismatches that might result in your pages being cut off on the edges or framed by black bars in Microsoft PowerPoint, change Slide Size as soon as you know where and how you’ll deliver your presentation. Unfortunately, not everyone knows which PowerPoint Slide Size is best in each situation. If you’re in doubt, you can always rely on the two most common PowerPoint slide dimensions:
- Standard (4:3) – the default PPT Slide Size in PowerPoint 2010 and previous versions. Works best on older screens with low resolutions, old projectors, online presentation sharing platforms like SlideShare , and iPads.
- Widescreen (16:9) – the default in Microsoft PowerPoint 2013 and newer. Works best on new screens with a wide aspect ratio (HDTVs, Smart TVs, LCDs, 4K monitors), new or HD projectors, Microsoft Surface devices, and online platforms like YouTube or Vimeo. Most laptops use a 16:9 aspect ratio, with the exception of MacBook’s 16:10 aspect ratio.

Common PPT Slide Size options
These are the only two settings available on iPhones. However, Microsoft PowerPoint offers you more Slide Size options in Windows 10 and macOS, such as Letter Paper or A4 Paper , which are better suited for printing your presentation. On top of that, if you want to optimize everything as much as possible, you can input a custom PPT Slide Size in inches, centimeters, or pixels, as you’re about to see in this guide.
IMPORTANT: It’s best to change Slide Size in PowerPoint before designing your presentation, to create a perfect canvas for your ideas. If you change the size of a PowerPoint slide after adding content to it, the elements and images you included might appear distorted and need further adjustments, so the sooner you find out the aspect ratio or resolution of the device you’re using for your presentation, the better.
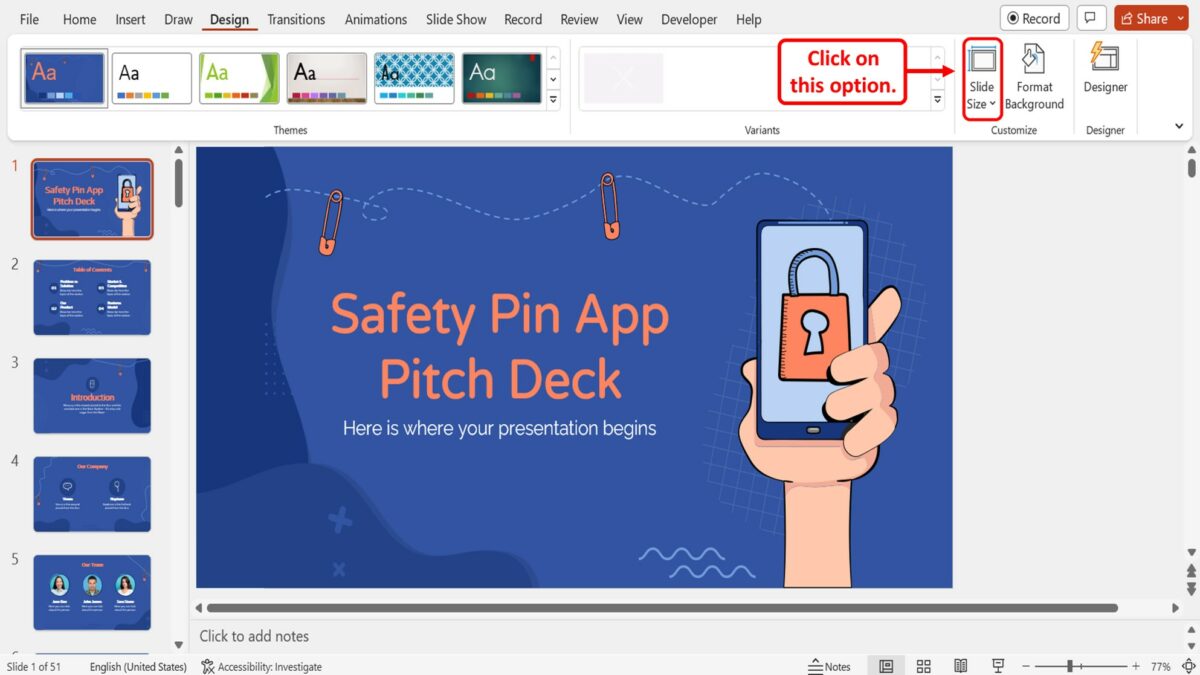
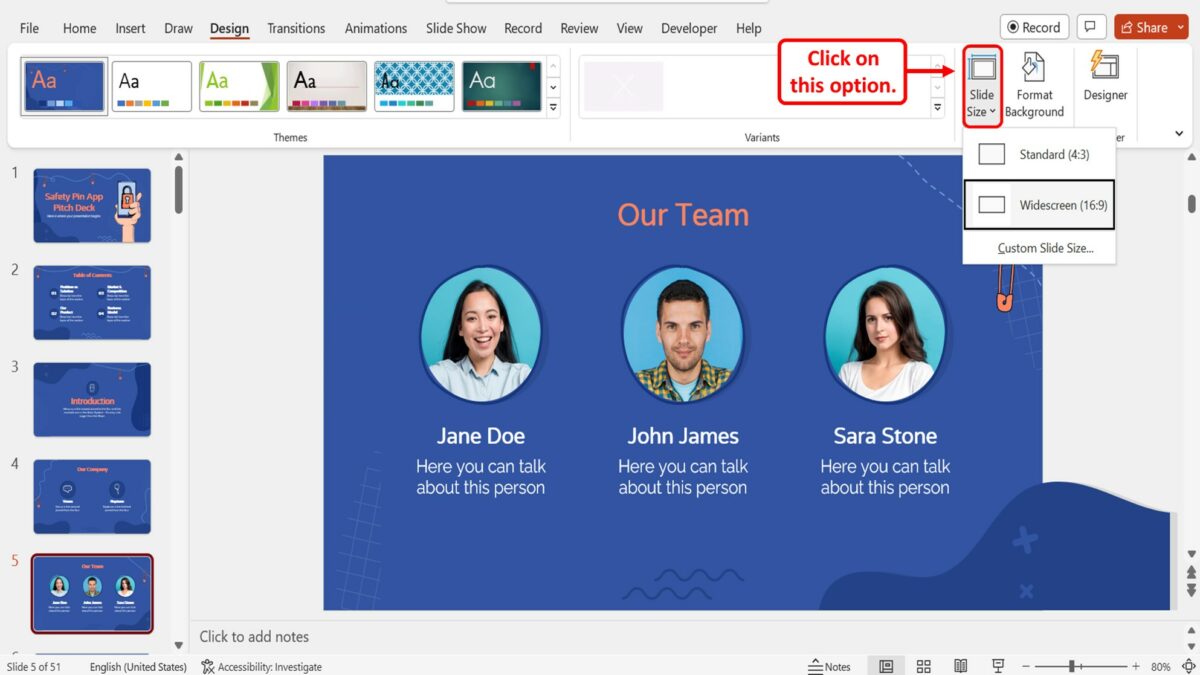
Open the Microsoft PowerPoint presentation you want to work with or start a new project. To change the PowerPoint slide dimensions, first access the Design tab on the app’s ribbon. Then, you can find the Slide Size button in the Customize section on the right.

Change size of PowerPoint slide from the Design tab
Depending on your screen and the size of the PowerPoint window, the option might be hidden. If you can’t see the button, press Customize to reveal it, and then click or tap on Slide Size .

Press the PowerPoint Slide Size button
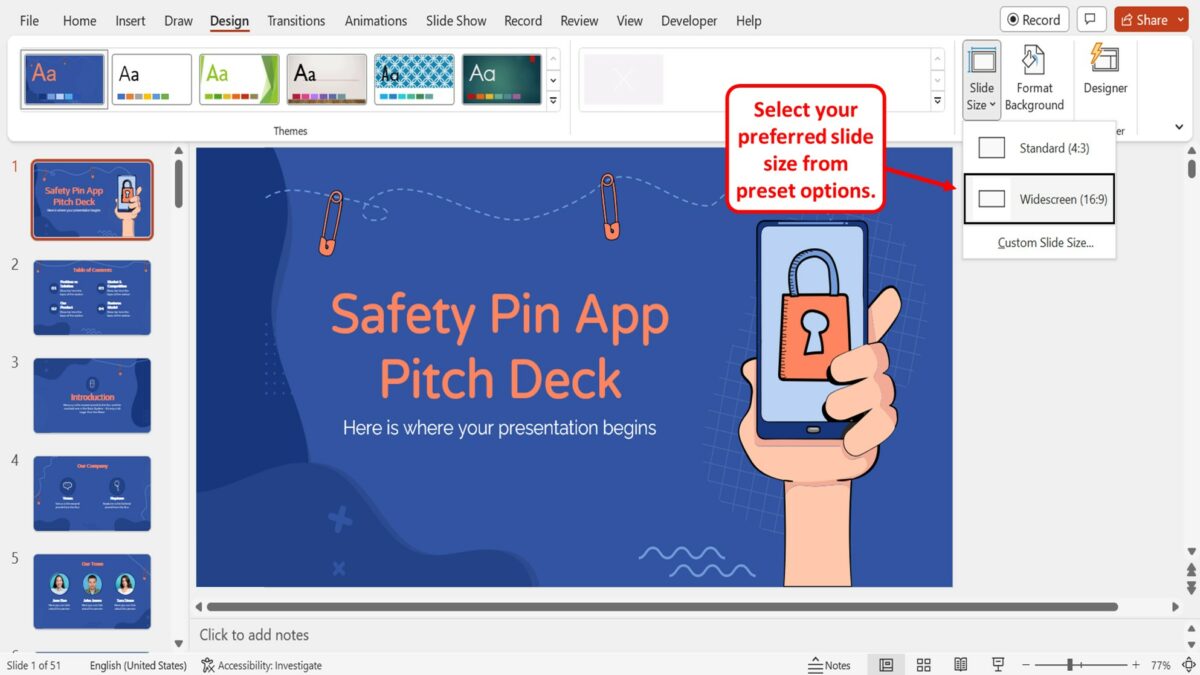
This opens a dropdown menu with three available options:

In PowerPoint, change Slide Size using one of these three options
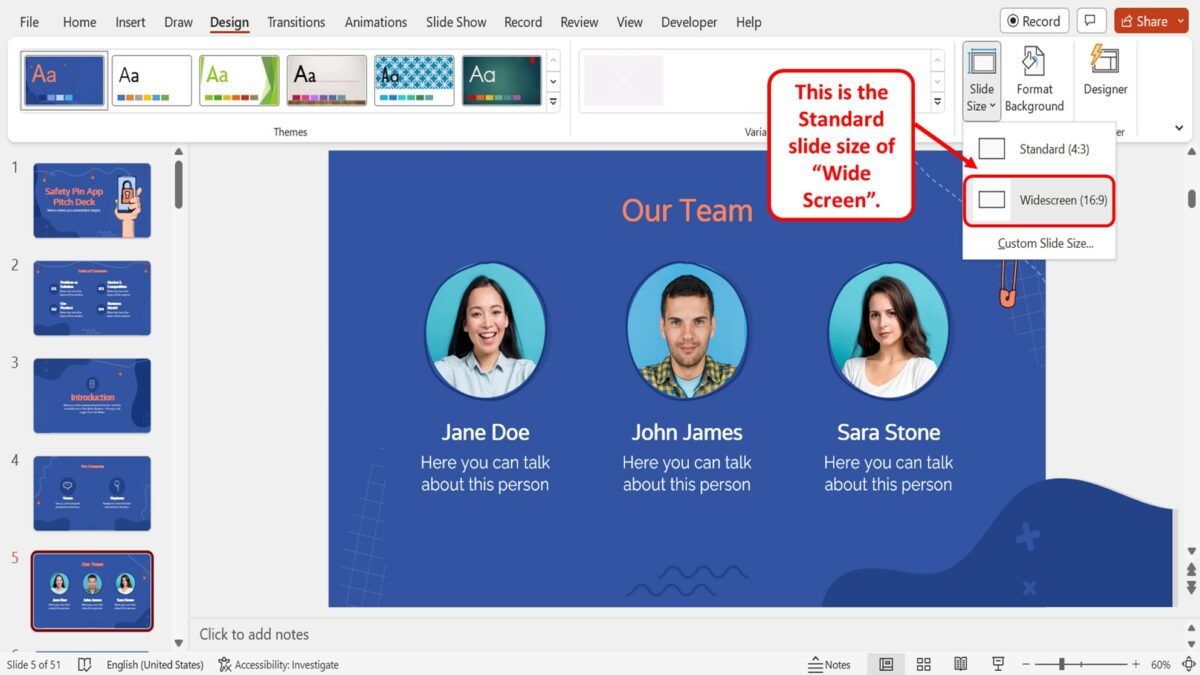
- Standard (4:3) - click or tap on this option to get slides of 10 x 7.5 inches or 25.4 x 19.05 cm.
- Widescreen (16:9) - press to get slides of 13.33 x 7.5 inches or 33.867 x 19.05 cm.
- Custom Slide Size - access this option if you are looking for something different than the two commonly used settings we discussed.
Choosing the last option opens the Slide Size pop-up window, where you can select a custom size to work with or change other slide aspects, like their orientation.

The PowerPoint Slide Size pop-up in Windows 10
While you can use the options on the right of the window to tweak the Orientation options, the settings related to the size of a PowerPoint slide are on the left side of the Slide Size pop-up. Click or tap the “Slides sized for:” field to access a dropdown menu with other presets you can use for your PowerPoint slide dimensions.

Change size of PowerPoint slide with one of the preset options
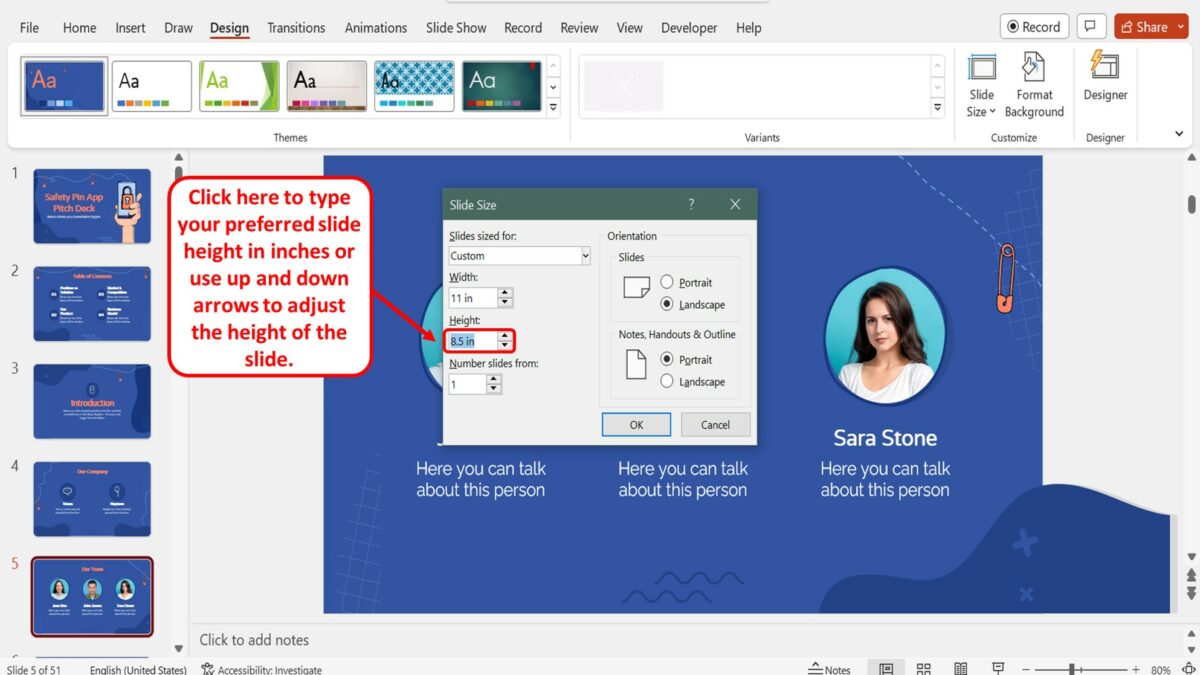
To modify the Width and Height fields, use the arrow buttons next to them or write the specific values you prefer into each box. When you change slide size in PowerPoint, you can use pixels, inches, or centimeters by typing px , in , or cm accordingly, next to the value you want.

Enter a custom value to change the PowerPoint slide size
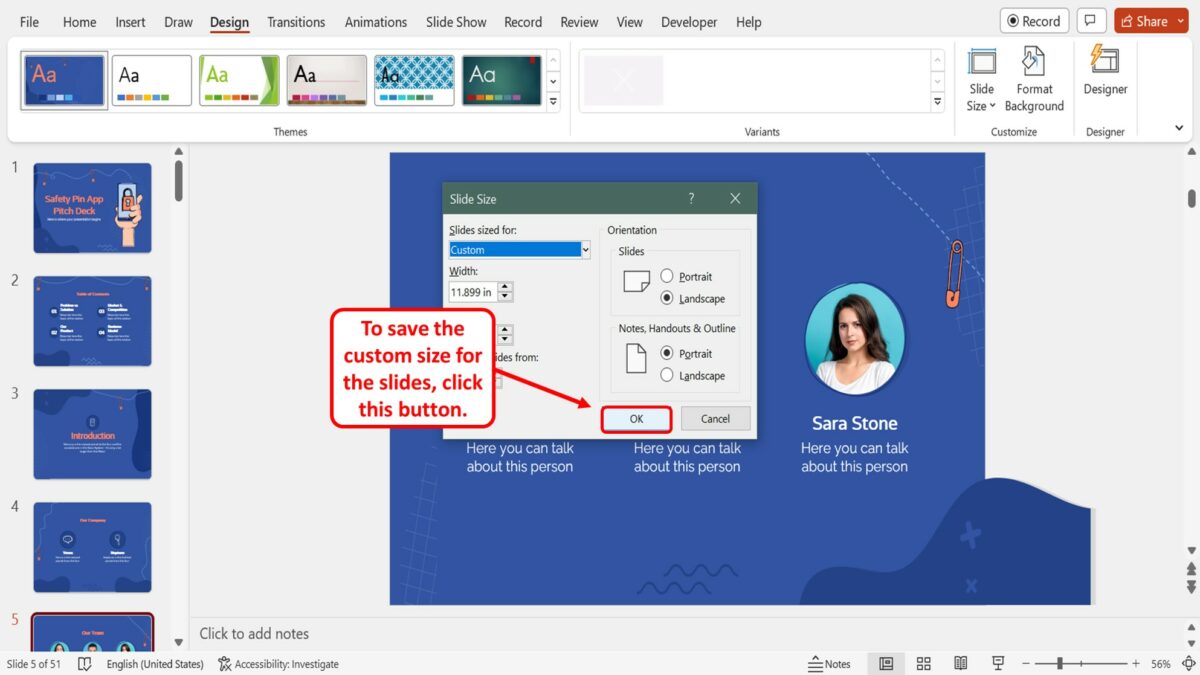
Once you are done choosing the slide size, click OK in the Slide Size window. In Microsoft PowerPoint 2016 and newer, you get a pop-up window and can choose how to change the slide size. This only happens when scaling down to a smaller Slide Size - e.g., from Widescreen to Standard . There are two available options:

Decide what happens with the content when you change Slide Size in PowerPoint
- Maximize - click or tap on either of the two Maximize buttons to leave the contents of your slides as they are, without resizing them. If there is a lot of information on a slide, some elements might not fit anymore and bleed out.
- Ensure Fit - reduces the size of your texts or images to fit the smaller slide size. While your content is not cut out, it does scale down in proportion to the new selected size.
The new slide size is immediately applied to your PowerPoint presentation.
TIP: If you are going to hold your presentation on a Windows device, read our tutorial listing 7 ways to find out your screen resolution to find the right size for your slides.
The options to change PowerPoint Slide Size on your Mac are similar to the ones in Windows. Access the Design tab and click on the Slide Size option on the right.

Click the PowerPoint Slide Size button on the macOS Catalina version
You also get a dropdown menu with three available options on the macOS version of PowerPoint:

Change the size of a PowerPoint slide by choosing one of the three options available on your Mac
- Standard (4:3) – click on this option if you want slides of 10 x 7.5 inches or 25.4 x 19.05 cm.
- Widescreen (16:9) – clicking on this setting gets you slides of 13.33 x 7.5 inches or 33.867 x 19.05 cm.
- Page Setup – lets you define a custom size (preset or custom) if the previous common sizes are not what you want for your presentation. Clicking on it opens the Page Setup pop-up seen below.

Change the PPT Slide Size from the Page Setup pop-up on macOS Catalina
The size options in the Page Setup pop-up are identical to the ones found in Windows. Scroll up to the previous chapter to learn more about the preset values in the “Slide(s) sized for” dropdown menu or the custom ones you can insert in the Width and Height fields using inches ( in ), centimeters ( cm ), or pixels ( px ).
When you are done, click OK, and you get a different pop-up, asking you how to handle your content. If you choose to Scale , PowerPoint tries to fit everything into the new scale size, reducing your content size if needed. Clicking the Don’t Scale button keeps elements at their original sizes, even if they no longer fit correctly.

Decide to scale or keep your original content when resizing your PowerPoint slides
The new Slide Size is immediately applied to the presentation, with slide content being resized or cut if needed, according to your preferences.
On your iPhone’s slightly more basic version of PowerPoint, change slide size by accessing the Design options, which house the setting on iOS as well. The steps you need to follow are, however, not as straightforward on these devices. First, tap on the More button in the lower-right corner. Its icon looks like three horizontal dots.

Press on the three horizontal dots icon in the bottom-right corner of your screen on iPhone
You can now see and edit the PowerPoint tab you’re in. Tap on the Home button to see other available options.

Press Home to change the PowerPoint tabs on your iPhone
This opens a dropdown menu, where you can finally find the Design tab. Press on it.

Tap the PowerPoint Design tab on your iPhone
Tap on the Slide Size button listed in the Design screen.

Press the PowerPoint Slide Size button shown on the iPhone
There are only two options available, and we covered them at length in the first chapter of this guide. Tap on the Slide Size you want, and it is immediately applied.

Choose a PowerPoint Slide Size from the two options available on your iPhone
TIP: If you need to know the aspect ratio of an iOS device, read our tutorial listing 3 ways to find the screen resolution of your iPhone or iPad .
If you must regularly create and send PowerPoint presentations at work, it may not be possible to choose the perfect size, as you can’t control the devices your audience is using. The best you can do is use our guidelines to ensure the content is optimized for most viewers. If you show a PPT or PPTX project to a larger audience, make sure to review your slides, test your file in advance on the exact device you plan to use, and leave time for any adjustments.
We tend to stick with the common PowerPoint slide sizes, which are good enough for most devices we come across. What about you? Which PowerPoint Slide Size did you select? Did you find it necessary to create a custom one, or did you end up using the preset ones? Tell us your story in the comments.
- Subscribe to newsletter.
Receive our daily newsletter. You may unsubscribe at any time. For details read the Privacy policy.
Check this box if you agree to receive our emails.
You are subscribed to www.digitalcitizen.life .
Receive our weekly newsletter. You can unsubscribe at any time. For details, read our Privacy policy.
Related articles

How to embed MP3 and other audio files into PowerPoint presentations

4 ways to align text in Microsoft Word
How to embed videos into your powerpoint presentations, how to change the orientation of all the pages in a microsoft word document.
Presentation Training Institute
A division of bold new directions training, how to estimate the amount of time your presentation will last.
A presentation should last as long as it takes to adequately deliver your message. Furthermore, you need to make sure you adhere to any specific time restrictions. For these reasons, it’s important to know how long your presentation will last so you can plan accordingly and ensure you are not boring your audience to tears. Here are a few tips for determining the length of your presentation.
Consider the Complexity
Much of your time will be based on the complexity of your topic. If your topic is heavy in stats, graphs, and complex material than it will take you longer to present. The goal is to make sure your information is clearly presented to your audience so you will need to consider the complexity of the topic to determine how long it will take you to explain it thoroughly.
How Many Slides are Being Used and How Detailed are They?
Another factor that will determine the length of your presentation is the number of slides you are using and the amount of detail in each slide. In general, you should talk for less than a minute per slide. However, some slides might be more text heavy and require a bit more time to explain. You should never speak for more than 3 minutes, however, on one slide. If it takes you longer than that, you should consider adding another slide. Presenters should be mindful of how much time they spend per slide, so they remain focused on communicating their ideas more efficiently.
How Many Different Points are in the Presentation?
Every presentation should have an introduction and a conclusion but the number of main points in the body of the presentation will vary. Consider how many points you will be addressing and how many slides will be associated with each point. Generally, you should spend no more than 5-7 minutes per main point.
Give Your Presentation
The best way to determine how long your presentation will last is to perform it live. Perform it exactly as you would in front of your audience and time yourself. You can even record yourself, so you know where to make adjustments if needed.
Once you have finalized your presentation it is important to rehearse it several times. The more familiar you are with the presentation the more efficient you will be with transitions and overall delivery.
How-To Geek
How to change slide size in powerpoint.

Your changes have been saved
Email Is sent
Please verify your email address.
You’ve reached your account maximum for followed topics.
Microsoft Office Files Have a Secret That Could Help You
Thunderbird's big "nebula" update is now available, the future of ssds: what comes after nvme, quick links, changing powerpoint slide sizes, changing to a custom powerpoint slide size.
PowerPoint allows you to format and present the content of your slides in different ways. If you want to print out or display your PowerPoint slides in a bigger or smaller-than-average size, you can change the slide sizes to match.
PowerPoint has two common slide sizes. The first, 4:3, is a good option if you're using older hardware to present your slides. If you're planning on presenting your PowerPoint presentation using a modern projector or display, then the 16:9 slide size should be your preferred choice.
By default, PowerPoint will default to the 16:9 side slide. To print your slides (full size, one per page), you'll likely need to use a custom slide size, rather than one of these options.
Switching to another size is thankfully an easy process---open your PowerPoint presentation to begin and then click the "Design" tab on the ribbon bar.

In the "Customize" section of the "Design" tab, select the "Slide Size" button. This will display the two common slide sizes in a drop-down menu.
Click either the "Standard (4:3)" or "Widescreen (16:9)" option to switch all of your PowerPoint slides to that size.

Unfortunately, it isn't possible to use multiple slide sizes in a PowerPoint presentation. Just as if you were making PowerPoint slides vertical , any changes you make to your PowerPoint slide sizes will apply to all slides.
Related: How to Make Slides Vertical in PowerPoint
It's possible to use a custom PowerPoint slide size if the default 4:3 or 16:9 options are unsuitable. You might choose to use a custom slide size if you're printing full-size PowerPoint slides using a custom page layout, for instance.
To do this, select Design > Slide Size > Custom Slide Size to display the "Slide Size" options menu.

Various preset slide sizes, such as A3 or A4 paper sizes, are shown under the "Slides Sized For" drop-down menu.
Select one of these preset options, or set your slide dimensions manually using the "Width" and "Height" option boxes. From there, click the "OK" button to save.
If you're scaling down to a smaller size, PowerPoint will ask you how it should handle any slide content.
Choose "Maximize" if you want the slide contents to remain at a similar scale, but with the risk that some of the content may be cut. Alternatively, click "Ensure Fit" to scale the slide contents down in size to match the new slide size without losing any content.

Once saved, the custom slide size you selected will be immediately applied to all of your slides, with slide content being resized or cut to match.
- Microsoft Office
- Microsoft PowerPoint
What is the Size of a PowerPoint Slide in Pixels?
By: Author Shrot Katewa

When creating a PowerPoint presentation, it is essential to determine the appropriate size for your slides. Understanding the size of a PowerPoint slide in pixels is crucial to ensure that your presentation looks great on all devices, from desktops to mobile devices.
The standard size of a PowerPoint slide is 1024×768 pixels and the widescreen PowerPoint slide is “1920×1080” pixels. It can also be adjusted based on your preferences or the requirements of the platform on which you plan to present your slides.
In this article, we will discuss the standard size of a PowerPoint slide in pixels or inches as well as how to adjust it to fit your needs. Let’s get started!
1. What is the Size of a PowerPoint Slide in Pixels?
In Microsoft PowerPoint, there are multiple preset slide sizes available. You can also customize the size of the slide using the “Custom Slide Size” feature available in the application. Depending on the slide size you select, the size of the slide in pixels will vary.
1.1 What is the Size of a PowerPoint Standard Slide in Pixels?
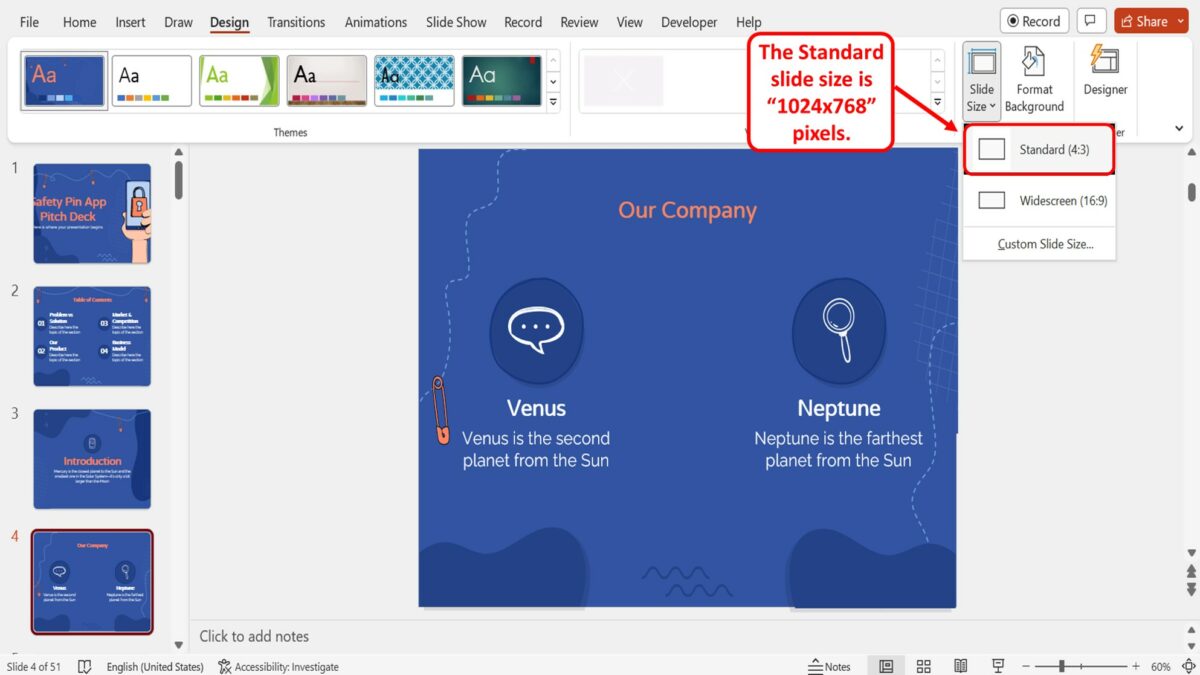
The “Standard (4:3)” option in Microsoft PowerPoint used to be the only size option in the beginning since most screens from 2010 and before were that size. The standard slide size in PowerPoint is “1024×768” pixels.
1.2 What is the Size of a PowerPoint Widescreen Slide in Pixels?
In Microsoft PowerPoint, the default size of the slides is the “Widescreen (16:9)” option. The widescreen PowerPoint slide is “1920×1080” pixels.
2. What is the Size of a PowerPoint On-Screen Show Slide in Inches?
In Microsoft PowerPoint, the size of the slides is mostly measured in inches. Using the “Slide Size” dialog box, you can check the dimension of a slide in inches. Depending on the type of the selected slide, the slide size varies. There are three different “On-Screen Show” slide sizes available in Microsoft PowerPoint.
2a On-Screen Show (4:3)
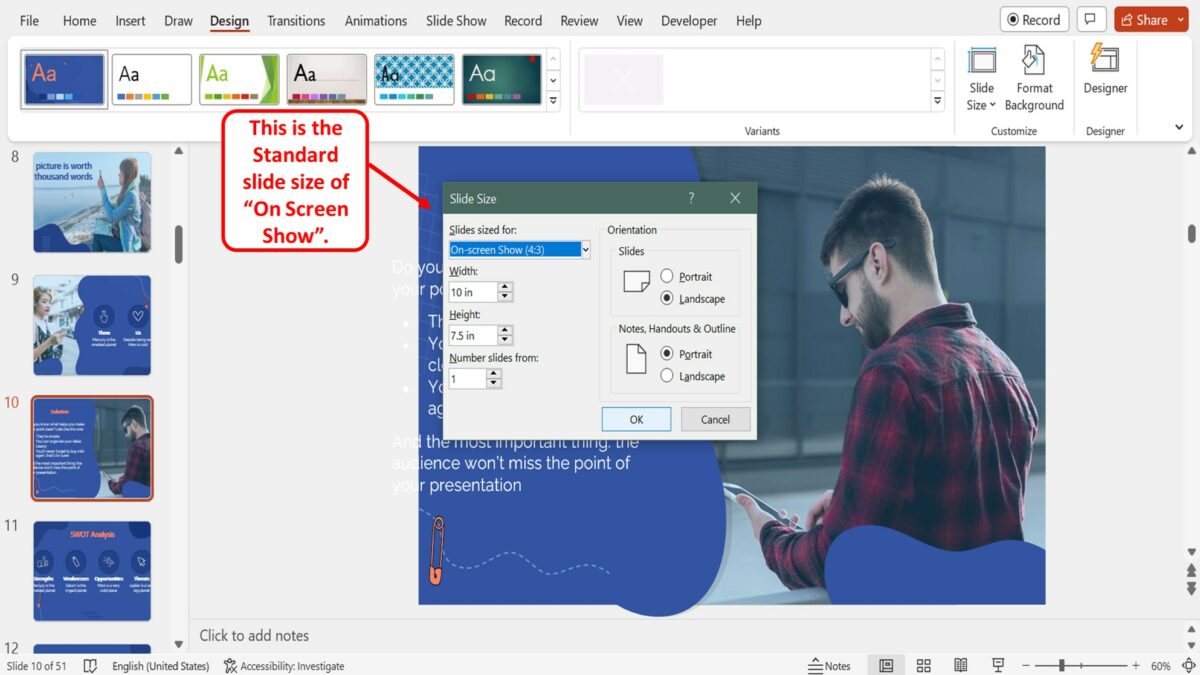
The “On-Screen Show (4:3)” slides are “10×7.5” inches in size. This is the “Standard” slide size.
2b On-Screen Show (16:9)
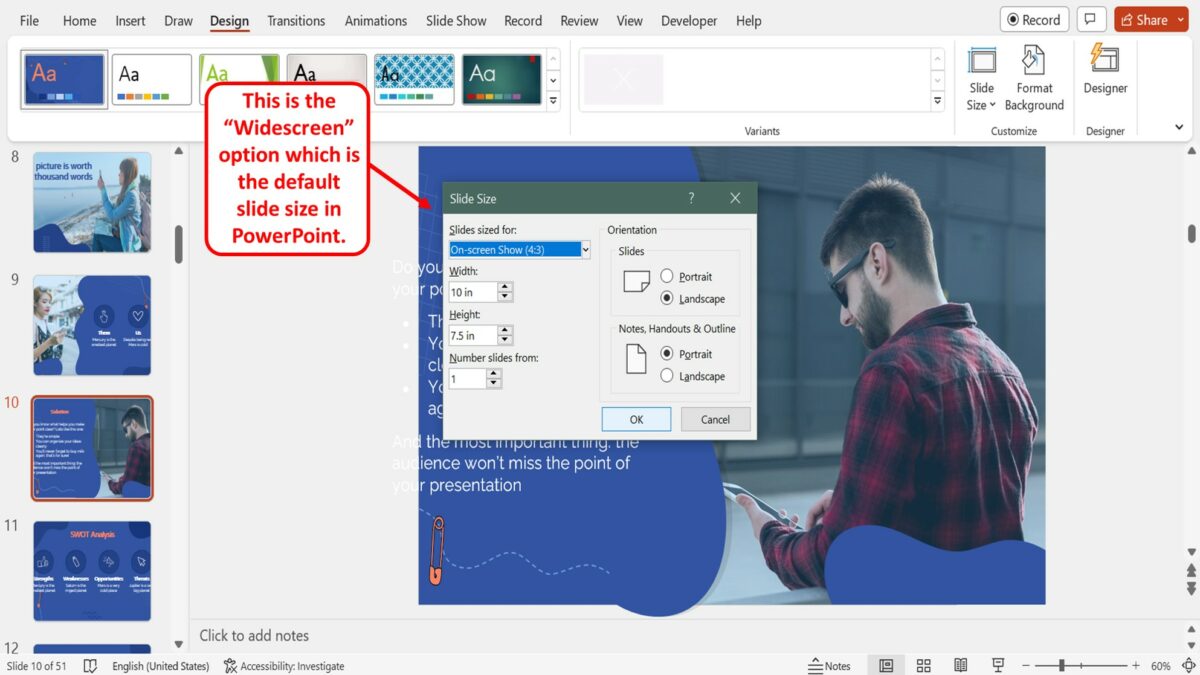
The “On-Screen Show (16:9)” slide size is “10 x 5.625” inches in dimension. This is the “Widescreen” option which is the default slide size in PowerPoint.
2c On-Screen Show (16:10)
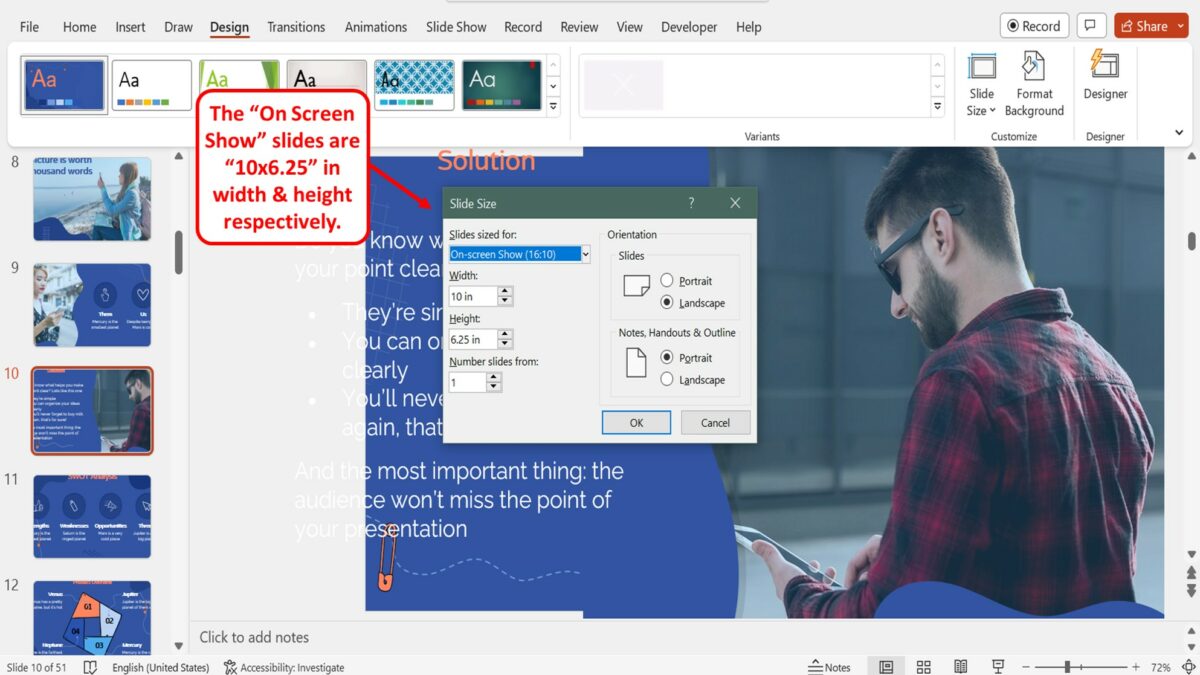
The “On-Screen Show (16:10)” slides are “10 x 6.25” inches in width and height respectively.
3. How to Find the Size of the Slide in Inches?
Using the “Slide Size” dialog box in Microsoft PowerPoint, you can find the size of the slides in your presentation in inches. To do so, follow the 3 quick steps.
Step-1: Click on the “Design” tab
In the menu ribbon located at the top of the screen, click on the “Design” tab. This will open the “Design” menu.
Step-2: Click on the “Slide Size” option
In the “Customize” group of the “Design” menu, click on the “Slide Size” option. Then click on the “Custom Slide Size” option in the dropdown menu under the “Slide Size” option. This will open a dialog box.
Step-3: Click on the “OK” button
In the “Slide Size” dialog box, you can now see the size of the slide in inches in the “Width” and “Height” boxes. Then click on the “OK” button at the bottom of the dialog box to close it.
4. How to Change the Size of a PowerPoint Slide?
In Microsoft PowerPoint, you can change the side of the slides using the “Design” menu. However, you can only change the size of all the slides in a presentation at once. To change the size of the slide in PowerPoint, follow the 3 simple steps.
The first step is to open the “Design” menu. To do so, click on the “Design” tab in the menu ribbon located at the top of the screen.
In the “Customize” group of the “Design” menu, you have to now click on the “Slide Size” option. This will open a dropdown menu containing the preset slide size options available in PowerPoint.
Step-3: Click on your preferred slide size
Finally, all you have to do is click on your preferred slide size option from the preset options available in the dropdown menu under the “Slide Size” option. The available slide sizes are “Standard” and “Widescreen” .
4.1 How to Customize the Size of a PowerPoint Slide?
The “Custom Slide Size” feature in Microsoft PowerPoint allows you to customize the size of all the slides in a presentation. Using the feature, you can set any dimension to the slides in your presentation. To customize the size of the slides in a presentation, follow the 7 easy steps.
The first step is to open the PowerPoint presentation file where you want to customize the size of the presentation slides. Then click on the “Design” tab in the menu ribbon located at the top of the screen to open the “Design” menu.
The next step is to click on the “Slide Size” option in the “Customize” group of the “Design” menu. In the dropdown menu, the default slide size is the “Widescreen (16:9)” option.
Step-3: Click on the “Custom Slide Size” option
Now all you have to do is click on the “Custom Slide Size” option at the bottom of the dropdown menu under the “Slide Size” option in the “Design” menu. This will open a dialog box.
Step-4: Click on the “Slide sized for” option
In the “Slide Size” dialog box, click on the “Slides sized for” option. Then click on the “Custom” option at the bottom of the dropdown menu under the “Slides sized for” box.
Step-5: Click on the “Width” box

In the “Slide Size” dialog box, the next step is to click on the “Width” box. Now you can type in your preferred width of the slides in inches. You can also use the up and down arrows in the “Width” box to increase or decrease the width of the slide respectively.
Step-6: Click on the “Height” box
The next step is to customize the height of the slides. To do so, click on the “Height” box in the “Slide Size” dialog box and type in your preferred slide height in inches. You can also click on the up or down arrows in the “Height” box to adjust the height of the slides to your preference.
Step-7: Click on the “OK” button
Finally, all you have to do is click on the “OK” button at the bottom of the “Slide Size” dialog box to save the custom size for the slides in the presentation file.
- PRO Courses Guides New Tech Help Pro Expert Videos About wikiHow Pro Upgrade Sign In
- EDIT Edit this Article
- EXPLORE Tech Help Pro About Us Random Article Quizzes Request a New Article Community Dashboard This Or That Game Happiness Hub Popular Categories Arts and Entertainment Artwork Books Movies Computers and Electronics Computers Phone Skills Technology Hacks Health Men's Health Mental Health Women's Health Relationships Dating Love Relationship Issues Hobbies and Crafts Crafts Drawing Games Education & Communication Communication Skills Personal Development Studying Personal Care and Style Fashion Hair Care Personal Hygiene Youth Personal Care School Stuff Dating All Categories Arts and Entertainment Finance and Business Home and Garden Relationship Quizzes Cars & Other Vehicles Food and Entertaining Personal Care and Style Sports and Fitness Computers and Electronics Health Pets and Animals Travel Education & Communication Hobbies and Crafts Philosophy and Religion Work World Family Life Holidays and Traditions Relationships Youth
- Browse Articles
- Learn Something New
- Quizzes Hot
- Happiness Hub
- This Or That Game
- Train Your Brain
- Explore More
- Support wikiHow
- About wikiHow
- Log in / Sign up
- Computers and Electronics
- Presentation Software
- PowerPoint Presentations
How to Choose the Right Number of Slides for a Powerpoint Presentation
Last Updated: June 24, 2024 References
Choosing the Right Number of Slides Based on Design Choices
Using time to determine the right number of slides, moving beyond formulaic answers to finding the right number of slides.
This article was co-authored by wikiHow Staff . Our trained team of editors and researchers validate articles for accuracy and comprehensiveness. wikiHow's Content Management Team carefully monitors the work from our editorial staff to ensure that each article is backed by trusted research and meets our high quality standards. There are 10 references cited in this article, which can be found at the bottom of the page. This article has been viewed 222,755 times. Learn more...

- Keep the presentation about you, not the slideshow. [2] X Research source The slides are there to support what you have to say. They should be just one part of your presentation, not the whole thing.

- Go through your entire presentation and ask yourself if you really need a given slide. If the answer is no, or if you find you can deliver the info verbally instead, eliminate it.

- If your presentation ended well before the time limit you’ve been given, try to extend the amount of time you spend on each slide, or add extra slides to expand on the info introduced in the presentation.
- Solicit advice from family and friends during your practice presentation. If they feel there are too many or too few slides, or if they feel certain sections of the presentation felt rushed or slow, adjust your presentation to correct these deficiencies.

- One well-known formulation for PowerPoint presentations is the 10/20/30 rule. This rule dictates that you should use about ten slides for a twenty minute presentation, and each slide should utilize thirty point font. In other words, each slide should be about two minutes in length. [8] X Research source Perhaps the 10/20/30 rule works for you. If it does not, don’t feel as if you’re using the wrong number of slides.
- Others argue that an average slide should be onscreen for no more than two minutes, and can be onscreen for as little as 15 seconds. [9] X Research source

- If, on the other hand, you’re in a more intimate environment and can control the lighting, you might be inclined to utilize a greater number of slides. As always, however, don’t feel obligated to use many slides just because you can.
Community Q&A
- If your slide has embedded video, or you aren’t using one slide for each point of your presentation, you can spend longer on each slide. [11] X Research source Thanks Helpful 0 Not Helpful 0
- Treat each slide on its own merits. If one slide needs to be onscreen for two minutes, so be it. If it needs to be onscreen for ten seconds, that’s fine too. Thanks Helpful 0 Not Helpful 0
- If you have a slide with no pictures but several bullet points, each of which you intend to talk about for fifteen to twenty seconds, you might spend well over a minute on that slide. Thanks Helpful 0 Not Helpful 0

- When you take all of these factors (detail, technicality, audience size and awareness, etc.) into consideration, you can see that the only short answer to "how many slides should I use" is: "it depends." Thanks Helpful 3 Not Helpful 0
You Might Also Like

- ↑ http://www.virtualsalt.com/powerpoint.htm
- ↑ http://www.bloomberg.com/news/articles/2006-06-01/how-to-powerpoint-like-a-pro
- ↑ http://www.shutterstock.com/blog/7-design-tips-for-effective-beautiful-powerpoint-presentations
- ↑ http://www.mrmediatraining.com/2011/03/10/the-five-most-common-powerpoint-mistakes/
- ↑ http://www.free-power-point-templates.com/articles/how-many-slides-for-a-30-minute-presentation/
- ↑ https://owl.english.purdue.edu/media/ppt/20071016041310_686.ppt
About This Article

1. Break complex slides into several simple slides. 2. Include audio and video support only as needed. 3. Time your presentation. 4. Match the number of slides to the subject matter. 5. Tailor to your audience. Did this summary help you? Yes No
- Send fan mail to authors
Reader Success Stories
Jun 29, 2017
Is this article up to date?

M. Fernandez
Dec 19, 2017

Featured Articles

Trending Articles

Watch Articles

- Terms of Use
- Privacy Policy
- Do Not Sell or Share My Info
- Not Selling Info
wikiHow Tech Help Pro:
Level up your tech skills and stay ahead of the curve
Determining the Size of a PowerPoint Slide in Pixels: A Guide
Have you ever wondered what the size of your PowerPoint slide is in pixels? It’s actually pretty simple to figure out, and you can do it with just a few clicks. In this article, I’ll walk you through the steps so you can determine the pixel dimensions of your presentation slides.
Step by Step Tutorial: Determining the Size of a PowerPoint Slide in Pixels
Before we dive into the steps, let’s understand why this is important. Knowing the pixel size of your slides can help you design better presentations that look great on any screen. Plus, if you’re creating content for the web or digital platforms, pixel dimensions are crucial for ensuring your work displays correctly.
Step 1: Open PowerPoint and go to the ‘Design’ tab
Click on the ‘Design’ tab located at the top of the PowerPoint window.
When you’re working on your PowerPoint presentation, the Design tab is where you’ll find all the options for customizing the look and feel of your slides. It’s the gateway to adjusting the size of your slides.
Step 2: Click on ‘Slide Size’
Look for the ‘Slide Size’ button on the right-hand side of the toolbar and click on it.
The ‘Slide Size’ button gives you access to various options for adjusting the size of your PowerPoint slides, including the ability to see and change the pixel dimensions.
Step 3: Select ‘Custom Slide Size’
In the drop-down menu that appears, select ‘Custom Slide Size’ to open the Slide Size dialog box.
The ‘Custom Slide Size’ option allows you to specify the exact dimensions for your slides, including width and height, in various units of measurement including pixels.
Step 4: Check the pixel dimensions
In the Slide Size dialog box, look for the width and height measurements in pixels.
The Slide Size dialog box will show the current size of your slides. If it’s set to a different unit of measurement, you can easily switch to pixels.
Step 5: Adjust the slide size if necessary
If you need to adjust the size of your slides, enter the desired dimensions in pixels and click ‘OK’.
You can customize the size of your PowerPoint slides to fit specific requirements or to ensure that your presentation looks its best on different devices or resolutions.
Once you’ve completed these steps, you’ll have successfully determined the pixel size of your PowerPoint slides. This information can be incredibly useful for graphic design purposes, ensuring that your presentation looks sharp and professional on any screen.
Tips for Determining the Size of a PowerPoint Slide in Pixels
- Always make sure you’re working with the latest version of PowerPoint for the most accurate size adjustments.
- If your presentation will be displayed on a large screen, aim for higher pixel dimensions to maintain image quality.
- Remember that changing the slide size can affect the layout of your content, so double-check your presentation after resizing.
- Consider the aspect ratio when customizing slide size; common ratios include 4:3 for standard screens and 16:9 for widescreens.
- Use pixel dimensions that match common screen resolutions to ensure your presentation looks great on most devices.
Frequently Asked Questions
What is the default size of a powerpoint slide in pixels.
The default size of a PowerPoint slide is 960 pixels wide by 540 pixels high for a widescreen (16:9) aspect ratio.
Can I change the pixel dimensions for all slides in my presentation at once?
Yes, when you adjust the slide size, the changes will apply to all slides in your presentation.
Will changing the slide size affect the quality of my images?
If you increase the slide size, you may need to use higher resolution images to maintain quality.
What should I do if the content on my slides gets distorted after resizing?
You may need to manually adjust the content on your slides to fit the new dimensions.
How do I know what pixel dimensions to use for my presentation?
Consider the device or screen where your presentation will be displayed and use dimensions that match its resolution.
- Open PowerPoint and go to the ‘Design’ tab
- Click on ‘Slide Size’
- Select ‘Custom Slide Size’
- Check the pixel dimensions
- Adjust the slide size if necessary
Determining the size of a PowerPoint slide in pixels is a piece of cake once you know where to look. Whether you’re a seasoned presenter or new to the game, understanding the pixel dimensions of your slides can make a world of difference in how your presentation is perceived. By following the steps outlined in this article, you can ensure that your slides are perfectly tailored to any screen size, making your message resonate with clarity and impact. Plus, with a few extra tips up your sleeve, you can easily navigate through any presentation design challenges that come your way. Remember, the devil is in the details, and in this digital age, knowing your pixels from your points can truly set you apart. So, go ahead, give it a try and watch your presentations transform from good to great!

Matt Jacobs has been working as an IT consultant for small businesses since receiving his Master’s degree in 2003. While he still does some consulting work, his primary focus now is on creating technology support content for SupportYourTech.com.
His work can be found on many websites and focuses on topics such as Microsoft Office, Apple devices, Android devices, Photoshop, and more.
Share this:
- Click to share on Twitter (Opens in new window)
- Click to share on Facebook (Opens in new window)
Related Posts
- How to Rotate a Powerpoint Slide Presentation
- How to Change Paper Size in Google Docs Quickly [5 Steps + Infographic]
- How to Download a Google Slides Presentation as a Powerpoint File
- How to Make Google Slides Vertical (5 Quick Steps)
- How to Do a Powerpoint Google Slides Presentation Conversion
- Adobe Photoshop: How to Change Ruler Units to Pixels from Inches
- How to Make a Powerpoint Slide Vertical in Powerpoint 2013: A Step-by-Step Guide
- How to Change Slide Size in Powerpoint 2016
- How to Delete a Slide in Powerpoint 2010: Step-by-Step Guide
- How to Add a New Slide in Google Slides: A Step-by-Step Guide
- How to Hide a Slide in Powerpoint 2010: A Step-by-Step Guide
- How to Delete Multiple Slides in Google Slides: A Step-by-Step Guide
- How to End Powerpoint on Last Slide in Powerpoint 2010: A Step-by-Step Guide
- How to Insert Slides from Another Presentation: Powerpoint 2024 Guide
- How to Add a Hyperlink on Google Slides
- How to Convert Powerpoint to Google Slides: A Tech Solution
- How to Remove Slide Numbers in Powerpoint 2019: Easy Steps
- Can You Print a Google Slide?
- How to Hide Background Graphics in Powerpoint 2013: A Step-by-Step Guide
- Can You Save a Powerpoint as a Video in Powerpoint 2013? Find Out Here!
Get Our Free Newsletter
How-to guides and tech deals
You may opt out at any time. Read our Privacy Policy
Stack Exchange Network
Stack Exchange network consists of 183 Q&A communities including Stack Overflow , the largest, most trusted online community for developers to learn, share their knowledge, and build their careers.
Q&A for work
Connect and share knowledge within a single location that is structured and easy to search.
How can I determine the size of individual slides in a PowerPoint slide deck?
I have a powerpoint file containing images and it has gotten too big for emailing and I need to decide which slides to cut out. But how can I tell which slides are consuming all the space? There could be just a few slides containing over-large images, but how do I know which slides they are? Is there any way to know the filesize of individual slides?
- microsoft-powerpoint
- microsoft-powerpoint-2013
6 Answers 6
There is a built-in way to measure slides! Publish all slides and use Windows Explorer.
Publishing all slides to an empty folder creates as many presentations as slides you have. Each new presentation stands for one slide and its Windows Explorer file size shows you which slide has the biggest pictures/audio/video.

In my sample I had 3 slides with different kinds of media. And the first slide with 12 MB was indeed the biggest one.
- 3 One caveat: Suppose you have a large image on slide 1 and you've copied it to several other slides. PowerPoint only stores the image once per presentation, but if you publish to multiple presentations, each presentation that includes this image would get a copy of it. It'd look quite large, but deleting it from the original presentation wouldn't have nearly such a large effect on overall size. – Steve Rindsberg Commented Apr 6, 2014 at 15:33
- 4 Another caveat - the names of the slides are "slide IDs" which are not the same as the slide numbers. If you've copied or reordered slides it could get confusing. – Rob I Commented Jul 16, 2015 at 15:51
- 4 Another caveat - the Publish option requires a Professional version of PowerPoint. – Mark Cramer Commented Dec 2, 2015 at 19:52
- @SteveRindsberg: Your comment that PowerPoint stores only a single copy of a reused image is indeed correct. However, would that reused image need to be copied over if each slide is made into its own presentation using the technique shown here? Presentation_002.pptx would need its own copy of the image, since it is now a standalone, one-slide presentation on its own without any way to reference copied images from other slides, would it not? – JeffFerguson Commented Mar 23, 2016 at 20:48
- When you save/export a slide/slides, PPT takes care of the accounting for reused images. That is, if the slide references a reused image, the standalone version of the slide will get a copy of the image. That's why I mentioned that the size might be misleading. – Steve Rindsberg Commented Mar 24, 2016 at 3:44
This might depend on the specific version of PowerPoint, but in the version I'm using it is possible to save the presentation as 'Strict Open XML Presentation' file type, which is essentially a zip file with all the elements represented as files within the archive (in some cases this would actually be the default, so no need to 'save as'). So, one can rename the file from .pptx to .zip, open it, and see the sizes of the different element (as well as compression ratio). A good candidate place would be to look under ppt/media. Besides just large images (which can be then easily found and compressed or modified/removed within PowerPoint), in some cases it may contain images from unused master slides, and you may not even know they exist (especially if you are reusing presentations based on someone else's templates). In this case the way to handle it would be to open View -> Slide Master, and browse the master slides to find the one comprising the pictures (and potentially just delete it, if it is not used by any of the slides).
- 1 Just a note to duplicate the file before you rename it and go digging so you have a solid backup. Also on the Mac you can open a .pptx with something like The Unarchiver (free) directly and it will expand it into the package contents without requiring renaming first. – Matt Sanders Commented Jul 18, 2018 at 21:56
The easiest way in the latest Powerpoint 365 or any other version is: Save a copy of your presentation with ending PPTX. Rename the ending to .ZIP Unzip the file, and you will see all individual content. Your pictures will be in the folder under the directory ppt/media. Usually, I found PNG files to be largest, so avoid them. sort your files by size, and convert the largest to jpg. Then remove your original pictures in the PPT file and use the jpg files to replace them.
To make your slide deck smaller, quickly, try PowerPoint > File > Compress Pictures. This process just reduced a Mac PowerPoint file (version 16.11) that's photography-heavy from 40MB to 14MB with no degradation in presentation quality.
- 2 Welcome to Super User! This doesn't answer the question which OP asked, which is about determining the sizes of images, not necessarily compressing them. – bertieb Commented Apr 4, 2018 at 15:15
- This is related enough that I think it is reasonable to retain as an answer. The main reason that most people want to know image size is to optimize or remove those images. For some users this capability will be adequate to meet their needs without them needing to identify the individual culprits. – Matt Sanders Commented Jul 18, 2018 at 22:00
I wrote a small UNIX script that will unzip a pptx file and then shows you the list of larger images (over 100K) sorted by size. It will also have an "open" command (on the Mac) and it will tell you what slides each of the large images are in.
https://gist.github.com/dmccreary/7734b7148f523771adb38597bcbe5732
Feedback welcome.
I'm using Powerpoint 365 and I really, really miss the publish slides feature. The zip instructions in this thread didn't work for me but gave me and idea that worked which was using the 'Package Presentation for CD' feature. Open your PPT, go to Export, Package Presentation for CD, Package for CD, change name if you need to, PPT name should be selected in box, hit Copy to Folder, choose where to save files and remember location, hit OK, hit Yes for linked items. Go to your new set of folders, unzip/extract the zip file, and there should be one with all of your images which you can view by details and sort by file size. My path: PresentationCD\PPT_Name\ppt\media
You must log in to answer this question.
Not the answer you're looking for browse other questions tagged microsoft-powerpoint microsoft-powerpoint-2013 ..
- Featured on Meta
- Announcing a change to the data-dump process
- Upcoming initiatives on Stack Overflow and across the Stack Exchange network...
- We spent a sprint addressing your requests — here’s how it went
Hot Network Questions
- Is a shunt jumper for a power plane jumper a good idea?
- Flawed reasoning somewhere when calculating the radius of convergence for a power series
- Contour Integration yielding wrong result
- Binary search tree with height of max 1.44 * log(n) is AVL tree or it's not an iff
- Okay to travel to places where the locals are unwelcoming?
- If the sleep time of a function at first time differs from the second time, but the output is the same, is it still a idempotent function?
- Is Firefox's about:license non-compliant wrt. MIT and BSD style Licenses?
- How artificial is the lack of 450%+/50t+ gearing on lesser 1x groups?
- "Des fini ton plat"?
- Upper bound on natural ordinal sum
- New causes of side channel
- Citing specific R functions in publications?
- How can a hazard function be negative?
- Finite verification for theorems due to Busy Beaver numbers
- How to Construct a Stellar Instar
- Is a LAN and landline phone on 4 wires possible?
- How do Trinitarian Christians respond to these differences between Jesus Christ and God
- How could breastfeeding/suckling work for a beaked animal?
- Are hardware benchmark results copyrighted?
- Could today's flash memory be used instead of RAM in 1980s 8 bit machines?
- Solution for a modern nation that mustn't see themselves or their own reflection
- Signature doughnut from a city
- How to understand "...we could all see our way past thinking…"
- Reference request: Software for producing sounds of drums of specified shapes
Home Blog PowerPoint Tutorials PowerPoint Slide Size: What is the Best Size for a Presentation
PowerPoint Slide Size: What is the Best Size for a Presentation

Whether you’re a business professional, educator, or public speaker, understanding what are the optimal slide dimensions can enhance the impact of your presentation. This guide will walk you through everything you need to know about the size of your PowerPoint presentation, from the basics to advanced tips.
What is the PowerPoint Slide Size?
PowerPoint slide size refers to the dimensions of the slides within your PowerPoint presentation. These dimensions determine how your content is displayed in a monitor or projector, and can significantly affect the overall look and feel of your presentation.
The most common slide sizes in PowerPoint are 16:9 (widescreen) and 4:3 (standard).
Choosing the right slide size is essential as it impacts how your content is perceived and ensures compatibility with various display devices. Once you define the optimal slide size for your next presentation, you can change the slide dimensions in PowerPoint following the steps described in our article.

It is important to understand the differences between Aspect Ratio and Pixel Dimensions.
The specific pixel dimensions for a standard 16:9 slide are 1920 pixels in width by 1080 pixels in height.
Understanding Aspect Ratio vs. Pixel Dimensions
Aspect ratio vs. pixel dimensions: what’s the difference.
When defining the optimal slide size for your presentation, it’s important to understand the difference between aspect ratio and pixel dimensions, as these terms often cause confusion but are critical for creating well-designed presentations.
Aspect Ratio
The aspect ratio refers to the proportional relationship between the width and height of your slide. It’s expressed as two numbers separated by a colon, such as 4:3 or 16:9. The aspect ratio defines the shape of your slide and how it will appear on different screens.
Pixel Dimensions:
Pixel dimensions, on the other hand, specify the total number of pixels in the width and height of your slide. This measurement determines the resolution and quality of your images and text in your PowerPoint slide size. For example:
- 1920 x 1080 pixels: This is a common dimension for a 16:9 aspect ratio, known as Full HD. It provides high clarity and detail, making it suitable for large screens and high-resolution displays.
- 1024 x 768 pixels: This dimension matches a 4:3 aspect ratio and is often used for smaller screens or lower resolution displays. It’s less detailed than 1920 x 1080 but can be effective for standard printouts or older projectors.
Why both slide size definitions matter? Understanding both aspect ratio and pixel dimensions is important because they impact how your PowerPoint slide size is viewed across different devices and formats. Here’s why:
- Consistency Across Devices: Ensuring your aspect ratio is compatible with the display device prevents issues like black bars on the sides (letterboxing) or content being cut off (cropping).
- Clarity and Detail: Choosing appropriate pixel dimensions ensures that your images and text appear sharp and clear, avoiding pixelation or blurriness.
- Professional Appearance: Matching the right aspect ratio and pixel dimensions helps maintain a polished and professional look, whether you’re presenting on a large screen, sharing a PDF handout (as we will see later), or displaying your slides online.
The Impact of Slide Size on Different Industries
Different industries have unique needs when it comes to presentation slide sizes. For instance:
- Business: Corporate presentations often require widescreen formats (16:9 slide size) to showcase detailed charts and data on modern projectors and screens. However, in some environments there are still projectors using the traditional 4:3 aspect ratio format for slide sizes.
- Education: Lectures and workshops benefit from both 16:9 and 4:3 formats, depending on the teaching aids and screen setups used.
- Design: Creative professionals need to create visually appealing slides that may require custom dimensions to stand out and effectively communicate their ideas.
Best Practices for Choosing a Proper Slide Size for your Presentation
When selecting an optimal PowerPoint slide size, consider the following:
- Audience and Venue: Tailor your slide size to the screen size and setup of your presentation venue. Widescreen (16:9) is typically best for large screens, while standard (4:3) works well for print distributions.
- Presentation Type: Webinars and online presentations held via Zoom or Teams , for example, often benefit from widescreen formats, while in-person meetings might require flexibility.
- Aesthetics vs. Functionality: Balance visual appeal with readability and content integrity.
When creating PDF handouts from your PowerPoint presentation, it’s also important to choose a convenient slide size that ensures readability and clarity in print.
The 4:3 aspect ratio is generally preferred for printed handouts as it aligns well with standard paper sizes such as A4 or Letter. This format ensures that your content fits neatly onto the page without excessive margins or cropping.
Additionally, using 4:3 for print ensures that text and graphics are appropriately scaled, maintaining the legibility and professional appearance of your handouts. This consideration is essential for creating effective printed materials that complement your live presentations.
Overcoming Challenges with Slide Size
Adapting content for different slide sizes.
Resizing images and adjusting layouts can be challenging. Here are some tips:
- Resizing Images: Ensure that images maintain their aspect ratio to avoid distortion.
- Text Adjustments: Modify font sizes and text boxes to fit the new slide dimensions without compromising readability.
- Consistency: Keep a consistent layout throughout your presentation to maintain a professional look.
Dealing with Mixed Slide Sizes in a Presentation
Sometimes, you may need to integrate slides with different dimensions. Here’s how:
- Transition Techniques: Use smooth transitions to blend slides of varying sizes seamlessly.
- Tools and Add-Ins: You can use PowerPoint add-ins that help manage and standardize slide sizes across your presentation.
Advanced Tips for Custom Slide Sizes
When it is time to innovate, the PowerPoint slide size can also play an important role. If you are considering to create a presentation for digital signage, or non traditional devices, choosing a custom PowerPoint slide size can help to achieve this. Here are some ideas and ways you can innovate by choosing a different slide size:
- Unique Dimensions: Create custom slide sizes for branding or special events.
- Custom Branding: Use non-standard slide sizes to align with your brand identity and marketing materials.
- Innovative Uses: Experiment with different dimensions to create unique visual experiences.
For example, to create high-quality digital signage content, you’d need to set the PowerPoint slides to a 1920×1080 resolution in vertical (portrait) or horizontal (landscape) mode, which are the typical digital sign screen sizes.
Understanding what is the optimal slide size and how to configure it is essential for creating effective and engaging presentations. By optimizing your slides, and overcoming common challenges, you can ensure your visual aids are impactful and professional. Keep experimenting with different sizes and formats to find what works best for your needs. Remember, the key to a successful presentation lies in the details—choosing the right slide size is one of them.
Like this article? Please share
Presentation Tips Filed under PowerPoint Tutorials
Related Articles

Filed under PowerPoint Tutorials • June 28th, 2024
How To Add Drop Shadows in PowerPoint Presentations
Improve your presentation’s design by mastering drop shadows in PowerPoint. In this article, we introduce you to the step-by-step process with cliparts for impressive shadow effects.

Filed under Google Slides Tutorials • June 3rd, 2024
How to Copy a Slide in Google Slides
Learn how to quickly duplicate slides in Google Slides with this guide.

Filed under PowerPoint Tutorials • June 3rd, 2024
How To Insert a Calendar in PowerPoint
Get the most out of calendar templates for PowerPoint by learning how to insert them into your presentation projects. A step-by-step guide for inserting and customizing the calendar template to your style.
Leave a Reply
CHICAGO AUGUST 29-30 PUBLIC SPEAKING CLASS IS ALMOST FULL! RESERVE YOUR SPOT NOW
- Public Speaking Classes
- Corporate Presentation Training
- Online Public Speaking Course
- Northeast Region
- Midwest Region
- Southeast Region
- Central Region
- Western Region
- Presentation Skills
- 101 Public Speaking Tips
- Fear of Public Speaking
How Many PowerPoint Slides Should You Use in a Presentation?

Instead, you want to figure out what you want to say first . Then, after you have designed a great presentation, go back and figure out what visual aids you will need to better make your key points. The main rule of thumb is to provide only the number of slides that you absolutely need and absolutely no more than that.
So in this session, I’m going to cover a few examples for the right number of slides needed in short presentations, the long presentation, the best way to give corporate presentations.
The Max Number of Slides for a 15-Minute Presentation (or Less.)

Instead, especially for short talks, the first thing you want to do is make a list of the most important items that need to be covered in your presentation. Then, rank these items based on their list of importance. As you go down the list, you should notice that the level of importance for each item drops exponentially as you go down the list. So, instead of covering all of the items, just cover the three (or five) most important items in your presentation.
On your first slide, give an overview of all of the points. Just list them out for the audience so they can see what you will be covering. Then, create a separate slide for each of the three (or five) main points. Finally, on your last slide, just copy the content from your first slide and your introduction now becomes a nice conclusion as well.
By the way, for most business presentations, if you can deliver the important things in a 10-minute speech, you will be loved. If you require a 30-minute presentation time, the audience will like you about three times less.
For more details about how to design presentations or to use our helpful online presentation generator click here.
What If You Have an Hour-Long Talk? How Many Slides Do You Need?

Start with an introduction slide with an overview of all five bullet points. On your internal slides, just cover the single main idea for each bullet. You will have five internal slides. Then, end with your summary slide with the main concepts one more time. This repetition of the main concepts will increase the audience’s retention of the material. For the more seasoned presenter, you can use just three main bullet points but add an extra relevant story to each point. The more that you use this technique the easier you will find it to fit your content into the correct presentation length.
For instance, if you find yourself rushing at the end without enough time to finish, you can give fewer details in your stories. If you finish early, you can add more details into your examples and stories.
For a 60-minute presentation, use five bullet points and seven slides . This time insert a couple of different stories as evidence of each bullet point. I like to use the “bad example/good example” technique. On each of the internal slides, give your audience an example of yourself or someone else who did the opposite of the point. Then, follow up with a good example.
The “Bad Example/Good Example” Technique.
If I were to use the technique to prove the point that you need seven slides for an hour presentation, I could use the following…
Bad Example : A few years ago, I went to a three-day seminar where the presenter taught about how to market to universities. On the first morning, his team gave each of us a three-ring binder with hundreds of pages. I was actually pretty excited as I scanned the binder. It was full of a ton of great information. During the first hour, the speaker gave us over 50 great tips and techniques. In the next hour, he covered another 50. He did this over and over for two and a half days. Because I am a public speaking
However, a better example is…
Good Example : A few weeks ago, a long-time client asked me to design a custom workshop for his team. He had a team who were working on a project that had been discontinued. So, he wanted to help the team members have an easier time getting rehired elsewhere in the company. We created a short class for them on how to do well in a job interview. I started by making a list of the most important items they would likely want to know. Art the top of the list was how to reduce nervousness. I spent the first few minutes covering details on how to do this. Second, I gave them a simple process to help them answer questions with credibility. Finally, I gave them a list of questions they would likely be asked. I could have covered hundreds of other tips. However, these were the things that would give them the most bang-for-their-buck.
How Many Slides for a Longer Presentation

Basically, if you design a 120-minute PowerPoint presentation, start by creating two 60-minute presentations. Then, just insert a short break in between each session. When I created the two-day Fearless Presentations ® class, I didn’t start with two days of content. On the contrary, I started with an outline of the “most important” items just like what I suggested you do in your 15-minute presentation.
Here is the list that I started with:
- How to Reduce Public Speaking Fear.
- Designing Short Impromptu Speeches.
- How to Create a Presentation that Is Easier to Deliver.
- Adding Energy and Enthusiasm to Boring Topics.
- Ways to Add Impact and Interactivity to a Presentation.
If I wanted to, I could deliver the entire content of this speech in an hour-long keynote. I’d just need to insert a few examples for each point. That is pretty easy. However, if I want to turn the list into a 2-day seminar, that is pretty easy as well. I’d start with the first point, “How to Reduce Public Speaking Fear.” This becomes the topic of a new one-hour presentation. I use the same technique. “What is the most important thing I can teach the audience about reducing nervousness? What is the second most important thing? And the third thing?”
Basically, the entire two-day class is just a collection of five shorter presentations. In my entire slide deck, I use about 30 different slides in two full days.
The Guy Kawasaki 10/20/30 Rule of PowerPoint
Guy Kawasaki created an interesting PowerPoint rule for entrepreneurs coming to him for venture capital. He calls it his 10/20/30 PowerPoint Rule . This general rule is what he requires presenters to use when they come to him for help. Basically, he noticed that presenters spend too much time blathering about unimportant things. So, he gave them a guide and set time limits for each presenter.
- 10 PowerPoint Slides
- 20-Minute Presentation
- 30 Point Font
Obviously, he created these criteria for a certain type of presentation. However, his logic is sound. In fact, the only thing I might argue with him about is the 10 slides rule. Kawasaki says, “Ten is the optimal number of slides in a PowerPoint presentation because a normal human being cannot comprehend more than ten concepts in a meeting.”
Let me reiterate that. A normal human being cannot comprehend. He doesn’t say retain. The average person can comprehend more information than he or she can retain. For instance, if I read an entire book on accounting, I might comprehend all of the content. However, because the book covers so many concepts, I’m likely to retain only a few. Knowing this, reduce your number of slides and you will increase retention of your important points.

Podcasts , presentation skills
View More Posts By Category: Free Public Speaking Tips | leadership tips | Online Courses | Past Fearless Presentations ® Classes | Podcasts | presentation skills | Uncategorized
How to change the size of slides in Microsoft PowerPoint
The actual size(s) of the slide is less important than the aspect ratio. By default, slides in presentations that you create from the Blank Presentation template are set to Widescreen size.
To change the size of your presentation slides, on the Design tab, in the Customize group, click the Slide Size button and then:
Notes : The Standard slide size:
- 1600 x 1200
- 2048 x 1536
- 2560 x 1920
- Matches the aspect ratio of standard tablet screens
- Exactly fills the screen in the Slide pane and when printed on a tablet.
Notes : The Widescreen slide size:
- 1920 x 1080
- 2048 x 1152
- 2560 x 1440
- Does not match the aspect ratio of standard tablet screens
- Has empty space above and below when printed on a 4:3 screen.
- Click Custom Slide Size... :

In the Slide Size dialog box:

- Choose the slide orientation in the Orientation group.
After choosing the necessary options, click OK . The Microsoft PowerPoint dialog box will show two options on how to scale the existing slides to a new slide size:

Maximize the content size or scale it down to Ensure Fit it on the new slide.
Note : It is impossible to change the size or orientation just for some slides.
Please, disable AdBlock and reload the page to continue
Today, 30% of our visitors use Ad-Block to block ads.We understand your pain with ads, but without ads, we won't be able to provide you with free content soon. If you need our content for work or study, please support our efforts and disable AdBlock for our site. As you will see, we have a lot of helpful information to share.

Equations in PowerPoint
Crafting Catchy Headlines for Your Slides: Finding the Correct Length
PowerPoint presentations are crucial in business, education, and beyond, but crafting effective slides requires careful consideration of every element, including headlines. Headlines are the cornerstone for conveying key messages, but finding the ideal length can be a balancing act.
In this article, we will look at the importance of headline length in PowerPoint slides and guide you to finding the perfect balance for maximum impact.
The Significance of Headline Length
In the fast-paced world of presentations, headlines serve as the first point of contact between the presenter and the audience. They should be concise yet informative, providing a snapshot of the slide’s content while enticing viewers to participate further. Headlines that are too long risk overwhelming the audience with information overload, while overly brief headlines may fail to convey the desired message effectively. Striking the right balance is vital for grabbing the audience’s attention throughout the presentation.
Let us look at how you can craft ideal PowerPoint presentation headlines.
1. Short and Sweet: The Power of Conciseness
Short headlines, typically one to three words, can pack a powerful punch when used effectively. They are easy to comprehend and instantly communicate the slide’s main idea, making them ideal for topics that require immediate impact or emphasis.
They work well for visually-driven slides, where the image or graphic takes center stage, and the headline serves as a complement rather than the focal point. When crafting short headlines, using power-packed words can immediately impact the audience.
For example, for a presentation on sustainable solutions, you can write “Innovative Solutions for Sustainability.” In this concise headline, you effectively communicate the main topic, and the short length lets viewers grasp the subject matter quickly.
2. The Middle Ground: Finding Balance in Length
For slides that require more explanation, headlines of moderate length, ranging from four to eight words, work well for brevity and clarity. They provide enough information to give viewers a sense of what to expect.
When crafting such headlines, aim for clarity and specificity, avoiding unnecessary words or jargon that may confuse or distract the audience.
For instance, you may title your time management presentation “Strategies for Effective Workplace Time Management” instead of using unnecessary words in your title, such as “Strategies for Managing Your Time Effectively in the Workplace.”
3. Going the Distance: Long Headlines with Purpose
While shorter headlines are generally preferred for PowerPoint slides, there are occasions where longer headlines, consisting of nine words or more, can be effective. These are suitable for detailed explanations, complex concepts, or multi-part messages. They provide ample space to convey nuanced ideas or elaborate on critical points, allowing presenters to give depth to their presentations.
When using long headlines, it is essential to maintain readability by breaking the text into smaller parts and using formatting techniques such as bullet points or subheadings to improve clarity and organization.
For example, you can title your presentation
“The Art of Presentations: Tips for Crafting Compelling Educational Slides.”
Tips for Crafting Effective Headlines
1. clarity is key.
We live in an era where attention spans are fleeting. Thus, it is vital to use clear and concise language to communicate the message quickly and effectively. Avoid ambiguity, technical jargon, or complex phrases that may confuse or deviate the viewers. Aim for simplicity and directness to ensure your headline is easily understood.
2. Create Intrigue
Humans are naturally curious beings drawn to mystery and intrigue. Harness this curiosity by crafting headlines that arouse interest and curiosity, leaving readers eager to learn more. Pose thought-provoking questions, tease intriguing insights, or promise unexpected revelations to captivate your audience.
For instance, for a presentation on Entrepreneurship Skills, you may write,
“What Does It Take to Be a Successful Entrepreneur?”
“Entrepreneurial Success: Do You Have These 10 Success Skills?”
Such questions arouse curiosity and make the audience wonder.
3. Use Powerful Words
Words have the power to evoke emotion, inspire action, and influence behavior. Pick phrases can align with the viewer’s desires, fears, or aspirations. Incorporate power words such as “free,” “exclusive,” “guaranteed,” or “instant” to add impact to your headlines, compelling readers to take notice and click through to your content.
For example, putting up your title as below can play with the reader’s emotions and create a sense of urgency towards the presentation.
“Failproof Techniques to Close Your Next Sales Deal”
“Exclusive Techniques to Win Over Your Clients,”
4. Be Specific
Specificity breeds credibility. Therefore, offer your readers tangible benefits or solutions. Include details, statistics, or examples in your headlines to maintain relevance.
Whether highlighting the number of tips, steps, or benefits offered in your content, specificity adds value and persuades readers to read further.
For instance, instead of writing “Tips for Success in Public Speaking,” you can write
“10 Actionable Tips for Public Speaking Success.”
5. Invoke Emotions
Emotion is a powerful motivator that drives human behavior and decision-making. Tap into your audience’s emotions by crafting headlines that elicit joy, excitement, or empathy. Whether they spark curiosity, inspire hope, or address a pain point, emotional headlines resonate deeply with readers, forging a connection and compelling them to take action based on their feelings.
For instance, while creating a title for your Community presentation, you can write
“Feel the Love: Giving Back to Society”
“Touching Lives: One Act of Kindness At a Time”.
By using phrases and words that ignite a sense of emotion, you can inspire, educate, and connect with your audience.
6. Harness the Power of Numbers
Numbers provide structure and clarity, making headlines more amazing and actionable. Incorporate numerical figures, lists, or statistics into your headlines to convey value and promise practical benefits.
Headlines featuring numbers, offer a great value proposition and attract readers seeking practical insights or solutions.
“5 Tips for Success”
“10 Must-Have Tools,”
7. Keep it Relevant
Ensure that your headline accurately reflects the content of your piece and delivers on the promise and value proposition conveyed in your headline. Avoid sensationalism or clickbait tactics that may mislead or disappoint readers, damaging your reputation in the long run.
8. Optimize for SEO
Using keywords and phrases in your headlines can improve your presentation’s visibility and attract organic traffic to your content. Run keyword research to identify relevant search terms and incorporate them naturally into your headlines. Aim for a correct balance between SEO optimization and readability, ensuring your headlines are search engine-friendly.
Headlines are the window to your entire presentation and can make or break your audience’s interest. By following best practices and considering the specific needs of each slide, presenters can craft headlines that elevate their presentations and leave a lasting impression on their audience .
Leave a Response Cancel reply
Save my name, email, and website in this browser for the next time I comment.
Please enter an answer in digits: 12 − six =

Ashish Arora
You might also like.

Interesting Presentation Statistics You Need to Know

How to Craft a Highly Effective Pecha Kucha Presentation

Essential Tips to Find the Right Audience for Your Next Presentation

Expert Tips to Handle Distractions When You Speak on Stage

Primary Navigation
Secondary navigation.

NYC Bin — Cheapest Bin of its Quality — Available for Purchase Online
Containerization Requirement for Buildings with One to Nine Residential Units to Go Into Effect November 12, 2024
Mayor Adams, Sanitation Commissioner Tisch Unveil First-Ever Official NYC Bin for Trash Pick up, Release Timeline for Residential Containerization of all one to Nine Unit Buildings
July 8, 2024
Watch the video here at https://www.youtube.com/watch?v=f88y2ARrGUs
As of November 12, Administration Will Have Containerized 70 Percent of New York City’s 14 Billion Annual Pounds of Trash in Two Years
NEW YORK – New York City Mayor Eric Adams and New York City Department of Sanitation (DSNY) Commissioner Jessica Tisch today symbolically set Gracie Mansion’s trash and recycling out at the curb, marking the next step in relegating New York City’s once-omnipresent mountains of black trash bags to the dust bin of history. This waste was the first to be set out in the first-ever official NYC Bin, now available online . The new official NYC Bin is equipped with wheels and a secure latching lid, and is the cheapest bin of its quality available, with prices below $50 for the most common size. Additionally, Mayor Adams today also announced that DSNY has put forth a proposed rule requiring that all buildings with one to nine residential units and all special use buildings that receive DSNY collection (e.g. city agency buildings, houses of worship, and professional offices located within residential buildings) put their trash in containers, effective November 12, 2024.
“Today, we are tossing even more black bags into the dustbin of history and taking the next step forward in our ‘Trash Revolution,’” said Mayor Adams . “The first-ever, official NYC Bin is high-quality, affordable, and will build on our efforts containerizing more than 70 percent of the city’s trash to protect our most valuable and limited resource — our public space.”
“NYC-branded wheeled containers, custom designed to work with our trucks, are the key to keeping our most precious real estate — New York City sidewalks — clear,” said Deputy Mayor for Operations Meera Joshi . “With over 70 percent of New York City’s trash contained, the Adams administration and the hardworking men and women of DSNY are defying the odds and the naysayers and winning the ‘Trash Revolution.’”
“Many property owners already use bins for their trash — and pay over $100 retail in order to keep the streets clean,” said DSNY Commissioner Tisch . “Well, we’ve got great news: at the same time that we’re moving to require containerization of trash for all buildings with one to nine residential units, we’re unveiling the official ‘NYC Bin’ — beautiful, durable, and less than $50 for the most common size.”

The new official NYC Bin is the cheapest bin of its quality available; similarly durable bins with wheels and a secure, latching lid are sold in retail stores for almost three times the price. These savings were achieved through an innovative contracting mechanism in which one vendor is held to a low price in exchange for exclusivity.
Many lower-density residential buildings and special-use buildings already use bins to set out their trash, and the rule provides a period of more than 18 months during which they may continue to use bins they already have, provided those bins are 55 gallons or less and have a latching lid to keep rats out. Thanks to this program, replacing those bins when they wear out just became vastly more affordable, significantly reducing costs for small property owners.
Effective June 1, 2026, those buildings will be required to use the official NYC Bin to facilitate faster, safer, cleaner mechanized collection with rear-loading “tipper” garbage trucks. Any property owner or manager covered by the rule who does not currently have a bin is encouraged to purchase the official NYC Bin, as this bin is far cheaper than anything of its quality sold in retail stores. While the requirements of this new rule only cover trash and compostable material, matching green (paper) and blue (metal, glass, plastic, cartons) NYC Bins are also available for purchase for any property owner or manager who prefers a matched set. Bins should be ordered by October 1 to guarantee delivery before the new containerization requirement goes into effect on November 12.
Implementation of the rule will include a warning period extending through the end of 2024, with issuance of fines to commence on January 2, 2025. As with existing commercial containerization requirements, the fine for leaving trash on New York City streets rather than in a secure bin of 55 gallons or less is $50 for a first offense, $100 for a second offense, and $200 for a third offense and each thereafter. DSNY will engage in substantial outreach this summer around these new rules, including through mailers, door to door canvassing, community and ethnic media outreach, and work with community boards and civic associations.
The “Trash Revolution” Thus Far
The launch of pre-orders for the official NYC Bin and the rule mandating low-density containerization are the latest steps in the rapid rethinking of the relationship between 8.3 million New Yorkers and 14 billion annual pounds of trash — an undertaking collectively known as the “Trash Revolution” — that has led to record-breaking reductions in rat sightings.
- In October 2022, the Adams administration kicked off the Trash Revolution by changing set-out times for both residential and commercial waste from 4:00 PM — one of the earliest set-out times in the country — to 8:00 PM in April 2023, while also allowing earlier set-out if the material is in a container. This incentivization of containerization was paired with major changes to DSNY operations, picking up well over a quarter of all trash at 12:00 AM rather than 6:00 AM, particularly in high density parts of the city, and ending a practice by which up to one-fifth of trash had been purposefully left out for a full day.
- Later that month, DSNY published its “ Future of Trash ” report, the first meaningful attempt to study containerization models in New York City, and the playbook to get it done.
- Last August, containerization requirements went into effect for all food-related businesses in New York City . These businesses — restaurants, delis, bodegas, bars, grocery stores, caterers, etc. — produce an outsized amount of the type of trash that attracts rats.
- That same month, installation of the initial 10-block, 14-school Manhattan Community Board 9 pilot containers began.
- Last September, commercial containerization requirements extended to chain businesses of any type with five or more locations in New York City. These chain businesses tend to produce a large total volume of trash.
- This past February, Mayor Adams and Commissioner Tisch unveiled a new, automated, side-loading garbage truck and a new data-driven containerization strategy, affirming a commitment from Mayor Adams’ 2024 State of the City address to set New York City on the course to store all trash put out for pickup in containers.
- On March 1, 2024, container requirements went into effect for all businesses — of every type — in New York City to get their trash off the streets and into a secure bin.
- On November 12, 2024, container requirements will go into effect for low-density residential buildings — those with one to nine units. At that point, approximately 70 percent of all trash in the city will be containerized. New Yorkers can purchase the official NYC Bin online starting today, and use of that specific low-cost bin will become required in June 2026.
- In the spring of 2025, installation of stationary on-street containers will begin in Manhattan Community Board 9 for the first full-district containerization pilot, serviced by new automated side-loading trucks.
“The NYC Bin adds another instrumental tool in New York City’s rat mitigation toolkit,” said Director of Citywide Rodent Mitigation Kathleen Corradi . “With this next step in the Department of Sanitation’s ‘Trash Revolution,’ New York City continues its efforts to systematically deny rats a curbside buffet and get black bags off our streets.”
“The New York City Department of Sanitation is on a roll and rats are on the run, thanks to the Adams administration’s continued expansion of waste containerization,” said “New” New York Executive Director B.J. Jones . “New Yorkers can hold their heads high instead of holding their noses as Commissioner Tisch, the DSNY team, and Rat Czar Corradi bring cleaner curbs and a better quality of life to every neighborhood.”
Media Contact
[email protected] (212) 788-2958
Find anything you save across the site in your account
19 Glorious Vintage Pictures of the Late Shannen Doherty

For children of the 1980s and ’90s who grew up eagerly tuning in to watch California’s golden youth in Beverly Hills, 90210 , or the adventures of the kind-hearted Halliwell witches in Charmed , a cult-favorite series of the 2000s, Brenda Walsh and Prue Halliwell were more than just beloved television characters. Sharp, captivating, and a bit rebellious, they felt thrillingly real—and were always closely associated with the woman behind them, Shannen Doherty.
The Memphis native was discovered at age 11 by Michael Landon, who cast her as Jenny, Laura Ingalls’s niece, in Little House on the Prairie . She would later appear in Parker Lewis Can’t Lose , 21 Jump Street , and Heathers , alongside a young Winona Ryder, before Beverly Hills, 90210 catapulted her to teen-idol status.
Doherty was first diagnosed with breast cancer in 2015, going into remission two years later. In 2020, however, she announced that the cancer had returned; and by June 2023, it had spread to her brain. Doherty’s death was announced by her publicist, Leslie Sloane, on Saturday, July 13.
Here, Vogue pays tribute to Doherty’s life and career with a look back at some of her most memorable screen roles—and some deliciously ’90s moments on the red carpet.

Shannen Doherty as Jenny Wilder in Little House on the Prairie.

With Winona Ryder, Kim Walker, and Lisanne Falk in Heathers.

At a charity softball game at Pepperdine University.

Sporting a chic red lip at the 10th Annual Scott Newman Gala.

With the cast of Beverley Hills, 90210.

IMAGES
VIDEO
COMMENTS
I am using PowerPoint 2007 and have prepared a slideshow, but I can't seem to find a way to quickly vew its total length when played. I can use "View/Slide Sorter" view to see the length of each individual slide, but can't find a way to see the length of the entire slide show.
To change the slide size: Select the Design tab of the toolbar ribbon. Select Slide Size near the far right end of the toolbar. Select Standard (4:3 aspect ratio) or Widescreen (16:9) or Custom Slide Size. For more about the predefined sizes (including formats like Overhead, A3, A4, Banner, B4, and B5) or your own custom sizing, click a heading ...
For more details, you can refer to this article: Set the timing and speed of a transition. At the same time, as a workaround for getting a total time for a Slideshow with automatic advancing, you can go to Transitions > Timing > After under Advance Slide, then you can click on each slide to get the number of minutes or seconds of automatic ...
To set an exact length of time for a slide to appear, type the length of time in the Slide Time book. To restart recording the time for the current slide, click Repeat. After you set the time for the last slide, a message box displays the total time for the presentation and prompts you to do one of the following: To keep the recorded slide ...
Set your PowerPoint presentation to run itself, advance when viewers click, or play in a loop. ... To set an exact length of time for a slide to appear, type the length of time in the Slide Time box. ... On the Slide Show tab, in the Set Up group, click the arrow on the Record Slide Show button. Select one of the following:
Click on the Design tab on PowerPoint's ribbon. The available options will change on the ribbon. Find the Customize section on the ribbon and click on the Slide Size icon. A drop-down menu opens with several options. Click on Custom Slide Size to open the Slide size menu and change your presentation's dimensions.
Six steps for creating a slide show. 1. Plan your slide show. Before getting too deep into your slide show project, it's a good idea to select and save the photos and videos you want to use. This helps you create a slide show more efficiently and purposefully, ensuring a better outcome. 4.
Select Your Slides from Slides Pane. In the first step, click the slide preview for the slide you wish to set time for. In case you want all your slides to switch according to a set time limit (e.g. 10 seconds), select one slide and hit CTRL+A to select all slides. In case you want to set a different time for each slide, you will have to select ...
Step 4. Click on one of the default text boxes on your screen. The rulers will snap into shape. The rulers are English, 1/8-inch rulers. You will then see that the top ruler measures the length of your presentation at 8 1/4 inches. Advertisement.
To change your slide size in PowerPoint, simply: Navigate to the Design tab. Open the Slide Size drop down menu. Select 4:3 , 16:9 or Custom Slide Size (see options below) When starting with a blank presentation, you are now good to go. You will not have to worry about any of the conversion issues discussed below.
On the Design tab, in the Customize group, click Slide Size. Click Custom Slide Size. Change the orientation for the slides to Portrait or Landscape. Note: You can also change the orientation of your notes, handouts, and outline. Click OK. PowerPoint now asks you to choose between maximizing the size of your content on the new layout (to do ...
The PowerPoint Slide Size pop-up in Windows 10. While you can use the options on the right of the window to tweak the Orientation options, the settings related to the size of a PowerPoint slide are on the left side of the Slide Size pop-up. Click or tap the "Slides sized for:" field to access a dropdown menu with other presets you can use for your PowerPoint slide dimensions.
Generally, you should spend no more than 5-7 minutes per main point. Give Your Presentation. The best way to determine how long your presentation will last is to perform it live. Perform it exactly as you would in front of your audience and time yourself. You can even record yourself, so you know where to make adjustments if needed.
In the "Customize" section of the "Design" tab, select the "Slide Size" button. This will display the two common slide sizes in a drop-down menu. Click either the "Standard (4:3)" or "Widescreen (16:9)" option to switch all of your PowerPoint slides to that size. Unfortunately, it isn't possible to use multiple slide sizes in a PowerPoint ...
Report abuse. It is simple. Insert "Date & Time" from the Insert tab in the first and the last slides. While inserting date and time, pick the options (i) to Update automatically, (ii) long date and time a shown in the following fig. Now run the presentation and note the time shown on the first slide and the time shown on the last slide.
In the "Slide Size" dialog box, you can now see the size of the slide in inches in the "Width" and "Height" boxes. Then click on the "OK" button at the bottom of the dialog box to close it.. 4. How to Change the Size of a PowerPoint Slide? In Microsoft PowerPoint, you can change the side of the slides using the "Design" menu. However, you can only change the size of all the ...
2. Think about the speed at which you speak. If you speak quite quickly, you will be able to get through a great number of slides. If, on the other hand, you speak more slowly, you'll probably require a smaller number of slides. Use your rate of speech to determine how many slides your presentation can accommodate. 3.
Step 1: Open PowerPoint and go to the 'Design' tab. Click on the 'Design' tab located at the top of the PowerPoint window. When you're working on your PowerPoint presentation, the Design tab is where you'll find all the options for customizing the look and feel of your slides. It's the gateway to adjusting the size of your slides.
File, Save & Send, Publish Slides, Publish Slides (button) Select All - I recommend using Select All the first time so you can see the size of all your slides. Choose destination Windows folder. Publish. Review sizes and you can launch each individual-slide powerpoint file to see which one it is and whether you can reduce the size.
PowerPoint slide size refers to the dimensions of the slides within your PowerPoint presentation. These dimensions determine how your content is displayed in a monitor or projector, and can significantly affect the overall look and feel of your presentation. The most common slide sizes in PowerPoint are 16:9 (widescreen) and 4:3 (standard).
When you understand the concepts covered in the short talk tips, a longer presentation is pretty easy. To design a slide show for a good presentation, the easy thing to do is to just combine a series of shorter presentations. Basically, if you design a 120-minute PowerPoint presentation, start by creating two 60-minute presentations.
To change the size of your presentation slides, on the Design tab, in the Customize group, click the Slide Size button and then: Choose one of the pre-defined sizes: Standard (4:3) was the default slide size in older versions of Microsoft PowerPoint, like 2003 or 2007. Standard (4:3) slides have a size of 10 x 7.5 inches or 25.4 x 19.05 cm.
Step 3. A dialog box will pop-up that says slides sized for. Here is where you can choose custom and enter the slide dimensions you would prefer for your slide. You also have the options to choose ratio's like on-screen show 4:3 or Letter paper, ledger paper, A1, etc. You see you can also choose for the slides to be formatted in landscape or ...
PowerPoint presentations are crucial in business, education, and beyond, but crafting effective slides requires careful consideration of every element, including headlines. Headlines are the cornerstone for conveying key messages, but finding the ideal length can be a balancing act. In this article, we will look at the importance of headline length in PowerPoint slides and […]
"Well, we've got great news: at the same time that we're moving to require containerization of trash for all buildings with one to nine residential units, we're unveiling the official 'NYC Bin' — beautiful, durable, and less than $50 for the most common size." The new NYC Bin. Credit: New York City Department of Sanitation
Celebrating the life and career of the iconic "Heathers," "Beverly Hills, 90210," and "Charmed" star, who died on Saturday at 53.