How-To Geek
How to remove slide numbers from powerpoint slides.

Your changes have been saved
Email Is sent
Please verify your email address.
You’ve reached your account maximum for followed topics.

Samsung's Galaxy Z Flip 6 Gets the Upgrade We Wanted
Why the logitech g502 will forever be my favorite mouse, what to do if google messages keeps crashing, quick links, remove slide number from one or all slides, remove slide number from title slide.
Slide numbers are a great way to navigate to a specific slide on your PowerPoint presentation quickly. In the event that the slide numbers are no longer necessary, you might want to remove them. Here’s how.
First, open the PowerPoint presentation that contains the slide numbers you want to remove. The slide number appears in the top-left corner of its respective slide.

Next, head over to the “Text” group of the “Insert” tab and select “Slide Number."

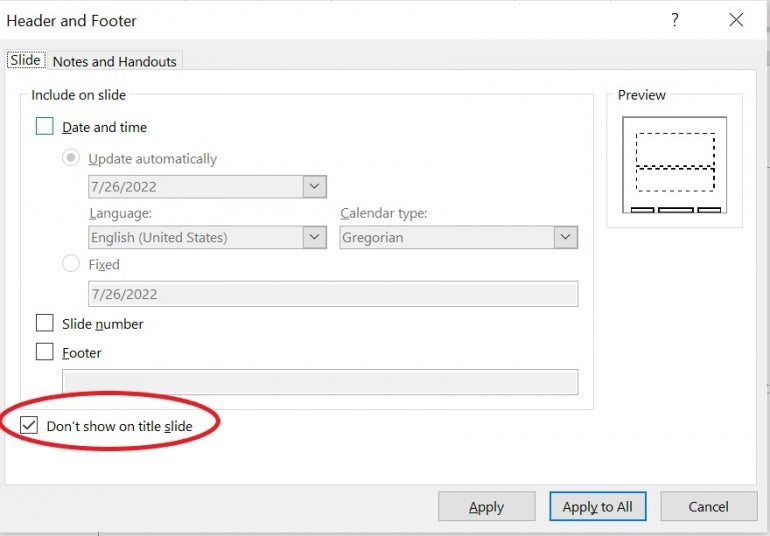
Once selected, the “Header and Footer” dialog box will appear. In the “Slide” tab, uncheck the box next to “Slide Number." If you want to remove the number from only the selected slide, then select “Apply” (2). If you want to remove the numbers from every slide in the presentation, then select “Apply to All" (3).

You might want to remove the slide number from the title slide only. Numbering that slide probably isn't necessary as most understand the title slide is the first slide of your presentation.
To remove the slide number from the title slide only, select “Slide Number” in the “Text” group to open up the “Header and Footer” dialog box again. This time, check the box next to “Don’t Show on the Title Slide."
If you happened to be on the title slide when you opened the dialog box, then select “Apply." However, if you were on any other slide, you’ll need to select “Apply to All” for it to work.

- Microsoft Office
- Microsoft PowerPoint
- office 2019
- Slide Library
- Slide Library for PowerPoint
- Downloadable slides and shapes
- Slide Library search
- Search Library via shortcut keys
- Slide Library update alerts
- Rename or delete objects
- Share Slide Library
- Save slides or shapes to Slide Library
- Save presentation to Slide Library
- Manage Templates
- View all templates and set default
- Agenda Wizard
- Create Agenda Slides
- Update Agenda Slides
- Agenda Slide Numbering
- Navigate via Agenda
- Table of Contents
- Import Agenda Items
- Save Agenda Format
- Manage Colors
- Color Palette Toolbar
- Customize Color Toolbar
- Apply fill with outline color
- Recolor Charts
- View RGB color values & names
- Theme Color Tints and Shades
- Share Color Palette with team
- Insert Shapes
- Standard PowerPoint shapes
- Callouts / Speech Bubbles
- Hand Drawn Circles
- Harvey Balls
- Create Mini Slides
- Move to Multiple Slides
- Right Facing Centered Triangle
- Status Indicators
- Arrange and Align Shapes
- Select same color or size
- Select shapes by attribute
- Align shapes
- Align to first selected shape
- Choose Align anchor point
- Align using shortcut keys
- Copy paste position multiple shapes
- Straighten Lines
- Swap positions
- Distribute evenly
- Set Horizontal Gaps
- Set Vertical Gaps
- Squeeze or expand gaps
- Remove gaps
- Group Objects by Row
- Group Objects by Column
- Send to back, bring to front
- Send backward, bring forward
- Flip or rotate
- Group, ungroup and regroup
- Edit Shapes
- Same height, same width
- Copy paste position, size
- Resize shapes
- Slice shapes
- Multiply shapes
- Stretch shapes and fill gaps
- Toggle line weight and style
- Change margins toggle
- Chevrons same angle
- Paragraph Styles
- Save Paragraph Styles
- Apply Paragraph Styles
- Use PowerPoint Indent Increase/ Decrease to apply bullet styles
- Reset Paragraph Styles
- Ticks and Crosses bullets
- Paint Formatting
- Advanced Format Painter
- Position & Size Painter
- Table Format Painter
- Style Painter
- Text Format Painter
- Change Shape Painter
- Chart Format Painter
- Angles & Curves Painter
- Animation Painter
- Cycle Accent Colors
- Format Text
- Fit text to textboxes
- Wrap Text Toggle
- Merge Textboxes
- Split Textboxes
- Increase/ Decrease Font size
- Change Text Case
- Color Bold Text
- Delete Text or Replace
- Insert Superscript text
- Format Tables
- Create table from text boxes
- Convert table to text boxes
- Convert text to table
- Insert columns and rows
- Paste Excel data without source formatting
- Paste Excel data into text box tables
- Export Table or Box Table Data to Excel
- Set cell margins
- Express Table layout
- Table stripes
- Autofit columns
- Evenly space columns
- Align shapes over tables
- Harvey Balls for Tables
- Status Indicators for Tables
- Customizable PowerPoint Shortcut Keys
- Extra PowerPoint shortcuts
- Add PowerPoint shortcuts
- Search shortcut keys
- Reassign PowerPoint shortcuts
- Reset PowerPoint shortcuts
- McKinsey PowerPoint shortcuts
- F4 or Ctrl+Y redo or repeat
- Printable PowerPoint Shortcuts PDF
- How to Print a Custom Shortcuts list
- Search Shortcut Keys
- Searchable PowerPoint Shortcuts list
- Format Toolbar Overview
- Format Toolbar Layout Options
- Lock or Unlock Objects
- Lock objects
- Lock objects to the Slide Master
- Unlock objects
- Proofing Tools
- Fix Lines & Outlines
- Fix Layout, Transitions, Animations
- Fix Punctuation & Spacing
- Fix Margins, Bullets, Indents
- Check for Confidential items
- Reduce File Size
- Check Slide Master
- Set Proofing Language
- Change set language for PowerPoint presentations
- Flip PowerPoint Slides
- Flip Slides for Translation
- Slide Numbering
- Manage Slide Numbering
- Slide Numbers with totals
- Add words to Slide Numbers
- Change Starting Slide Number
- Skip Slide Numbers on Hidden Slides
- Slide Navigator
- Footers & Footnotes
- Filename Footer
- Enlarge Footnotes
- Refine Slides
- Add summary slide
- Format slide title
- Display No Fly Zone
- Send slide to appendix
- Camouflage mode
- Format Painter
- Set Grayscale
- Format Images
- Compress file size
- Format Charts
- Charts Toolbar
- Config Options
- Customize Settings
- Dark Mode Display
- Review Slides
- Customizable Status Stamps
- Sticky Notes
- Tag slides with filename and page number
- Share Slides
- Email selected slides in PPT or PDF format
- Print selected slides
- Save selected slides
- Slide Library for Teams
- Team Slide Library
- Create multiple Team Slide Libraries
- Synchronize Team Slide Libraries
- Synchronize Team Slide Library to your company Dropbox/ Box/ OneDrive folder
- Updating your Team Slide Library
- Import entire presentation to the Slide Library
- Share Slide Library with a colleague
- Share Custom Settings
- Share Custom Settings with Team
- Getting Started
- Getting started with PPT Productivity add-in for PowerPoint
- Downloadable PowerPoint Elements for Slide Library
- Tutorial - How to Create Custom Paragraph Styles for PowerPoint
- Can I use PPT Productivity on a Mac?
- PPT Productivity Basic Tools Tutorial
- PPT Productivity Plus Tools Tutorial
- New Features
- August 2023 update: Color Toolbar enhancement, new icons and more
- February 2023 update: New Slide Libraries available to download!
- January 2023 Update: Agenda Wizard, Format Painters + More
- How to copy and paste formatting in PowerPoint
- PowerPoint How To
- What are the most popular PowerPoint shortcuts?
- Where are PPT templates stored? Finding templates in PowerPoint
- Pasting data into a PowerPoint table without source formatting?
- Consulting Toolkit
- How to create effective consulting slides using Minto Principles
- Missing the McKinsey PowerPoint Shortcuts?
- Missing the Accenture QPT for PowerPoint?
- Missing the BCG PowerPoint Tools?
- Missing the Bain Toolbox for PowerPoint?
- How to add Stamps or Stickers to PowerPoint slides?
- Looking for a Consulting PowerPoint Toolbar?
- Top 10 PowerPoint Hacks / Shortcuts used by strategy consultants
- PowerPoint Tips
Can I change PowerPoint starting slide number?
- April 23, 2021
Do you want to start your PowerPoint Slide number / page numbers at zero or another number? By default, PowerPoint starts your presentation slide numbering at one. But setting your slide number to start from zero or any other number in PowerPoint is easy.
There’s a couple of ways to change your slide numbering in PowerPoint – from the Design Tab or using the PPT Productivity Slide Numbering feature.
Change Starting Page Number in PowerPoint from the Design Tab
To set your page numbers to start from a page other than one, navigate to the ‘Design’ tab in PowerPoint. Once on the ‘Design’ tab, use the following steps to update the slide numbering;
1. Open the ‘Slide Size’ dropdown menu 2. From the ‘Slide Size’ menu, select ‘custom slide size’

3. At the bottom of the ‘custom slide size’ dialogue box you will see the ‘Number slides from:’ dropdown box.

4. From the ‘slide numbers from:’ dropdown box, select or input the slide number you want to start your slide numbering from. For example, selecting zero will start your presentations slide numbering from slide 0 rather than slide 1 5. Click ‘OK’ for the slide numbering change to be applied to your presentation

Change Starting Page Number in PowerPoint with PPT Productivity
PPT Productivity has made it even easier to set your slide numbers to begin at zero, or any other number.
To change slide numbering with PPT Productivity, 1. From the top ribbon select the ‘Slide Numbers and Totals’ icon from the ‘Footer’ feature group.

2. In the ‘Slide Numbers and Slide Totals’ menu, select or input the slide number you want the presentation numbering to begin with. For example, changing the slide number to start at zero will make the first slide in the presentation number 0 rather than 1. 3. Click OK for the slide numbering change to be applied.

The PPT Productivity slide numbering tools are also accessible from the ‘Insert’ tab.

Visit our Slide Numbering feature page to learn more about Slide Numbers and Slide Totals

See our tools at work
Book a personal demo with our PPT professionals

Start 30 Day Free Trial
Start your 30 day free trial - Microsoft Office for Windows
Download and Install
Existing customers download to install on a new computer
Related productivity tips

Troubleshooting PowerPoint Slide Numbering: How to fix common issues
Looking for how to add slide numbers in PowerPoint? Trying to work out what to do when PowerPoint ...

Can I insert slide totals with slide numbers in PowerPoint? Yes!
PPT Productivity add-in recently released our Manage Slide Numbering feature for PowerPoint. ...

How to add a PowerPoint Table of Contents slide?
Adding a table of contents in PowerPoint is easy with the PPT Productivity PowerPoint add in. ...
TechRepublic
Account information.

Share with Your Friends
How to remove slide numbers from specific slides in Microsoft PowerPoint
Your email has been sent

Occasionally, you see a Microsoft PowerPoint presentation with numbered slides. It’s the same as numbering pages in a Microsoft Word document. Similar to Word, there might be slides that you don’t want to number, such as the title slide. PowerPoint’s slide-numbering feature is easy to implement, but it is seriously limited.
In this tutorial, I’ll show you how to add slide numbers to a presentation. Then, I’ll show you how to remove numbers from specific slides and a trick that lets you restart slide numbering at the second slide, but that’s the only time it works.
SEE: Windows, Linux, and Mac commands everyone needs to know (free PDF) (TechRepublic)
I’m using Microsoft 365 on a Windows 10 64-bit system, but you can use older versions of PowerPoint. PowerPoint for the web supports slide numbers. If you’re working with a slide show other than the default, add slide numbering to the master show slides. The process is the same.
How to add slide numbers in PowerPoint
Adding slide numbers to a presentation is simple. Similar to Word, you’ll add a field that displays the current slide number. Because it’s a field, it updates when you move, delete and add slides. Let’s start by adding slide numbers to all the slides in a simple presentation:
- After adding a slide, click the Insert tab.
- Click Header & Footer in the Text group to add the numbers to the footer.
- In the resulting dialog, click the Slide tab if necessary.
- Check the Slide Number option ( Figure A ).
- Click Apply to All. Notice that there’s also an Apply button. Click Apply to insert the page number only on the selected slide(s).

As you can see in Figure B , the slide number is in the bottom-right corner.
Enabling slide numbering for one or all slides is easy. Now, let’s turn it off for a specific page.
How to disable slide numbering in PowerPoint
Once you’ve enabled numbering for all slides, you might want to disable it for a page or two. For instance, this presentation has a title page — most do. As a rule, title slides don’t display a number, so let’s turn numbering off for the title slide as follows:
- Click the Insert tab and then click Header & Footer in the Text group.
- In the resulting dialog, check the Don’t Show On Title Slide option ( Figure C ).
- If the title page is currently selected, click Apply. If you select another slide, click Apply All.
That was easy, but what if you want to disable numbering for a slide other than the title slide? Again, the solution is simple:
- Select the slide in question. In this case, we’ll use slide 2.
- Click Insert and then click Header & Footer in the Text group.
- In the resulting dialog, uncheck the Slide Number option.
- Click Apply to disable numbering for only the selected slide, the second slide.
This simple presentation has four slides. The first two have no slide numbers, and slides 3 and 4 do. You might want to consider restarting the page numbering at slide 3. Instead of displaying 3, you might want it to display 1. To the best of my knowledge, you can’t restart slide numbering. However, I do have a quick trick that will work only when you’ve turned numbering off for the first slide.
You can reset the starting slide number, and PowerPoint will apply it to the entire presentation. If you start with 4 slides and disable numbering for the first slide, you can reset that starting number to 0. Consequently, slide 1 is 0, slide 2 is 1 and so on. To reset the starting number to 0, do the following:
- Click the Design tab.
- In the Customize group, click Slide Size.
- From the dropdown, choose Custom Slide Size.
- In the resulting dialog, change the Number Slides From setting from 1 to 0 ( Figure D ).

At this point, slide 3 displays 2 and slide 4 displays 3. The only way to fix this is to enable numbering for slide 2 as follows:
- Select slide 2 — the real slide 2.
- Click the Insert tab.
- Choose Header & Footer in the Text group.
- In the resulting dialog, check Slide Number.
Figure E shows the slides and numbering. The title slide displays no number. The second slide displays 1. Slide 3 displays 2 and slide 4 displays 3. The only time this works is when the first slide doesn’t display a number and you reset the starting number to 0.

You can reset the starting slide number to a larger number. You’ll do so when combining different presentations. For instance, you might run the first show with slides 1 through 10 and then run a second, from slides 11 to 25.
There are third-party products available that allow you to implement more complex slide numbering schemes in PowerPoint.
Subscribe to the Developer Insider Newsletter
From the hottest programming languages to commentary on the Linux OS, get the developer and open source news and tips you need to know. Delivered Tuesdays and Thursdays
- Windows 11 cheat sheet: Everything you need to know
- Windows PowerToys: A cheat sheet
- Google Workspace vs. Microsoft 365: A side-by-side analysis w/checklist
- Best software for businesses and end users

Create a TechRepublic Account
Get the web's best business technology news, tutorials, reviews, trends, and analysis—in your inbox. Let's start with the basics.
* - indicates required fields
Sign in to TechRepublic
Lost your password? Request a new password
Reset Password
Please enter your email adress. You will receive an email message with instructions on how to reset your password.
Check your email for a password reset link. If you didn't receive an email don't forgot to check your spam folder, otherwise contact support .
Welcome. Tell us a little bit about you.
This will help us provide you with customized content.
Want to receive more TechRepublic news?
You're all set.
Thanks for signing up! Keep an eye out for a confirmation email from our team. To ensure any newsletters you subscribed to hit your inbox, make sure to add [email protected] to your contacts list.
How to remove Slide number from PowerPoint slides
Remove slide number from powerpoint.
So, to remove the slide number from the title slide, go to ‘ Slide Number ’ visible under the ‘ Text Group ’ of ‘Insert’ tab to open ‘ Text ‘ group to open ‘ Header and Footer’ dialog box.
HemantS@TWC
How to Add or Remove Slide Numbers in PowerPoint

Your changes have been saved
Email Is sent
Please verify your email address.
You’ve reached your account maximum for followed topics.
If you use Microsoft products like Word and Excel, there's also a good chance that you use PowerPoint for presentations. Depending on the purpose, such presentations can either be short or long.
Whereas one-page slides do not need numbering, you cannot say the same for longer and larger presentations which usually run into tens or hundreds of pages. In such cases, it makes perfect sense to number the slides for easy reference.
So, we'll show you how to add, format, and remove slide numbers from your PowerPoint presentation.
Adding Slide Numbers in PowerPoint
Adding slide numbers in PowerPoint is easy and straightforward. Here's how to go about it:
- Launch PowerPoint on your desktop.
- Open the PowerPoint presentation you want to number.
- Click on the Insert tab in the ribbon area.
- Then click on Header and Footer .

- To add a page number to the current slide only, click on Apply .
- To add slide numbers to all the pages, click Apply to All instead. There's also the provision to add the current date and time .
- If your first page also doubles as your title page, you definitely don't want a slide number there. To prevent that, simply check the Don't show on title slide box.
If you want to be a little adventurous, you can also add the Zoom effect .
Repositioning Slide Numbers in PowerPoint
If, for some reason, you don't like the placement of the slide number, you can easily reposition it to your liking. You can do this two ways—for specific or all slides.
Repositioning Slide Numbers for a Specific Slide
To reposition the slide number for a particular slide in PowerPoint:

- Now drag the Slide Number box to any location of your choice. This can be the header, footer, or even side panels; it's up to you.
Repositioning Slide Numbers for All Slides
To reposition the slide numbers for all slides in PowerPoint:
- Click on the Slide Number box.
- Go to the ribbon and click on the View tab.

- Now, drag the Slide Number box to your desired location.
- When done, click on Close Master View .
Formatting Slide Numbers
You can change the font type, size, and color of your slide numbers in PowerPoint. You can even use special characters like Roman, Chinese, or Hebrew numerals and more. To do so:

- From the popup toolbar options, select your font and size. You can also bolden, underline, or italicize the slide number to your taste.
Removing Slide Numbers in PowerPoint
Removing slide numbers in PowerPoint is also easy and straightforward. You can equally do it in two ways for short and long presentations.
Removing Slide Numbers from a Specific Slide
To remove the slide number from a particular slide:
- Open the PowerPoint presentation.

- Press the Delete key on your keyboard.
Removing Slide Numbers from All Slides
If you want to remove slide numbers from all pages:
- Open the PowerPoint presentation in question.

- On the Header and Footer dialog box, uncheck the Slide number box.
- Now click on Apply to All .
You can add, format, and remove PowerPoint slide numbers across all platforms, including online and mobile. It's essentially the same process.
Keep Track of Your PowerPoint Slides.
If your PowerPoint presentation runs into dozens or hundreds of slides, you'll be better off numbering it. This way, you can easily reference a particular page. It also makes it easier for your viewers to keep track of your slides as they read or study. It helps them track their progress and not get lost along the way.
Adding, formatting, and removing slide numbers is another simple way of optimizing your PowerPoint presentations for maximum impact.
- Productivity
How to Remove Slide Numbers in Powerpoint 2019: Easy Steps
Removing slide numbers in PowerPoint 2019 may seem like a daunting task, but it’s actually quite simple! All you need to do is access the “Insert” tab, select “Slide Number,” uncheck the box that says “Slide number,” and then apply the changes to all slides. And just like that, your slides will be number-free!
Step by Step Tutorial: Removing Slide Numbers in PowerPoint 2019
Before we dive into the steps, let’s understand what we’re about to do. We’re going to take away those pesky little numbers at the corner of your slides that can sometimes distract your audience. Ready? Let’s go!
Step 1: Open the “Insert” Tab
Open the “Insert” tab on the ribbon at the top of PowerPoint.
The “Insert” tab is where you can add various elements to your slides, like text boxes, pictures, or symbols. For our purpose, it’s also where we’ll start the process of removing slide numbers.
Step 2: Click on “Slide Number”
Click on the “Slide Number” option in the “Text” group.
The “Text” group on the “Insert” tab is where you can add or edit text-related items in your PowerPoint presentation, like headers, footers, and you guessed it – slide numbers.
Step 3: Uncheck “Slide number”
In the “Header and Footer” dialog box, uncheck the box next to “Slide number.”
A dialog box will pop up when you click “Slide Number.” This is where you can control various options for headers and footers on your slides. To remove the slide numbers, simply uncheck the corresponding box.
Step 4: Apply to All
Click “Apply to All” to remove numbers from all slides.
After unchecking the “Slide number” box, don’t just close the dialog box. Make sure to click “Apply to All” to ensure that slide numbers are removed from every slide in your presentation, not just the one you’re currently working on.
After you complete these actions, you will see that the numbers that used to appear on the bottom right corner of your slides disappear. Your slides will look cleaner and more professional, allowing your audience to focus on the content of your presentation, not the slide numbers.
Tips: Making the Most of Your PowerPoint 2019 Presentation
- Always preview your presentation after making changes to ensure everything looks as intended.
- If you want to remove slide numbers from only a few slides, simply select those slides before performing the steps.
- Remember that removing slide numbers does not affect your ability to navigate the slides during a presentation.
- Consider if your presentation really needs slide numbers–sometimes they can be helpful for reference during Q&A sessions.
- Keep in mind that any changes you make to slide numbers will not affect any other footer elements like date or footer text.
Frequently Asked Questions
How do i add slide numbers back if i change my mind.
To add slide numbers back, simply follow the steps in reverse: click on “Slide Number” and then check the “Slide number” box.
Can I remove slide numbers from just the title slide?
Yes, in the “Header and Footer” dialog box, you will find an option to “Don’t show on title slide.” Check this box to remove numbers from the title slide only.
Will removing slide numbers affect the total number of slides?
No, removing slide numbers does not affect the total number of slides in your presentation. It only removes the visible numbers on the slides.
Can I customize the format of the slide numbers?
Yes, you can customize the format before you remove them by selecting the slide numbers and using the “Format” options.
What if the “Slide Number” option is greyed out?
If the “Slide Number” option is greyed out, it could be because you’re in a view that doesn’t support editing. Try switching to “Normal” view.
- Open the “Insert” Tab
- Click on “Slide Number”
- Uncheck “Slide number”
- Apply to All
There you have it, a step-by-step guide on how to remove slide numbers in PowerPoint 2019. Whether you’re fine-tuning your presentation for a big meeting or just tidying up some slides for a class project, getting rid of those numbers can make your slides look cleaner and more professional. With this knowledge, you can now tailor your presentations to suit your audience and content without unnecessary distractions.
Remember, PowerPoint is a powerful tool that offers a lot of customization options. It’s always worth exploring these options to make your presentations stand out. Keep practicing, keep experimenting, and before long, you’ll be a PowerPoint pro!
If you’re looking to learn more about PowerPoint 2019 or need further assistance with other features, plenty of resources are available online. Don’t be afraid to search for tutorials or ask for help. After all, the best way to learn is by doing, and the more you use PowerPoint, the more skilled you’ll become.
So, go ahead and give your presentations that extra polish by removing those slide numbers. Who knows, it might just be the small detail that makes a big impression!

Matt Jacobs has been working as an IT consultant for small businesses since receiving his Master’s degree in 2003. While he still does some consulting work, his primary focus now is on creating technology support content for SupportYourTech.com.
His work can be found on many websites and focuses on topics such as Microsoft Office, Apple devices, Android devices, Photoshop, and more.
Share this:
- Click to share on Twitter (Opens in new window)
- Click to share on Facebook (Opens in new window)
Related Posts
- How to Remove Page Number from First Page of Google Docs and Google Sheets
- How to Add a Footer in Powerpoint 2016: A Step-by-Step Guide
- How to Rotate a Powerpoint Slide Presentation
- How to Add Page Numbers in Powerpoint 2010: A Step-by-Step Guide
- How to Download a Google Slides Presentation as a Powerpoint File
- How to Insert a Google Slides Page Number: Step-by-Step Guide
- How to Add a Hyperlink on Google Slides
- How to Do a Powerpoint Google Slides Presentation Conversion
- How to Make Google Slides Vertical (5 Quick Steps)
- How to Delete a Slide in Powerpoint 2010: Step-by-Step Guide
- How to Add a New Slide in Google Slides: A Step-by-Step Guide
- How to Put the Worksheet Name in Excel’s Footer: A Step-by-Step Guide
- How to Hide a Slide in Powerpoint 2010: A Step-by-Step Guide
- How to Make a Powerpoint Slide Vertical in Powerpoint 2013: A Step-by-Step Guide
- How to Delete Multiple Slides in Google Slides: A Step-by-Step Guide
- How to End Powerpoint on Last Slide in Powerpoint 2010: A Step-by-Step Guide
- How to Change Slide Size in Powerpoint 2016
- How to Convert Powerpoint to Google Slides: A Tech Solution
- How to Hide Background Graphics in Powerpoint 2013: A Step-by-Step Guide
- Can You Save a Powerpoint as a Video in Powerpoint 2013? Find Out Here!
Get Our Free Newsletter
How-to guides and tech deals
You may opt out at any time. Read our Privacy Policy
- What to Know Before Buying a Smartwatch
- Are Solar Chargers Worth It?
Remove Slide Numbers From PowerPoint Slides
- Brock University
In some instances, you may wish to remove slide numbers from a PowerPoint presentation. Learn how to remove the numbers from a current presentation with these easy to follow instructions.
Instructions in this article apply to PowerPoint 2019, 2016, 2013, 2010; and PowerPoint for Microsoft 365.
Remove Slide Numbers
Save the presentation using a different file name if you wish to retain the original presentation with the slide numbers.
On the ribbon , select Insert .
In the Text section, select Slide Number . The Header and Footer dialog box opens.
Remove the checkmark next to Slide number .
Select Apply to All to remove the slide number from all slides in your presentation.
If the slide numbers were added one at a time to each slide (using a small graphic image, for example), delete the slide numbers from each individual slide.
Get the Latest Tech News Delivered Every Day
- How to Add Page Numbers in PowerPoint
- Loop a PowerPoint Slide Show
- Create Pictures From PowerPoint Slides
- How to Use PowerPoint Slide Master Layouts
- Add, Delete or Change the Order of PowerPoint Slides
- How to Print PowerPoint Slides
- How to Increase PowerPoint Slide Number Size
- PowerPoint Master Slide
- How to Print PowerPoint Slides With Notes
- How to Copy a PowerPoint Design Template to Another Presentation
- Adding Sounds, Music or Narration to PowerPoint Slide Shows
- Change the Default Font in PowerPoint Text Boxes
- How to Use the Slide Sorter View in PowerPoint
- How to Change a Black-and-White Picture to Color in PowerPoint
- Print a PowerPoint Handout in PDF Format Without a Date
Change Presentation Slide Numbering to Start From 0
When inserting slide numbers at the bottom of each slide of a PowerPoint presentation, it is common to remove the slide number from the Title slide. However the numbering begins from number 2 on the second slide.
If you want the slide numbering to start from number 1 on the second slide. You first need to remove the slide number from the Title slide, and then set the presentation slide numbering from 0.
Remove Slide Numbering from the Title Slide
To remove slide numbering from the Title slide of a presentation;
Start the Slide Numbering from 0
Reader interactions, leave a reply cancel reply.
Your email address will not be published. Required fields are marked *
Useful Links
Course topics, join our mailing list.
The Tech Edvocate
- Advertisement
- Home Page Five (No Sidebar)
- Home Page Four
- Home Page Three
- Home Page Two
- Icons [No Sidebar]
- Left Sidbear Page
- Lynch Educational Consulting
- My Speaking Page
- Newsletter Sign Up Confirmation
- Newsletter Unsubscription
- Page Example
- Privacy Policy
- Protected Content
- Request a Product Review
- Shortcodes Examples
- Terms and Conditions
- The Edvocate
- The Tech Edvocate Product Guide
- Write For Us
- Dr. Lynch’s Personal Website
- The Edvocate Podcast
- Assistive Technology
- Child Development Tech
- Early Childhood & K-12 EdTech
- EdTech Futures
- EdTech News
- EdTech Policy & Reform
- EdTech Startups & Businesses
- Higher Education EdTech
- Online Learning & eLearning
- Parent & Family Tech
- Personalized Learning
- Product Reviews
- Tech Edvocate Awards
- School Ratings
Teach Vocabulary Effectively: Everything You Need to Know
Gopro hero12 bundle, holy stone hs175d drone, digital picture frame, nintendo switch, meta quest 3 (128gb), adult electric scooter, great question (yc w21) is hiring senior rails engineers in australia, this ai chatbot will answer all your climate change questions, nypd nixing slogan on new patrol cars for crime-focused motto, how to add or remove slide numbers in powerpoint.

PowerPoint presentations are an essential tool for students, teachers, business professionals and anyone who needs to present information in an organized and visually appealing manner. Adding slide numbers is an important feature that helps the presenter and the audience to keep track of the progress of the presentation. In this article, we will explain how to add or remove slide numbers in PowerPoint.
How to Add Slide Numbers in PowerPoint
1. Open your PowerPoint presentation.
2. Click on the Insert tab located on the top menu bar.
3. Click on the Slide Number option.
4. A dialog box will appear with different options. You can choose to add slide numbers to all slides or to selected slides.
5. Once you have selected the option, click on the Apply or Apply to Selected Slides button.
6. The selected slides will now have slide numbers added to them.
How to Remove Slide Numbers in PowerPoint If you have previously added slide numbers to your presentation and now want to remove them, follow these simple steps:
4. A dialog box will appear with different options. You can choose to remove slide numbers from all slides or from selected slides.
6. The selected slides will now have the slide numbers removed.
Adding slide numbers to your PowerPoint presentation is simple and easy. It helps the presenter and the audience to keep track of the progress of the presentation. If you want to add or remove slide numbers, just follow the steps above, and you will be able to do it easily. Remember to make sure that your presentation is well-organized and visually appealing and use tools like slide numbers to make your presentation even better.
How to Safely Uninstall VirtualBox from a ...
How to fix the no camera attached ....

Matthew Lynch
Related articles more from author.

How to Shut Down a Raspberry Pi Remotely

How to Get a Microsoft Store Student Discount

Assistive Technology to Help Students with Cerebral Palsy Succeed Academically
How to Send GIFs on iPhone

How to Upload Videos on Twitch

How to Select All of the Same Color in Photoshop
How to Remove Slide Numbers in PowerPoint Slide

In my previous article about adding a slide number to PowerPoint slides , I mentioned that each number can only be edited individually — meaning that if you want to remove all of them, you have to clean it manually.
Here’s how to remove slide numbers easily!
3. Select Slide Number .
However, if you only click the “Apply” button on the #4 step, it only a slide number on the current slide. It may be useful on the slide you want it to clean from a slide number.
About The Author
Related posts, powerpoint 2016: printing, how to highlight your presentations in powerpoint, how to make your powerpoint presentations compelling and memorable, how to enlarge a picture when clicked on powerpoint.

Remove a background graphic or watermark from your slides in PowerPoint for Mac
Here's how to remove the picture background or watermark from your slides.
On the View menu, select Master > Slide Master .
In the thumbnail pane on the left, click any slide layouts that have the picture watermark you want to remove.
On the Slide Master tab, click Background Styles .

Click Format Background .

In the Format Background pane, under Fill , click Solid Fill .
Click the Color button and select white, or any other color you like.

If you want to remove the background from all slides, click Apply to All .
Add background graphics or transparent pictures (watermarks) to your slides in PowerPoint for Mac

Need more help?
Want more options.
Explore subscription benefits, browse training courses, learn how to secure your device, and more.

Microsoft 365 subscription benefits

Microsoft 365 training

Microsoft security

Accessibility center
Communities help you ask and answer questions, give feedback, and hear from experts with rich knowledge.

Ask the Microsoft Community

Microsoft Tech Community

Windows Insiders
Microsoft 365 Insiders
Was this information helpful?
Thank you for your feedback.
IMAGES
VIDEO
COMMENTS
On the Insert tab, in the Text group, click Header & Footer. In the Header and Footer dialog box, click the Slide tab. Do one of the following: To number the slide that you currently have selected, select the Slide number check box, and then click Apply. Repeat this step for each individual slide that you want to number. To number all slides ...
Remove Slide Number from One or All Slides. First, open the PowerPoint presentation that contains the slide numbers you want to remove. The slide number appears in the top-left corner of its respective slide. Next, head over to the "Text" group of the "Insert" tab and select "Slide Number." Once selected, the "Header and Footer ...
1. Open the 'Slide Size' dropdown menu. 2. From the 'Slide Size' menu, select 'custom slide size'. Set PowerPoint Slide Number from Slide Size menu. 3. At the bottom of the 'custom slide size' dialogue box you will see the 'Number slides from:' dropdown box. Change Slide Numbering to start from 0 or another number. 4.
Select the slide in question. In this case, we'll use slide 2. Click Insert and then click Header & Footer in the Text group. In the resulting dialog, uncheck the Slide Number option. Click ...
In PowerPoint you can add or remove automatic slide numbers, hide numbering on the title slide, and move slide numbers. You can also add the date and time to slides. If you'd like to suggest improvements to the slide numbering feature, you can do that by clicking Help > Feedback > I have a suggestion. Select a heading below to open it and see ...
In reply to Kobi Aflalo's post on March 23, 2015. You can get the same effect as a -1 page number by creating your first slide in a separate presentation, then using an action button to link to the first slide 0 of your main presentation. Here's a link that tells you how to do the linking: Create a Link to Another Presentation.
Here, if you would like to remove the numbers from an individual slide, select slide in the presentation, then select 'Apply'. To remove the numbers from all the slides, select 'Apply to All'.
Open the PowerPoint presentation in question. Click on the Insert tab in the ribbon area. Click on Header and Footer . On the Header and Footer dialog box, uncheck the Slide number box. Now click on Apply to All . You can add, format, and remove PowerPoint slide numbers across all platforms, including online and mobile.
Step 3: Uncheck "Slide number". In the "Header and Footer" dialog box, uncheck the box next to "Slide number.". A dialog box will pop up when you click "Slide Number.". This is where you can control various options for headers and footers on your slides. To remove the slide numbers, simply uncheck the corresponding box.
On the ribbon, select Insert . In the Text section, select Slide Number. The Header and Footer dialog box opens. Remove the checkmark next to Slide number . Select Apply to All to remove the slide number from all slides in your presentation. If the slide numbers were added one at a time to each slide (using a small graphic image, for example ...
Removing slide numbers in PowerPoint only takes a few clicks: Open the PowerPoint file with the slides you want to edit. Click the Design tab at the top of the window. Click Slide Number in the Footer section of the Design tab. Slide Number button. When the drop-down menu appears, select (none) to remove slide numbers.
Select the slide in question. In this case, we'll use slide 2. Click Insert and then click Header & Footer in the Text group. In the resulting dialog, uncheck the Slide Number option. Click Apply to disable numbering for only the selected slide, the second slide. This simple presentation has four slides.
Setting the presentation slide numbering from 0 ensures that slide 2 is numbered as slide number 1. Click the Design tab on the Ribbon. Click the Page Setup button. Set the Number slides from: box to 0. Set slide numbering in PowerPoint to start from 0. This means that slide number 2 (first non title slide) becomes slide number 1.
Click on the Insert tab located on the top menu bar. 3. Click on the Slide Number option. 4. A dialog box will appear with different options. You can choose to remove slide numbers from all slides or from selected slides. 5. Once you have selected the option, click on the Apply or Apply to Selected Slides button. 6.
This will open up the Header and Footer dialog box. 3. Uncheck the Slide Number Box. In the dialog box, click on the "Slide" tab. Uncheck the box next to "Slide number" to remove slide numbers. Uncheck slide number. 4. Apply to All or Selected Slides. You now have two options: Click "Apply" to remove the slide number from only the ...
Replied on February 5, 2011. Report abuse. Design tab >> page set up >> Number slides from. zero is an option, usually used to omit number on Title slide. Microsoft® MVP PowerPoint® since 2007. Web Page: PowerPoint Alchemy Hints and Tips. www.pptalchemy.co.uk.
Launch the PowerPoint file that you want to remove its slide numbers. 2. Go to the Insert menu. 3. Select Slide Number. 4. Uncheck Slide number, then Apply to All. 5. The slide numbers are gone now.
In PowerPoint, go to File - Options. On the left, choose Advanced and on the right, go to the Print section. Clear the option 'Print slide numbers on handouts' and click OK. Or. In PowerPoint, on the View Ribbon, choose Handout Master, see if you can remove those numbers form there . . .
On the View menu, select Master > Slide Master. In the thumbnail pane on the left, click any slide layouts that have the picture watermark you want to remove. On the Slide Master tab, click Background Styles. Click Format Background. In the Format Background pane, under Fill, click Solid Fill. Click the Color button and select white, or any ...
In reply to ofirperez's post on January 21, 2019. "I'm here to help you!" That actually won't help at all. Instead try: File > Options. In the Advanced Tab scroll down to the PRINT section and untick 'Show Slide Numbers on Handouts'. www.pptalchemy.co.uk.
Like Microsoft PowerPoint, Google Slides lets users create text boxes in presentations. You can easily remove them from your laptop or phone as well.
PowerPoint - Remove Slide Numbers Hi All . When I go to print a PP presentation as handouts, the slide numbers show up under the slides to the left. ... (0) Report abuse Report abuse. Type of abuse Harassment is any behavior intended to disturb or upset a person or group of people. Threats include any threat of violence, or harm to another. ...
Some support posts report that there should be a checkbox under File > Options > Advanced > Print. That options is not there for me, as the screen capture below shows. Other support posts direct one to the Print Layout dropdown under File > Print. However, the option to disable slide numbers is, again, not there. This problem appeared suddenly.
Namely, mass deleting Slide Masters. THE MORE EFFICIENT OPTION. The most efficient way I know to do it is to ensure all slides share the same design template. I did this by going to the Design tab, and then one by one verifying each slide shared the same template. Or, you could simply select all slides by using "Shift + A" on your keyboard, and ...
formatting: PowerPoint.InsertSlideFormatting.useDestinationTheme, }); await context.sync(); }); Here "selectedSlideID" is the unique id of the slide after which this slide needs to be inserted. When I am inserting, say, 3 slides using this method and then press undo button (or Ctrl +Z) all 3 slides disappear together.