How-To Geek
How to fix a "dns server is not responding" error on windows.

Your changes have been saved
Email Is sent
Please verify your email address.
You’ve reached your account maximum for followed topics.

How You Can Restore the Windows 10 File Explorer in Windows 11
6 lesser-known built-in windows features you should use, my windows laptop was a battery hog until i made these changes, quick links, why do you get a "dns server not responding" error, fixes for a dns server not responding error on windows, key takeaways.
To resolve DNS issues on Windows, try opening your site in a different web browser, restarting your router, disabling your VPN, or running the "Internet Connections" troubleshooter. Other options include deleting your DNS cache, trying another device on the same network or another DNS server, updating your network adapter drivers, turning off your antivirus or IPv6, deactivating other network adapters, and booting your PC in safe mode.
DNS servers' unavailability causes your Windows PC to display a "DNS Server Is Not Responding" error. Various items can cause your DNS servers not to work. Luckily, it's easy to fix many of those items and resolve your problem. Here's how to do just that.
A "DNS server not responding" error appears when the server your device uses to resolve domain names is down or otherwise can't be reached. If that's confusing, let's review the function of a DNS server.
When you type in a domain name in your PC's web browser, your web browser asks your DNS server to translate your domain name to an IP address . Your browser then uses this IP address to locate your site on the internet and let you access its contents.
Related: What Is DNS, and Should I Use Another DNS Server?
When your DNS server is down or is experiencing an issue, your web browser can't retrieve your site's IP address , resulting in an error message. Many problems can cause your DNS servers to go down, and other issues could simply prevent your PC from connecting to your specific DNS servers.
Some of those potential problems are a malfunctioning router, a faulty web browser, an incompatible VPN app, a corrupt DNS cache, and more.
Related: How Do IP Addresses Work?
To resolve your Windows DNS error and access your sites, use the methods below that fix the underlying items causing the problem. Once you've resolved the issues, your DNS error will be gone, and the sites you're trying to reach will open just as they should.
Use a Different Web Browser
When you encounter a DNS issue in a web browser, the first thing to do is try accessing your site in another web browser . This helps you find out if your issue is device-specific or browser-specific.
To do that, launch a different web browser on your PC and try to access your site. If your site loads in this browser, your previous browser likely had issues. In this case, apply some fixes like clearing your previous browser's cache ( Chrome , Firefox , Edge ), turning off your browser's extensions ( Chrome , Firefox , Edge ), and resetting your web browser ( Chrome , Firefox , Edge ).
If you get the same error in your other browser, read on to discover more fixes.
Related: Why You Should Use Multiple Web Browsers
Reboot Your Router
Your router may be acting up, causing your PC not to reach your DNS servers. In this case, give your router a reboot to possibly fix your issue .
You can restart most routers by pressing the Power button on them. If yours hasn't got a Power button, unplug it from the power socket to turn the router off and (after at least 10 seconds) back on. Then, launch your web browser and try to access your site.
Related: Why Rebooting Your Router Fixes So Many Problems (and Why You Have to Wait 10 Seconds)
Turn Off Your VPN
Your VPN app transmits your data via a third-party server, letting you bypass your ISP's restrictions. Sometimes, this mechanism causes issues with your DNS servers, leading to errors like the one you're experiencing.
To verify that, turn off your VPN service and see if your site loads. If it does, reach out to your VPN provider to seek a permanent solution.
Use the Internet Connections Troubleshooter
Windows has many troubleshooters to help you fix issues with your PC's various components. When you have trouble connecting to the internet , use your PC's Internet Connections troubleshooter to find and fix all the faults with your connection.
To run the troubleshooter on Windows 11, navigate to Settings > System > Troubleshoot > Other Troubleshooters. On the open page, next to "Internet Connections," click "Run."

If you're on Windows 10, head into Settings > Update & Security > Troubleshoot > Additional Troubleshooters. Click "Internet Connections" and choose "Run the Troubleshooter."

Follow the troubleshooter's instructions to detect and resolve your DNS issues.
Related: Internet Connection Not Working? 10 Troubleshooting Tips
Flush Your DNS Cache
Windows caches your DNS queries to help you quickly translate domain names to IP addresses. It's possible this cache has become corrupted, causing issues with your web browsers.
In this case, clear your bad DNS cache , and your issue will be resolved. Note that you don't lose any personal data when you do this.
To start, open the "Start" menu, find "Command Prompt", and launch the utility. In the Command Prompt window, type the following command and press Enter:
ipconfig /flushdns

Windows will clear your current DNS cache, and you're all set.
Use Another Device on the Same Network
To ensure your router configuration isn't the cause of the issue, use another device on your network and see if you can access your site on it. You can use any of your devices to do this, including iPhone, Android, Windows, Mac, Linux, Chromebook, or any other machines.
Related: How to See Your Wi-Fi Password on Windows 11
If your site fails to load on your other device and you get the same DNS error, your router likely has an issue. In this case, speak to your internet service provider (ISP) for help. Another thing you can do is reset your router to the default settings , but you'll need your ISP's configuration to re-configure your router and make it work with your current internet company.
In case your site opens just fine on your other device, your Windows PC has a problem. In this case, read on to learn more fixes.
Change Your PC's DNS Servers
If your DNS servers are down or are experiencing technical glitches, that may be why you can't access sites on your PC. In this case, change the current DNS servers on your PC to fix your issue.
We've already written guides on how to change your DNS servers on Windows 11 and Windows 10 , so check them out to learn how to perform the procedure.
Update Your Network Adapter Drivers
Your network adapter drivers tell your physical adapter how to communicate with your PC. If these drivers are outdated or corrupted, that may be why Windows displays a DNS error message.
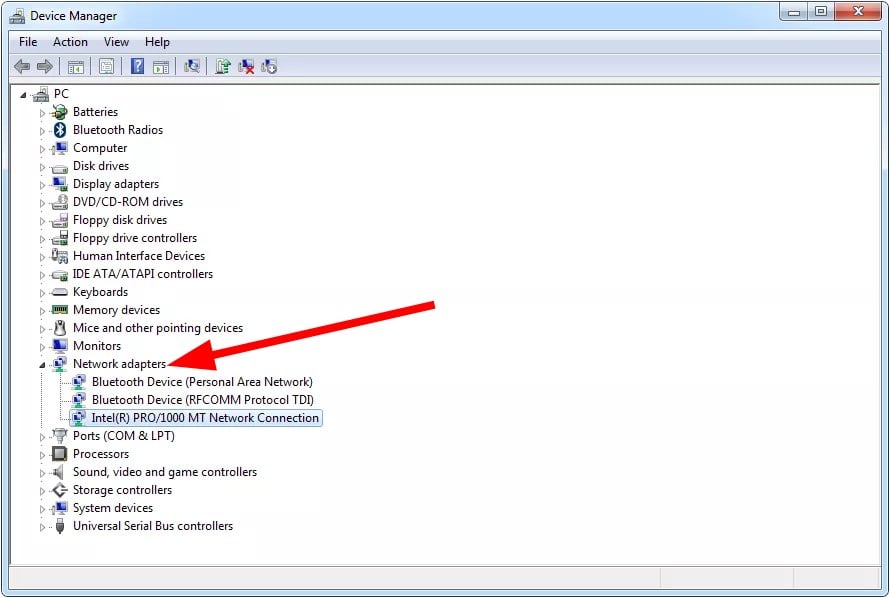
In this case, resolve your issue by updating your drivers . Do this by first right-clicking the "Start" menu and choosing "Device Manager."
Then, expand "Network Adapters," right-click your adapter, and choose "Update Driver."

Select "Search Automatically for Drivers" and download and install the available drivers.

Restart your PC, and try to access your site.
Related: How to Update Drivers on Windows 11
Temporarily Disable Your Antivirus
Your PC's antivirus program may be interfering with your browsing sessions, causing your browsers to display a DNS error message. Usually, this happens when your antivirus detects a potential threat in your browsers.
If you trust your site and your DNS servers, temporarily turn off your antivirus protection to see if you can then load your site. Check out our guide on how to turn off Microsoft Defender Antivirus to learn how to do that.
Make sure to turn real-time protection back on when you've checked your site.
Turn Off IPv6 on Your PC
IPv6 is the latest Internet Protocol version, which aims to fix many IP-related issues on your devices. Sometimes, when this protocol version is enabled, you can get errors like a DNS server not responding.
To fix that, disable IPv6 on your PC, and your issue will be resolved.
To turn off IPv6, head into Control Panel > Network and Internet > Network and Sharing Center > Change Adapter Settings. Right-click your adapter and choose "Properties." Disable "Internet Protocol Version 6 (TCP/IPv6)" and click "OK."

And that's it.
Related: Are You Using IPv6 Yet? Should You Even Care?
Disable Other Network Connections
Your computer might have other network connections, causing an issue with your DNS queries. If you don't use those other adapters, it's a good idea to turn them off to potentially resolve your problem.
To do that, navigate to Control Panel > Network and Internet > Network and Sharing Center. Find an unused adapter, right-click it, and choose "Disable."

Repeat the above step for each unused adapter to disable it on your PC.
Reboot Your PC in Safe Mode
With Windows' safe mode, you can turn on your computer by only loading the essential files. This helps you find out if a third-party app installed on your PC is causing the problem. And if that's the case, you can remove that app from your PC.
Check out our guide on how to use Windows' safe mode . When in safe mode, if your web browser can open your site without the DNS error message, your third-party apps are likely the culprit.
You can start fixing the issue by removing your recently installed apps . Feel free to uninstall any app that you think might be the cause of the issue.
And that's how you resolve a "DNS Server Is Not Responding" error on a Windows 11 or Windows 10 PC. Enjoy browsing your favorite sites!
Related: How to Fix "This Site Can't Be Reached" ERR_ADDRESS_UNREACHABLE in Chrome
- Troubleshooting Guides
- Common Errors
- Tech Tutorials
- Apps & Programs
- About our team & mission
DNS Server Not Responding in Windows 7: How to Fix it
Try changing the DNS server manually or updating the network drivers
updated on October 4, 2023
Share this article
Improve this guide
Read our disclosure page to find out how can you help Windows Report sustain the editorial team Read more
- DNS server issues can be pretty frustrating as they will prevent you from accessing the internet. They have been reported by several Windows 7 users.
- You can try clearing the DNS cache or switching to a different browser and see if this resolves the problem or not.
The DNS server ensures that you are able to connect to the internet and surf through it. Sadly, there have been multiple user reports regarding DNS server issues on Windows 10 .
So much so that this issue has also troubled Windows 7 users in the past. Users have been complaining about the DNS server not responding in Windows 7 error. This guide will give you a bunch of solutions that will help you resolve the problem quickly.
What causes the DNS server not to respond in Windows 7?
Here are a few reasons that could trigger the DNS server not responding in Windows 7:
- Misconfigured DNS settings : If the DNS settings are misconfigured then your browser will have a hard time connecting to the internet.
- Outdated network driver : Outdated drivers often cause multiple issues and conflict with the smooth performance of the PC.
- DNS Cache : The presence of unwanted DNS cache can also trigger multiple issues, such as the one at hand.
- Problem with your internet connection : You should ensure that the internet that you are connected to is working and there are no issues with it.
- Your browser is at fault : Often due to a bug or glitch the browser may misbehave and throw up errors like the DNS server not responding in Windows 7.
How can I fix the DNS server not responding in Windows 7 error?
Before jumping to the advanced solutions, let us first go through a bunch of preliminary solutions that could help you fix the problem:
- Try restarting your PC . There might be a temporary glitch that is causing the problem.
- Restart your modem or router . This will ensure that the router starts from scratch and connects to the server without any issues.
- Install all the latest Windows updates as this could very well be because of a bug on the earlier version of Windows update.
1. Change the DNS server manually
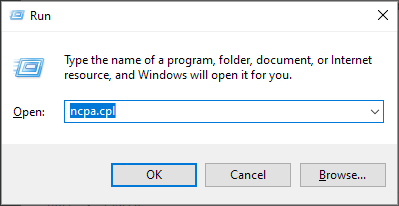
- Press Windows + R to open the Run dialogue.
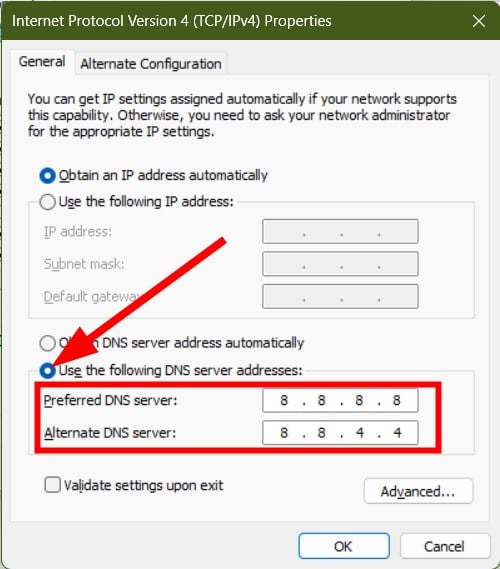
- Click on Use the following DNS server addresses option.
- Alternatively, you can also use 208.67.222.222 as Preferred and 208.67.220.220 as the Alternate DNS server .
- Click OK .
2. Clear DNS cache
- Press the Windows button to open the Start menu.
- Close the command prompt and check if this resolves the issue or not.
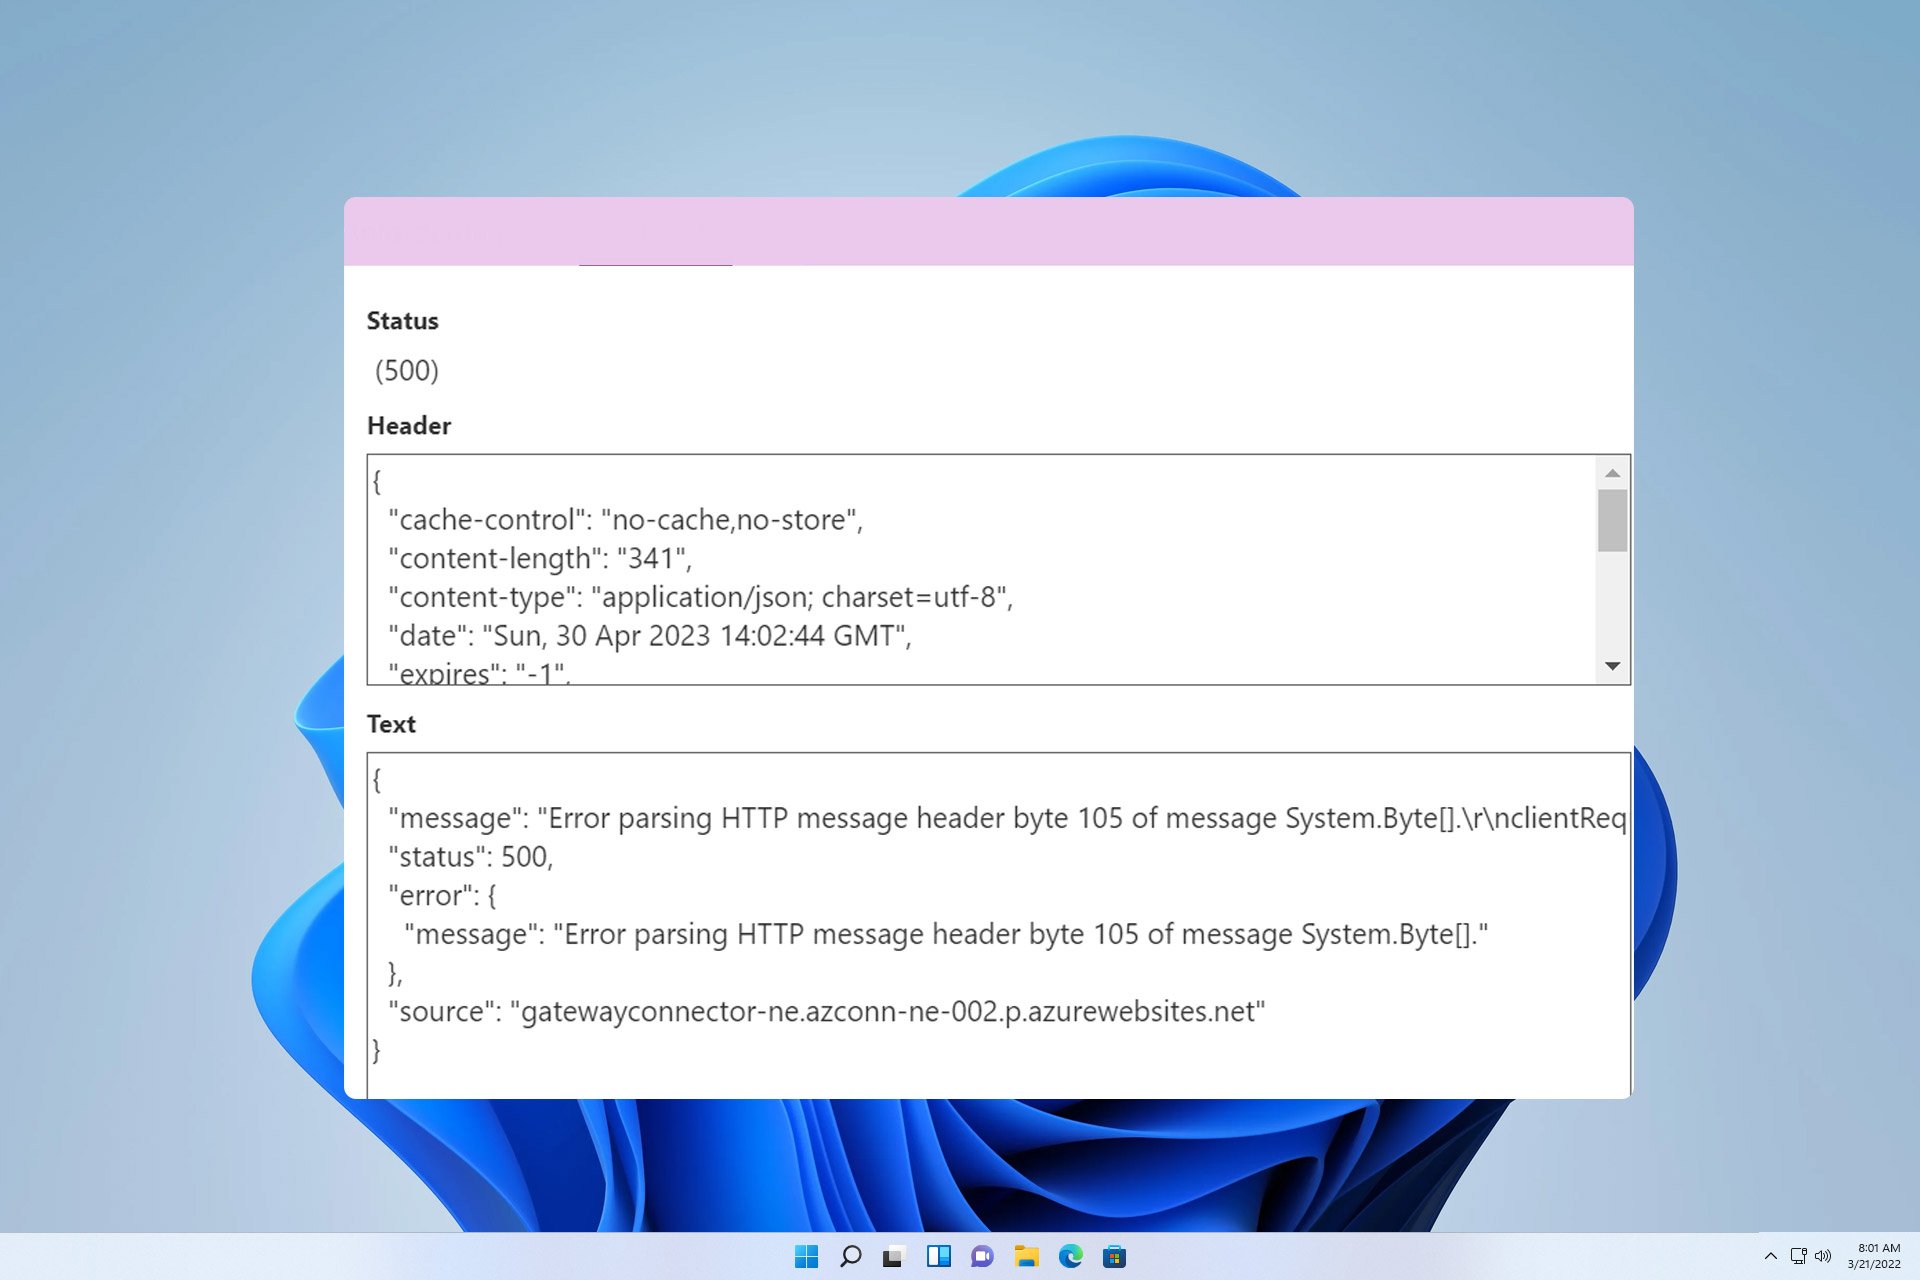
- Error Parsing HTTP Request Header: 3 Ways You Can Fix it
- El Capitan supercomputer blade showcased, comes with eight AMD MI300A APUs
3. Update network drivers
- Press the Windows key and open the Start menu.
- Type Device Manager and open it.
- Your system will check if there is a new update available and install it if it finds one.
Updated drivers not only bring new features on board but also get rid of the bugs and glitches present in the version that is currently installed on your PC.
While you can manually update the driver following the above steps, you can ease the process by using a dedicated driver updater tool. For this purpose, we recommend you use Outbyte Driver Updater .
Outbyte Driver Updater not only updates your drivers but can automatically scan for all of your drivers and update them for you. It can create driver backups, fix system-related issues, schedule scans, and much more.

Outbyte Driver Updater
4. perform network reset.
5. Run the Network Troubleshooter
- Open the Start menu by pressing the Windows key.
- Open Control Panel .
- Check Apply repairs automatically .
- Click Next .
- Select Troubleshoot my connection to the Internet .
- Your system will begin the diagnosis and will prompt you to perform steps to resolve the issue.
6. Use a different browser
Often the DNS server is not responding in Windows 7 error is associated with the browser itself. Because of some glitch or bug in the browser, it may throw up unnecessary errors.
In such a case, we would suggest you switch to a different browser and check if the problem exists there as well or not.
If you are confused about which browser to download, then we have a guide that gives a list of some of the best browsers that you can install on your Windows 7 PC .
Let us know in the comments below which one of the above solutions fixed the DNS server not responding issue.
More about the topics: server

Sagar is a web developer and technology journalist. Currently associated with WindowsReport and SamMobile. When not writing, he is either at the gym sweating it out or playing country music on his guitar. He is an avid traveler and has been to 15 countries, going to more places soon. TRAVEL and WORK is his mantra for a peaceful life.
Was this page helpful?
Let us know if you managed to solve your tech problem reading this article.
We’re happy to hear that!
You can subscribe to our newsletter to stay up to date with the latest news and best deals!
Do you have a suggestion?
We know how frustrating could be to look for an universal solution.
If you have an error which is not present in the article, or if you know a better solution , please help us to improve this guide.
- PRO Courses Guides New Tech Help Pro Expert Videos About wikiHow Pro Upgrade Sign In
- EDIT Edit this Article
- EXPLORE Tech Help Pro About Us Random Article Quizzes Request a New Article Community Dashboard This Or That Game Popular Categories Arts and Entertainment Artwork Books Movies Computers and Electronics Computers Phone Skills Technology Hacks Health Men's Health Mental Health Women's Health Relationships Dating Love Relationship Issues Hobbies and Crafts Crafts Drawing Games Education & Communication Communication Skills Personal Development Studying Personal Care and Style Fashion Hair Care Personal Hygiene Youth Personal Care School Stuff Dating All Categories Arts and Entertainment Finance and Business Home and Garden Relationship Quizzes Cars & Other Vehicles Food and Entertaining Personal Care and Style Sports and Fitness Computers and Electronics Health Pets and Animals Travel Education & Communication Hobbies and Crafts Philosophy and Religion Work World Family Life Holidays and Traditions Relationships Youth
- Browse Articles
- Learn Something New
- Quizzes Hot
- Happiness Hub
- This Or That Game
- Train Your Brain
- Explore More
- Support wikiHow
- About wikiHow
- Log in / Sign up
DNS Server Isn't Responding? Easy Troubleshooting & Fixes
Last Updated: June 24, 2024 Fact Checked
Troubleshooting
Changing your dns servers.
This article was co-authored by Luigi Oppido and by wikiHow staff writer, Nicole Levine, MFA . Luigi Oppido is the Owner and Operator of Pleasure Point Computers in Santa Cruz, California. Luigi has over 25 years of experience in general computer repair, data recovery, virus removal, and upgrades. He is also the host of the Computer Man Show! broadcasted on KSQD covering central California for over two years. This article has been fact-checked, ensuring the accuracy of any cited facts and confirming the authority of its sources. This article has been viewed 5,613,494 times.
Are you getting "DNS not responding" or "DNS server might be unavailable" errors? These errors occur when your device can't turn hostnames and domains into IP addresses . Although DNS server errors are frustrating and will keep you from browsing the web, we're here to help! Read on to learn how to fix DNS Not Responding problems on your computer for good.
DNS Server Not Responding: What It Means & How to Fix It
DNS server errors occur when your device can't turn domain names into IP addresses. There could be a problem with your DNS cache, internet connection, VPN, or the DNS servers themselves. You can stop the error by restarting your network, clearing your browser and computer's DNS caches, or changing your DNS servers.

- Go to Start > Settings > Network & Internet > Status .
- Click Network troubleshooter under "Change your network settings."
- Follow the steps in the troubleshooter. [1] X Trustworthy Source Microsoft Support Technical support and product information from Microsoft. Go to source
- Right-click the Wi-Fi, globe, or ethernet icon at the bottom-right corner (in the system tray) and select Diagnose network problems .
- If a problem is detected, you'll see an error.
- Press and hold Option as you click the Wi-Fi status icon in the menu bar. [2] X Research source
- Click Open Wireless Diagnostics and follow the on-screen instructions.
- If you see "DNS resolution failure," the issue is DNS related. If you see a broader error like "LAN Connectivity Failure," the issue is likely your connection to the internet.

- Type or paste chrome://net-internals/#dns into the address bar at the top of your browser and press Enter or Return .
- Click Clear host cache and then restart your browser.
- If you don't see the Develop menu when Safari is open, enable it in Safari > Settings > Advanced > Show features for web developers . [3] X Research source
- Click the Develop menu and select Empty Caches .
- Restart Safari and try browsing again.

Tip: If you're having trouble with a specific website, try accessing it using mobile data. If you still can't access the site, the issue is on the site's end.

- Close your web browser and all open programs.
- Press the Windows key , type cmd , and press Enter to open Command Prompt .
- Type ipconfig /flushdns and press Enter .
- In your Launchpad, type terminal , then click Terminal in the search results.
- Type sudo killall -HUP mDNSResponder and press Return .
- Type your password when prompted to complete the flush.

- If your router and modem are two separate devices, unplug the power cords from each device. If you have one combined unit, unplug it. Wait about a minute.
- Plug the modem back in and wait 3-5 minutes. If you have a separate router, don't plug it back in yet.
- (If your modem/router is not combined into one unit): Once the modem is back up (after 3-5 minutes), plug your router back in and wait another 3-5 minutes.
- When the modem and router (or combo gateway) are back online, reconnect to Wi-Fi if your computer doesn't connect automatically, then try using the internet again.

- If you're unsure how to boot into safe mode, see our guide to booting into safe mode for Mac and Windows.

- Mac only: After about 15-20 seconds, press Ctrl + C to stop the ping.
- If you see "Request timed out" or "Destination host unreachable," there is a problem with your internet connection, not your DNS servers. See our guide to troubleshooting your internet connection .
- Now type ping dns.google and press Enter or Return .
- If you get an error like "Ping request could not find host," "Name or service not known," or "cannot resolve dns.google: Unknown host," but were able to ping 8.8.4.4, the DNS servers your computer is using are not working, but your internet is working. In this case, see this method to learn how to change your DNS servers to ones that won't give you errors.
If you still get DNS server errors after troubleshooting, and you were able to ping Google's IP address , changing your computer's DNS servers will usually fix the problem.

- Press Windows key , type control panel , and click Control Panel .
- Go to Network and Internet > Network and Sharing Center > Change adapter settings .
- Right-click your connection and select Properties .
- If you're using IPv6, select Internet Protocol Version 6 (TPC/IPv6) instead.
- If "Use the following DNS server addresses" is selected and IP addresses are listed, there's a problem with those server addresses. Before changing your DNS servers to the public Google servers, select "Obtain an IPv4/6 address automatically" first to see if that fixes the problem. If it doesn't, continue with this method.
- If using IPv6, enter 2001:4860:4860::8888 and 2001:4860:4860::8844 . [4] X Research source
- Click OK and OK again to save your changes.
- Restart your computer, and clear your browser cache once it comes back up. This should fix your DNS errors.
- If the DNS not resolving errors persist, contact your ISP.

- Open the Apple menu and go to System Settings > Network > Wi-Fi (or your network type).
- Go to Details > DNS . [5] X Research source
- If using IPv6, enter 2001:4860:4860::8888 and 2001:4860:4860::8844 .
- Remove the other DNS servers listed and click OK .
Community Q&A
- Resetting your router periodically is a good way to prevent DNS issues from happening. Thanks Helpful 0 Not Helpful 0
- After resetting your DNS cache, your computer will load websites a bit slower the first time you visit them. This is because your computer establishes and verifies a new DNS address for the site. Thanks Helpful 0 Not Helpful 0

You Might Also Like

- ↑ https://support.microsoft.com/en-us/windows/fix-wi-fi-connection-issues-in-windows-9424a1f7-6a3b-65a6-4d78-7f07eee84d2c
- ↑ https://support.apple.com/guide/mac-help/use-wireless-diagnostics-mchlf4de377f/14.0/mac/14.0
- ↑ https://support.apple.com/guide/safari/use-the-developer-tools-in-the-develop-menu-sfri20948/mac
- ↑ https://developers.google.com/speed/public-dns/docs/using
- ↑ https://support.apple.com/guide/mac-help/change-dns-settings-on-mac-mh14127/mac
About This Article

To fix a DNS server not responding problem, try reaching the site with another device like a phone, since if this works you’ll know that the issue is with your other device. Alternatively, try to visit the site using a different web browser, such as Firefox or Chrome. If this works, try uninstalling and reinstalling your original browser to solve the problem. You could also try power cycling your modem and router by disconnecting them and letting them sit for at least 30 seconds. Then, reconnect them to the power supply, wait for them to reload, and try the website again. As another option, try connecting your device to the router with an Ethernet cable, since if you can access the site via the Ethernet it shows you have a problem with your wireless router. If this is the case, reset your router to resolve the issue. For tips on how to flush the DNS cache, read on! Did this summary help you? Yes No
- Send fan mail to authors
Reader Success Stories
Apr 30, 2017
Is this article up to date?
Apr 15, 2017
Sep 10, 2018
Noel Meaney
Jan 31, 2017
Dec 9, 2016

Featured Articles

Trending Articles

Watch Articles

- Computers and Electronics
- Terms of Use
- Privacy Policy
- Do Not Sell or Share My Info
- Not Selling Info
wikiHow Tech Help:
Tech troubles got you down? We've got the tips you need
- Killer Prime Day Apple Deals Available Now!
- Are Solar Chargers Worth It?
How to Fix DNS Server Not Responding Errors
Internet connection won't work? Take a deep breath; we've got the answers
- Massachusetts Institute of Technology
- University of Illinois
:max_bytes(150000):strip_icc():format(webp)/ryanperiansquare-de5f69cde760457facb17deac949263e-180a645bf10845498a859fbbcda36d46.jpg "how to fix dns server problem in windows 7")
- Western Governors University
- Why You Can't Connect to a DNS Server
- Step-by-Step: Run Network Troubleshooter in Windows 10
- Step-by-Step: Run Network Troubleshooter in Windows 7 or 8
- Fix DNS Server Not Responding Problems
- Resolve TCP/IP and DHCP Failures
- Handle DNS Provider Problems
- Avoid Internet Blockages From Antivirus Programs
Recover or Replace a Malfunctioning Router or Modem
When you connect a device to your home network or a Wi-Fi hotspot with internet access, the internet connection may fail to work for a variety of reasons.
Instructions in this article apply to Windows 10, Windows 8, and Windows 7.
Reasons Why You Cannot Connect to a DNS Server
One class of failures are related to Domain Name System — the distributed name resolution service used by internet providers around the world. Windows 7, Windows 8.1 and Windows 10 computers may report the following error messages in the Troubleshooting Problems found window:
The device will not be able to reach the internet when these failure conditions occur. These DNS server errors may appear for any of several different reasons. Step-by-step network troubleshooting steps can be used to diagnose and repair the problem as described below.
How to Run Windows Network Troubleshooter in Windows 10
On Microsoft Windows PCs, Windows Network Diagnostics can be run to help diagnose internet connection problems. If you're not sure whether or not your computer is reporting DNS Server Not Responding errors, follow these steps:
Select Start and then choose Settings .
Select Network & Internet . The Network Status window will open.
Select Network Troubleshooter under Change Your Network Settings. Windows Network Diagnostics will open.
Follow the steps to begin and wait for the troubleshooting tests to complete. The wizard will offer customized diagnostic assessments based on the errors it thinks it finds, so each pass-through will differ for different people. Look in the Problems found section of the window for the error message to better identify potential root causes.
How to Run Windows Network Troubleshooter in Windows 7 or 8
Open the Control Panel.
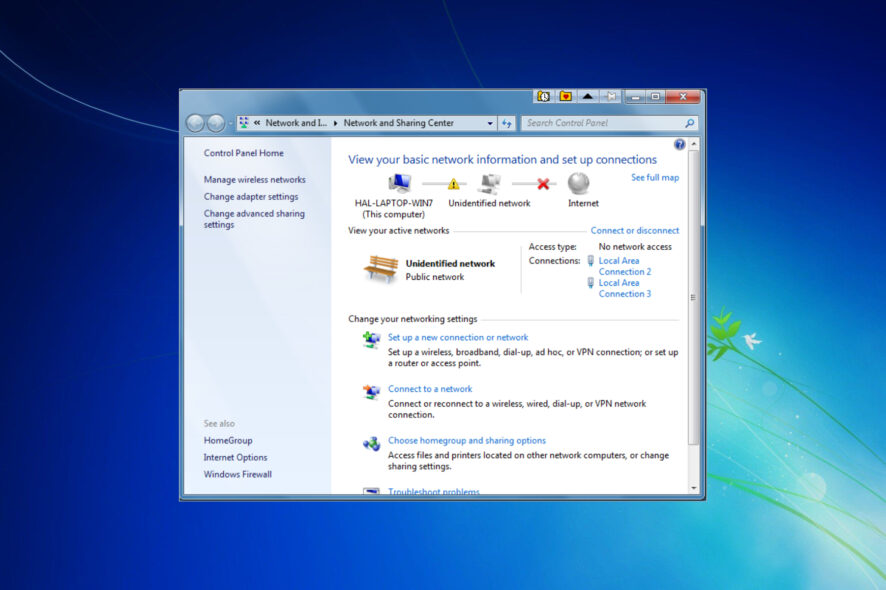
Open the Network and Sharing Center .
Click the Troubleshoot problems under Change your Networking Settings.
Click Internet Connections . A new Internet Connections window appears.
Click Next .
Click Run the Troubleshooter.
Click Troubleshoot my connection to the Internet .
Wait for the troubleshooting tests to complete and look in the Problems found section of the window for the error message.
You should be done!
How to Fix DNS Server Not Responding Problems
To properly fix these internet connection failures requires first isolating the problem down to its root cause. The sections below each cover common causes of these failures:
Misbehaving internet provider
Malfunctioning TCP/IP or DHCP services
Overly aggressive antivirus software
Malfunctioning router or modem
If not confident that your internet connection issues are truly related to DNS, try general connection troubleshooting techniques first .
Resolving TCP/IP and DHCP Failures
It’s possible for the TCP/IP software inside a client device’s operating system to malfunction and set its DNS server addresses incorrectly. Rebooting a Windows computer often clears these temporary glitches. A more elegant solution involves running TCP/IP utility programs that perform the standard procedure to release and renew the Windows IP address settings .
Similarly, most TCP/IP networks use the Dynamic Host Configuration Protocol service to assign IP addresses to clients. DHCP assigns not only the device's private IP address but also primary and secondary DNS server addresses. If DHCP is malfunctioning, a PC reboot is likely required to recover it.
Check to ensure both your device and the network router both have DHCP enabled. If either end of the connection is not using DHCP, internet connection errors normally result.
Handling DNS Provider Problems
Many people configure their home networks to automatically obtain DNS server addresses from their internet provider. When the provider's servers or network suffer an outage or are heavily loaded with traffic, their DNS services can suddenly stop working. Customers must wait until the provider fixes those problems before they can use the provider's DNS.
As an alternative to the private DNS servers supported by each provider, several providers, most notably Google and OpenDNS, offer free public DNS servers . A router administrator can switch their network's DNS setup over from a private to a public DNS configuration by manually entering the public DNS IP addresses into the router configuration settings.
DNS settings can also be applied on the Windows device itself through the Network and Sharing Center. However, this approach usually will not work as a permanent solution because devices normally obtain and override their local settings with those from the router through DHCP.
Avoiding Internet Blockages from Antivirus Programs
Antivirus programs that people install on their Windows PCs are designed to keep intruders out, but they also block internet access if they detect a misbehaving device.
Most antivirus programs work using special database files that the software vendors automatically update on a regular basis. PC users often don't realize when these install updates happen as they are triggered in the background and designed to not interrupt normal work.
Unfortunately, sometimes mistakes are made with these data updates that cause the antivirus program to believe a computer is infected when really it is a false alarm ( false positive test). These false positives can trigger Windows to suddenly start reporting DNS Server Not Responding errors.
To verify whether this is the cause for your device, temporarily disable the antivirus program and re-run the Windows Network Diagnostics. Then consult the antivirus vendor for either a new update or technical support. Although disabling antivirus does not work as a permanent solution, doing so to temporarily to troubleshoot the problem is normally (not always) safe.
A misbehaving broadband router or broadband modem can trigger these DNS error messages on home network devices. Restarting the router and modem will resolve intermittent router glitches, at least temporarily.
Routers and modems must eventually be replaced if they continue to exhibit failures. However, it is unlikely for either to fail in such a way that would cause DNS errors to be regularly generated. Failed routers and modems normally cannot power on at all or else generate errors related to the underlying network connection itself. If you connect to the router using a wired Ethernet port , try moving the Ethernet cable to use a different port instead.
Get the Latest Tech News Delivered Every Day
- How to Change DNS Servers in Windows
- How to Fix Wi-Fi Authentication Problems on Android
- How to Fix It When There's No Internet Connection
- How to Fix Amazon Error Code 1060
- 10 Ways to Fix a Wireless Adapter or Access Point Error Message
- DHCP Error: What It Is and How to Fix It
- The Best Free and Public DNS Servers (2024)
- How to Fix It When Your Wi-Fi Network Is Not Showing Up
- What to Do When Windows 11 Can't Connect to a Network
- How to Fix Netflix Error Code NW-2-5 on Any Device
- How to Connect Two Routers on a Home Network
- Is Reddit Down... Or Is It Just You?
- How to Change DNS Server Settings on Home Computer Networks
- How to Fix a YouTube Black Screen
- Is Twitch Down... Or Is It Just You?
- DNS Servers: What Are They and Why Are They Used?
Try using another web browser or device
Restart your devices, change your dns settings, flush your dns cache, update your network drivers, router, and modem, turn off your vpn and firewall, contact your isp, 8 ways to fix 'dns server not responding' errors on a mac or pc.
- You can fix a "DNS Server Not Responding" error by resetting your internet connection and computer.
- If the error keeps appearing, you can also flush your DNS cache and change the DNS settings.
- DNS errors might also come up if your ISP is having an outage.
DNS servers are like phonebooks – they help your computer find websites and load them properly. This means that if the DNS server stops responding, you won't be able to access any website or app.
Luckily, both Macs and PCs offer a few ways to fix "DNS Server Not Responding" issues. Here are eight ways to do it.
First, we need to figure out what's causing the issue: Is it your web browser, your computer, or your internet connection?
Using the same internet connection, try browsing the web using another browser. In other words, if you're using Google Chrome right now, try Microsoft Edge or Firefox instead. If the internet suddenly starts working, it means there's an issue with your original browser. Try clearing the cache , or uninstalling and reinstalling the app.
If it still doesn't work, try using another device. If the internet works on that device, the issue is coming from your computer. If you still run into internet problems, the issue is your connection.
Alternatively, try connecting to another internet signal on your computer. If the internet starts working, the issue is your connection; if it doesn't work, the issue is your computer.
Get closer to your internet router
It might seem too simple to be true, but a lot of DNS server issues are caused by weak internet signals. If you're too far away from the source of your internet connection – usually the router – your computer will have trouble reaching the DNS server.
Getting a stronger internet connection, either by moving closer to your internet router or removing obstructions, can solve this. You should also make sure that you're not taking up all your bandwidth by running too many websites or apps at once.
And if it's possible, consider connecting with an ethernet cable instead of Wi-Fi. Ethernet connections are way more stable than wireless ones , meaning you're much less likely to have DNS issues.
Before we delve into the more complicated troubleshooting steps, try restarting all your devices: Your computer, your router, and your modem. You'd be surprised by how many issues this can fix.
You can restart most routers and modems by unplugging them for about ten seconds, then plugging back in.
Once everything is running again, open a web browser and head to a website. There's a good chance that things will work now.
A lot of internet issues can be fixed by changing the DNS settings on your computer. These settings control how your computer interacts with the internet connection, and if they're not set up correctly, it can cause problems.
Specifically, you'll want to make sure that the DNS server is being obtained automatically. Or if it's already automatic and you're having trouble, you'll want to set one manually.
In Windows 10 and 11
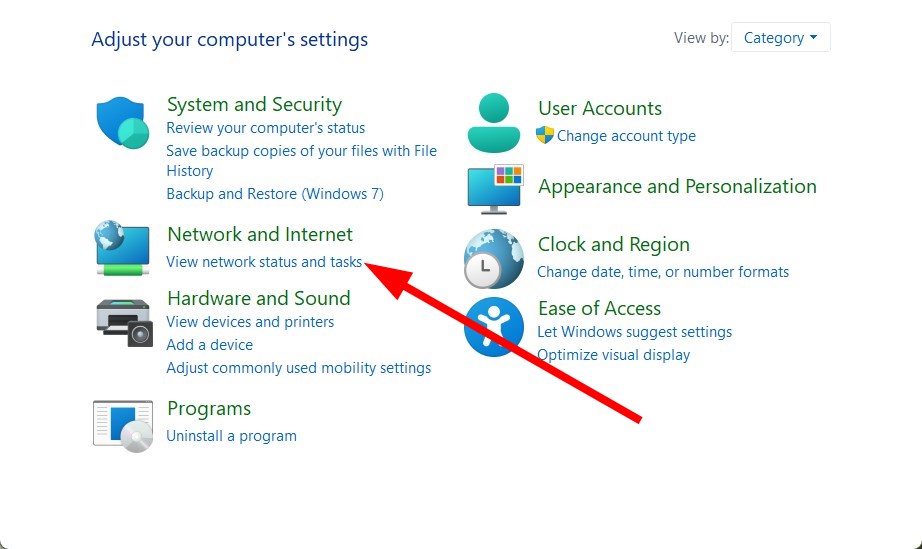
1. Open the Control Panel and click Network and Internet , then Network and Sharing Center , and then Change adapter settings .
2. Right-click on your Wi-Fi network and select Properties .
3. In the list that appears, double-click on the Internet Protocol Version 4 (TCP/IPv4) option.
You'll be given a menu that lets you set your DNS server. There are two options that let you obtain the DNS server either automatically or manually.
4. Click whatever option isn't already selected. If you're switching from automatic to manual, you'll also need to enter two DNS servers.
5. Click OK to save the changes.
See if the internet works now. If it doesn't, go back to the Properties menu and do the same steps for the Internet Protocol Version 6 (TCP/IPv6) option.
1. Open the System Preferences app and select Network .
2. Select the connection that you're trying to fix from the left sidebar, then click Advanced… in the bottom-right corner.
3. Select DNS from the tabs at the top.
4. Select the DNS Servers box and click the plus sign at the bottom, then enter a new DNS server you want to connect with.
5. Click OK to save your changes.
Most people know that every program and app has a cache, a small storage space for data that the app has loaded recently. Your DNS server has a cache too, which it uses to collect IP addresses and DNS records that you've connected with recently.
And just like other caches, letting the DNS cache get too full can cause problems. You can clear the DNS and refresh your IP address through the Command Prompt and Terminal apps.
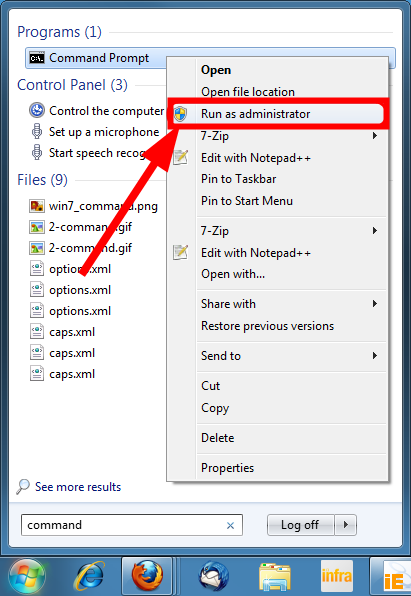
1. Search your computer for "Command Prompt." When it appears in the results, right-click it and select Run as administrator .
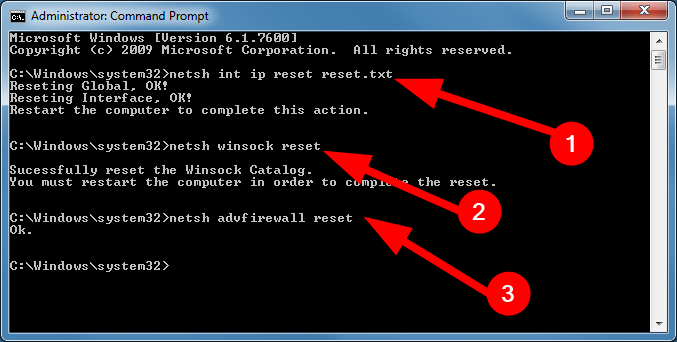
2. In the Command Prompt window, type and submit these five commands in order. Type one of them, press Enter , and then wait a few moments before typing the next.
- netsh winsock reset
- netsh int ip reset
- ipconfig /release
- ipconfig /renew
- ipconfig /flushdns
3. Restart your computer.
1. Search your computer for "Terminal" and open the app when it appears.
2. Type and submit the following code, without quotes: "sudo dscacheutil -flushcache; sudo killall -HUP mDNSResponder"
3. When prompted, enter your Mac's password. It won't look like you're typing anything, but don't worry, it's just hiding your password.
4. If you don't see any sort of response — Terminal just takes the command and gives you another blank entry line — it means it worked.
Even if you've just bought all your hardware, it's a good idea to check that everything is updated. There's a chance you might be using outdated software, which can lead to bugs.
First, your drivers. These are small pieces of software that tell the computer how to function . If you're using a Mac, all your drivers will update whenever you install a full computer update . But on a Windows PC, you'll likely need to update them separately.
You can do this by opening the Device Manager app, clicking the Network adapters tab, and right-clicking on your main internet driver. You'll likely have two of them, one for Wi-Fi and one for Ethernet (usually called the "Family Controller"). When you're asked how you want to search for drivers, pick the automatic option.
If that doesn't work, check your computer manufacturer's website to see if they offer drivers of their own. These might work better than the ones that come pre-installed.
Finally, you can also try uninstalling the driver and restarting your computer. This will force the driver to restart, which can clear away some issues.
When it comes to your router and modem, every model and brand has a different updating process. But in general, you'll probably need to log into your devices' settings pages using a web browser and update from there. Check the manual or call your ISP for exact steps.
This isn't as common, but if there's something standing between your computer and the open internet — say, a VPN or firewall — you can run into DNS issues.
Every VPN has a different method for turning it off, but look for a Disconnect option in the settings. You can also open the Network settings on your computer and disable all VPNs from there.
In Windows, you can disable the default firewall by searching for Windows Defender Firewall, then selecting Turn Windows Defender Firewall on or off .
On a Mac, open the System Preferences app and select Security & Privacy . Click Firewall at the top, then select Turn Off Firewall . You might need to click the lock icon in the bottom-left corner first.
If you're using a third-party antivirus program, you might need to disable that app's firewall too.
Finally, you can pick up the phone and call your internet service provider. At the end of the day, they're the ones with total control over your internet service.
If none of these steps have worked, it might mean that your ISP is having an outage. Alternatively, they might have shut off your service due to unpaid bills, or might be throttling your connection because you hit a data cap. If you rent your internet equipment from the ISP, they can even send someone out to troubleshoot in person.
- Main content
How to fix the “DNS server not responding” error on Windows and Mac

You can’t visit a website without first accessing a Domain Name Server (DNS) . In the process, you might be met with a message such as “DNS server not responding.” This means that the decentralized naming systems responsible for turning hostnames into IP addresses failed to respond.
There are a variety of reasons these types of DNS errors can occur. Fortunately, most of them have simple resolutions. In fact, fixing the issue could be as easy as restarting your computer or changing web browsers.
This post explains what the “DNS server not responding” message means and some common causes for it. It then walks you through several solutions for how to fix it, both on Windows and macOS devices.
Let’s get started!
What does “DNS server not responding” mean?
A DNS is a naming system that takes alphanumeric domain names (or “hostnames”) and turns them into numeric IP addresses. Essentially, DNS servers act as translators .
When you input a web address into your browser , it is forwarded to a DNS server from your router, where it’s then dissolved and returned as an IP address. However, if the DNS server is unable to properly complete this name resolution process, the end result is usually a message indicating that the DNS server is not responding.
“DNS server not responding” means that your browser was unable to establish a connection to the internet. Typically, DNS errors are caused by problems on the user end, whether that’s with a network or internet connection, misconfigured DNS settings, or an outdated browser. They can also be attributed to a temporary server outage that renders the DNS unavailable.
Therefore, it’s possible that you might be able to resolve the problem simply by switching browsers. In other cases, you may need to disable connections, change DNS servers, or flush the DNS cache.
How to fix the “DNS server not responding” error in Windows and macOS (11 methods)
Now that you understand what this message means and are familiar with some potential causes, it’s time to get to work resolving it. Let’s take a look at eleven potential ways you can fix the error on Windows and Mac devices.
1. Switch to a different browser
The first step is to troubleshoot the issue by testing your DNS connections. Fixing this problem might be as simple as switching or updating your web browser.
How do I switch to a different browser?
To do this, try accessing the web from a different browser. For example, if your default browser is Safari or Google Chrome, visit the desired website from Mozilla Firefox or Microsoft Edge instead.
If switching browsers works, you’ll likely need to update your default browser to the latest version or uninstall and reinstall it. However, if you still see the “DNS server not responding” error, you can rule out your browser as the source of the issue.
2. Connect with a different device
If your browser is not the problem, maybe your current device is. That is why it might be interesting to connect to a second device and access the site you’re unable to see.
How do I connect to a different device?
Grab your phone and try to access the site you’re having trouble with using the same network as before.
Still getting the “DNS server not responding” error? Then this might indicate that your router is the issue here.
Not so sure about it? Connect to the site using your mobile data. If it works, you have the answer that the problem is on your end and not on the site’s end.
3. Start your computer in safe mode
If your operating system is not functioning properly, it can result in the “DNS server not responding” error message. Therefore, you may want to try booting your Windows device in safe mode to see whether this resolves this issue.
Doing so will limit the files and resources used for running Windows, and can be an effective way to troubleshoot problems.
How do I start my computer in safe mode?
To start your Windows 10 computer in safe mode, first select the Windows button, and then hover over the Power icon:

Next, while you’re holding down the Shift key, select Restart :

In the window that appears, click on Troubleshoot > Advanced . Under Advanced options , select Start-Up Settings , followed by Restart . More options will appear. You can press 4 or 5 to Enable Safe Mode or Enable Safe Mode with Networking respectively. Your computer will then restart in safe mode.
If you’re using Windows 7 or earlier, you can restart it in safe mode by going to Power > Restart . Then, while it’s booting up, hold down the F8 key.
The process is similar on macOS devices.
While the machine is restarting and booting up, hold down the Shift key. Once the Apple logo appears, you can release it. Your device will then start in safe mode.
Once your computer is in safe mode, try to access the website again. If there doesn’t seem to be a network connection issue, the source of the problem may be a third-party software or installation, such as an antivirus application.
4. Temporarily disable your antivirus software and Firewall
If switching browsers doesn’t resolve the “DNS server not responding” error, the next step is to temporarily deactivate your firewall . Antivirus software and firewalls are critical for safeguarding your devices, but they can sometimes cause issues that interfere with network connections.
How do I temporarily disable my antivirus software and firewall?
For Windows users, you can do this by going to your control panel and navigating to Update & Security > Windows Security > Virus & Threat Protection > Manage Settings .
Mac users can find this option by navigating to System Preferences > Security & Privacy > Firewall .
Once your firewall is deactivated, try visiting the website again from your browser. If this resolved the issue, you might consider switching antivirus programs or reconfiguring the settings of your existing application. Either way, remember to reactivate your firewall once you’re done.
5. Disable secondary connections
If disabling your antivirus software or firewall didn’t do the trick, another potential solution is to disable any secondary connections available on your device. You want to make sure that only the connection you’re currently using is active.
How do I disable secondary connections?
To do this in Windows, type “Network connections” into the search box of your desktop taskbar. Next, click on View network connections :

This will bring you to the Network Connections page. Any connections you’re not currently using will have a red ( X ) next to them. Right-click on one, and then select Disable :

Repeat this for any other connections that are not currently active. When you’re done, restart your browser and try visiting the website again.
If you’re using a macOS, you can do this by clicking on the Apple icon, then navigating to System Preferences > Network . Your connections will be listed on the left side of the window.

To disconnect or disable one, select it, and then click on the ( – ) sign at the bottom of the window.
6. Disable the Windows peer-to-peer feature
If you’re using Windows, and disabling your firewall or secondary connections hasn’t resolved the “DNS server not responding” error message, there’s one more option you can try: the peer-to-peer (P2P) feature. Note: This is something you’ll only find in Windows 10.
This feature helps preserve your device’s download bandwidth. Essentially, it lets you download a Windows update one time, then use your device to spread or share the updated version across other computers included in your local network.
Unfortunately, it can also sometimes interrupt DNS processes. Therefore, it’s worth disabling to see if this resolves the error message you’re currently facing.
How do I disable the Windows peer-to-peer feature?
To do so, click on the Windows icon, followed by the Settings (gear icon) > Update & Security :

In the window that opens along the left-hand side, select Delivery Optimization :

Next to the ‘Allow downloads from other PCs’ option, toggle the switch to disable it:

When you’re done, restart your computer and try accessing the website again. If this doesn’t work, don’t worry. We still have more solutions to try.
7. Restart your router
The next troubleshooting step is to restart your router. Doing so will flush your router’s cache and could be the solution for resolving the “DNS server not responding” message.
How do I restart my router?
Most modems come with a power button that enables you to quickly power them off. After a minute or so, turn your modem back on and wait for it to re-establish a connection. Once it does, check to see whether you’re able to access the internet from your browser.
Note that sometimes simply restarting the router isn’t enough. You may want to reboot it by unplugging it entirely, and then waiting at least 30 seconds before plugging it back in and powering it on again.
8. Install updated network adapter drivers on your computer
Another reason you may be seeing the “DNS server not responding” message is if your current Windows network adapter driver is old or outdated. If this is the case, getting a new adapter driver or updating yours may be the solution you need.
How do I install updated network adapter drivers?
There are a couple of ways to update your network adapter driver. One is to do it manually , which you should only do if you are at least somewhat familiar working with drivers. Alternatively, you can do it using an automated tool such as Driver Easy or Snappy Driver Installer (SDI) :

Either of these solutions will automatically recognize your system and locate the appropriate drivers for you to use with it. We recommend this method because it eliminates the risk of human error, such as downloading or installing the wrong driver on your device.
Once you download SDI and finish installing the updated drivers, restart your computer. Then try reconnecting to the internet, to determine whether this resolved the issue.
9. Flush your DNS cache and reset your IP
If you’ve eliminated your browser, antivirus software, and router as the source of the issue, it’s time to turn your attention to your DNS settings. As with the router cache, it may be that your DNS needs to be cleared before it can properly make a connection to the internet, or your IP might need a reset.
How do I flush the DNS cache and reset my IP?
If you’re using Windows, start by typing “cmd” into the search field along the taskbar, and then selecting the Command Prompt app:

In the window that opens, enter “ipconfig/flushdns” (no quotations), and hit Enter :

When the process is finished, it will display a message letting you know that the DNS cache was successfully flushed. Repeat this process for the following commands:
If you’re using a Mac device, you can flush your DNS cache by opening the Terminal application (press the Command + Space keys, and then type “Terminal” into Spotlight). In the Terminal application window, enter the following:
Press the Enter key. There won’t be a success message as there is on Windows devices. However, simply running this command will flush the DNS cache. For further guidance, you can refer to our full guide on how to flush your DNS cache in Windows, Mac, and Chrome.
10. Disable IPv6
IPv6 is the latest Internet Protocol version that helps route traffic between networks and the internet. Unfortunately, it may also be behind the “DNS server not responding” error you’re currently seeing.
Therefore, another potential solution to try is disabling IPv6 on your computer.
How do I disable IPv6?
To do this in Windows, open your Network Connections control panel , then right-click on your current connection. In the drop-down menu, select Properties :

Under the Networking tab of the panel that opens, scroll down until you see Internet Protocol Version 6 (TCP/IPv6):

If it’s selected, unselect the box, then click on OK . Refresh your browser and try connecting to the internet again.
To disable IPv6 in macOS, you first need to determine what network interface you’re using. To do this, open the Terminal application , then issue the following command:
If you want to disable IPv6 for a wireless connection, you would use the following command:
For an Ethernet connection, you would use:
Then hit the Enter key, and refresh your browser to see if the issue is resolved.
11. Change the default DNS server on your Windows computer
Another solution you can try in order to fix “DNS server not responding” in Windows is to change your default DNS server. To do this in Windows 7, 8, or 10, the first step is to access your network connection properties.
How do I change the default DNS server?
Start by clicking on the Windows button in the bottom-left corner of the task bar. In the search field, type “Network connections”, and then select View network connections in the menu that appears:

Next, choose the internet adapter you’re currently using (WLAN for wireless network connections or LAN for ethernet cable connections). Right-click on the internet adapter, followed by Properties :

In the window that opens, choose Internet Protocol Version 4 (TCP/IPv4) , and then click on the Properties button:

To manually assign a different DNS server address, select Use the following DNS server addresses and input the address of an alternative server:

For example, you can enter Google’s DNS server, which is “8.8.8.8”, under Preferred DNS server . Then you can add “8.8.4.4” under Alternative DNS server , and hit OK .
If you’re running macOS, you can locate these settings by clicking on the Apple icon followed by System Preferences :

Next, select the Network icon. Choose your current network, and then click on the Advanced button:

Under the DNS tab, click the (+) button next to “IPv4 or IPv6 addresses”, and hit Enter :

After you enter the new DNS information, click OK followed by Apply . Restart your web browser, and then visit the website you were trying to access. You should find that the “DNS server not responding” error is now resolved.
Trying to access a website only to be met with a “DNS server not responding” error can be both frustrating and concerning. While there are a variety of reasons this error may occur, the good news is that most have simple resolutions.
As we discussed in this article, there are 11 potential solutions you can use to fix a “DNS server not responding” error, in both Windows and macOS:
- Switch to a different browser, and if necessary, update your default browser to the latest version.
- Connect With a Different Device
- Start your computer in Safe Mode.
- Temporarily disable your antivirus software and firewalls.
- Disable secondary connections.
- Disable the Windows Peer-to-Peer feature.
- Restart your router.
- Install updated network adapter drivers on your computer.
- Flush your DNS cache and reset your IP.
- Disable IPv6.
- Change the default DNS server on your computer.
Suggested reading:
- How to Fix the DNS_PROBE_FINISHED_BAD_CONFIG Error Code .
- How to Fix DNS_PROBE_FINISHED_NXDOMAIN Error Code
Related Articles

How to Flush DNS Cache (Windows, Mac, Chrome)

What Is DNS? Domain Name System Explained

8 Tips on How to Reduce DNS Lookups and Speed Them Up
How To Fix The “DNS Server Unavailable” Error
Luckily, there are a few easy solutions
The Domain Name System (DNS) server is where all of the domain names for the sites you’ve visited are stored. When searching a domain name in a web browser, it is forwarded by your router to a DNS server. If the particular site’s domain name has been saved, it then returns the corresponding IP address. This makes the loading process for those sites particularly faster.
As great as this process is, it’s not uncommon for the DNS server to fail to establish a connection from time to time. Attempting to troubleshoot your web browser in this instance can often result in a ‘DNS server not responding’ error.

Many factors could cause this particular error to show up on your screen. The most prominent of which is the possibility that the server itself is currently experiencing an outage. Luckily, this problem is often accompanied by a few easy solutions.
Have you’ve received an error that the DNS server is unavailable? For a quick fix, these problems can sometimes be corrected by something as simple as changing browsers, messing with a few of your firewall settings, or rebooting your router. It’ll be up to you to figure out the cause and subsequent correction for the problem.

Start by using a different browser for the web pages you’re trying to open. This means that if you’re currently receiving the error while using the Mozilla Firefox browser, switch it up to Microsoft Edge or Google Chrome. Should the problem persist, we can move on to testing out other devices.
Attempt to open a webpage using a mobile device, on the same network, to ensure that the problem isn’t the result of hardware failures. It would also be beneficial to attempt to connect to the same webpages using your data plan to identify if the cause is, in fact, with the DNS server.
Once you’ve exhausted these steps, reboot your router. If the “DNS server unavailable” error is still present, we’ll have to undergo a few more effective methods.
Flushing Your DNS (Windows)

The most effective method for fixing the issue with the DNS server being unavailable is to flush it using Command Prompt .
- Pull up the Run dialog by simultaneously pressing the Windows key and R key .
- Type cmd into the field and press Enter .
- In the Command Prompt window, type ipconfig /flushdns and press Enter .
- Follow up by typing ipconfig /release and press Enter .
- Finally, type ipconfig /renew and press Enter .
- Close out of the Command Prompt window and reboot your system.
Flushing Your DNS (MacOS)

You can also flush the DNS on a Mac. The way in which you do this will vary slightly depending on the version of Mac your computer is running. It often only involves a change in the syntax used during the process.
- Open a Finder window and then head into Applications , followed by Utilities , and ending in the Terminal .
- MacOS High Sierra – sudo killall -HUP mDNSResponder; sleep 2; echo macOS DNS Cache Reset | say
- MacOS Sierra – sudo killall -HUP mDNSResponder;say DNS cache has been flushed
- MacOS Mojave – sudo killall -HUP mDNSResponder;sleep 2;
- MacOS X El Capitan/Yosemite – sudo dscacheutil -flushcache;sudo killall -HUP mDNSResponder;say cache flushed
- Press the Return key, enter your password, and then hit the Return key once more.
- Await the audio alert that indicates a successful DNS flush before exiting the Terminal.
The MacOS X cache clearing will need a few added steps in order to fully flush it out. You’ll have to flush both MDNS and UDNS caches on top of the steps previously taken.
Before exiting from the Terminal, perform the following commands:
- For the MDNS cache, type sudo discoveryutil mdnsflushcache
- For the UDNS cache, type sudo discoveryutil udnsflushcaches
Remove Multiple Antiviruses

“You can never have too much protection.” This may be somewhat true in the real world, but in the world of technology, having multiple antivirus programs installed on the same computer can actually hinder the protection provided.
Check to see if you have two or more antivirus programs currently running as this may be the reason for the DNS issue. Once you disable all additional programs, reboot your system and the problem should resolve itself.
Ensure that moving forward you only keep a single software program running to help defend yourself from unwanted malware attacks. This not only increases security but can help you avoid running into more DNS server errors.
Changing DNS Servers

If you’ve already attempted all fixes written here and are still receiving the same “DNS server unavailable” error, it may be in your best interest to change your DNS servers. There are plenty of public DNS from which to choose, Google’s free DNS being one of the more popular choices.
The process for this is very simple and can be done in a few clicks, depending on where you choose to change it. We’ll be using the Windows operating system in each of our examples.
DNS Changes via Router

- You can find the Default Gateway by opening a Command prompt window, typing ipconfig, and pressing Enter. Copy the numbers located beside Default Gateway in the pulled up information.

- Login to the router using the proper credentials.
- Locate your internet account information which can often be found in a similarly named tab.
- Navigate to the DNS server and select the option that best mirrors your used internet protocol (IPv4 or IPv6).
- Google’s DNS server will be 8.8.8.8 in the preferred DNSv4 and 8.8.4.4 in the alternate DNS server . In the case of IPv6, you’ll want to use 2001:4860:4860::8888 and 2001:4860:4860::8844 respectively.
- Save the edited information and exit the router interface.
DNS Changes via Windows OS

- Access your network connection properties by launching the Run function ( Windows key + R ) and typing in ncpa.cpl . Press Enter .

- Windows 10 users can right-click the Windows icon at the lower left of the desktop screen and select Network Connections from the menu.
- Windows 10 will have your options on the left side panel. Select one and choose Change adapter options from the main window.
- Right-click your choice and select Properties .

- In the Networking tab, highlight your IP version (v4 or v6) from the menu and click the Properties button.

- Click the radial for Use the following DNS server addresses: to enable editing capabilities.

- If you had been using a previous DNS server not obtained automatically, remember to annotate the addresses just in case you want to return using them at a later date.
- Finalize the changes by clicking OK .
Test New DNS Server

Once the DNS servers have been changed, open a browser and attempt to launch a well-known site like www.google.com . If the site is immediately accessible, then the new DNS is functioning properly. If not, enter one of Google’s IP addresses, 172.217.16.195 , directly into your browser and hit Enter.
Wait for the familiar Google logo and search bar to appear. If this also fails, then the problem may lie with the internet and not the DNS server itself. Contact your internet service provider for additional help if this is the case.

Former US Army IT communications specialist who began his online blogging career in 2016. Joseph has over 10 years experience in the IT industry as both an analyst and communications expert. He's a night owl and an avid Red Bull consumer who spends most of his downtime enthralled by online gaming and website building. Read Joseph's Full Bio
Read More Posts:

- PHOENIXNAP HOME
- Colocation Overview
- Data Center as a Service Solutions for Digital Transformation
- Hardware as a Service Flexible Hardware Leasing
- Meet-Me Room The Interconnectivity Hub
- Schedule a Tour Guided Virtual Data Center Tour
- Data Center Locations Global Data Center Footprint
- Platform Overview
- Rancher Deployment One-Click Kubernetes Deployment
- Intel Xeon E-2300 Entry-Level Servers
- 4th Gen Intel Xeon Scalable CPUs Boost Data-Intensive Workloads
- Alliances Technology Partnerships
- Object Storage S3-Compatible Storage Solution
- Dedicated Servers Overview
- FlexServers Vertical CPU Scaling
- Intel Xeon-E Servers Intel Xeon 2200 Microarchitecture
- GPU Servers Servers with NVIDIA Tesla GPUs
- Dedicated Servers vs. BMC Compare Popular Platforms
- Promotions See Available Discounts
- Buy Now See All Servers
- Managed Private Cloud (MPC) Highly Customizable Cloud
- Data Security Cloud Secure-By-Design Cloud
- Hybrid Cloud Multi-Platform Environment
- Edge Computing Globally Distributed Servers
- Object Storage S3 API Compatible Storage Service
- Bare Metal Cloud API-Driven Dedicated Servers
- Alternative Cloud Provider Overcome Public Cloud Limitations
- Backup Solutions Veeam-Powered Services
- Disaster Recovery VMware, Veeam, Zerto
- Veeam Cloud Connect Backup and Replication
- Managed Backup for Microsoft 365 Veeam-Powered Service
- Data Security Cloud Secure-by-Design Cloud
- Encryption Management Platform (EMP) Cryptographic Key Management
- Confidential Computing Data-in-Use Encryption
- Ransomware Protection Data Protection and Availability
- DDoS Protection Network Security Features
- CONTACT SUPPORT
- Network Overview Global Network Footprint
- Network Locations U.S., Europe, APAC, LATAM
- Speed Test Download Speed Test
- Blog IT Tips and Tricks
- Glossary IT Terms and Definitions
- Resource Library Knowledge Resources
- Events Let's Meet!
- Newsroom Media Library
- Developers Development Resources Portal
- APIs Access Our Public APIs
- GitHub Public Code Repositories
- Search for:
Troubleshooting DNS Issues {nslookup, dig, host & More}
Home » SysAdmin » Troubleshooting DNS Issues {nslookup, dig, host & More}
Introduction
DNS (domain name system) stores information related to domain names as a distributed database . The client-server service translates domain names to IP addresses and vice versa.
Most other network services, such as Web, emails, and file transfer, use DNS. A misconfigured DNS server can lead to critical connectivity issues. Thankfully, troubleshooting DNS issues is a vital and relatively simple process to follow.
Follow this tutorial to learn the practical steps in troubleshooting DNS issues.

Prerequisites
- A stable internet connection.
- Access to the command line/terminal.
- A user account with administrator/sudo privileges.
Note: Follow our tutorial to set up a DNS nameserver on Ubuntu .
DNS Troubleshooting
DNS troubleshooting follows logical steps from basic network troubleshooting to more in-depth analysis. Network services often report DNS issues for reasons that do not require in-depth DNS troubleshooting.
If you are experiencing DNS issues, start by performing the following steps before going on to in-depth troubleshooting:
- Check cables
If using a wired connection, make sure everything is connected properly. On wireless networks, check if WiFi is turned on and connected. Check the router if all cables are functional. Try to switch ports for ethernet cables and test out the connection.
- Restart router
Turn the router off and wait for at least two minutes before turning it on again. Wait until the router fully boots up before rechecking the connection.
- Scan for malware
Viruses sometimes block an internet connection. Run a scan to see if anything suspicious appears and handle accordingly.
- Check the website
If the problems arise when connecting to a particular website or a part of the website, check if the connection problem is with the website itself. One way to do this is using the ping command .

The command output helps identify the reason for the connection problem:
1. If ping does not show a response, the issue is most likely on the server's end.
2. A common cause of an error in the response is a poorly configured DNS server or firewall restrictions. Learn how to resolve the "Temporary failure in name resolution" error .
3. If the output shows a response, the problem is most likely with the DNS.
The comprehensive list below provides valuable tips for troubleshooting DNS issues.
Note: Refer to our Linux network commands list for more troubleshooting commands.
Check TCP/IP Settings
Misconfigured DNS server addresses are a common issue. Reset the settings and check if communication is back to normal. Depending on which OS you're using, the steps are different.
For Windows:
1. Search for Network Status in the Start menu and open the tool.

2. Select Properties under the network connection details.

3. Click the Edit button to change the IP settings.

4. If the IP assignment is Manual , double-check the IP , Preferred , and Alternate DNS addresses. Change IP assignment by selecting Automatic ( DHCP ) from the dropdown menu to reset back to normal.

5. Save the settings when finished.
1. Click the connection icon in the top-right corner.

2. Open the menu and select Wired Settings .

3. Click the gear icon in the connection pane to open the settings.

4. Navigate to the IPv4 tab in the settings menu.
5. If manually assigned, double-check the Address and DNS IP address list. Select the Automatic (DHCP) option and change the DNS switch to Automatic to reset back to normal.

Apply the settings when finished and close the window. Lastly, check the connection to ensure everything functions correctly.
Note: Learn how to install and use PowerDNS on Ubuntu , an open-source DNS server solution that helps resolve namespaces.
Flush the DNS Cache
IP mapping to popular websites is often the target of malicious attacks. DNS caches information to improve loading speed, and it might have cached a wrong address. Clearing the DNS cache deletes all the lookup information and updates with subsequent requests.
Flushing DNS cache is a good security measure to take in general. Follow our tutorial for detailed and OS-specific instructions: How to Flush DNS Cache in macOS, Windows, & Linux .
Release and Renew DHCP Server IP
Releasing and renewing the IP address helps resolve an IP conflict and old DNS information by refreshing the cached information. The easiest way to accomplish a release and renewal is through the command prompt/terminal.
Warning: Resetting the IP disconnects the computer from the internet.
To renew the IP on Windows using the command prompt:
1. Run the following commands to release the current IP and renew the information:
2. Check the new information with:
To force IP renewal on Linux via the terminal:
1. Open the terminal and release the current IP with the following command:
The terminal outputs a confirmation message, and the connection is closed.
2. Run dhclient without any options to renew the IP:

Change to Public DNS Servers
Change the DNS servers to public domain addresses . Some standard options are:
- Google's 8.8.8.8 address as primary and 8.8.4.4 as secondary.
- Cloudflare's 1.1.1.1 address as primary and 1.0.0.1 as secondary.
Public domain addresses are generally reliable and are available for free. However, use this only as a temporary resolution.
On the other hand, some public domain DNS servers block traffic from malicious websites. A public DNS might detect a flagged website as suspicious, and the public DNS you're using might be blocking access.
The dig command (domain information groper) provides DNS information and helps in diagnosing issues. The utility's raw output makes it the preferred method for troubleshooting DNS issues.
The program is available on macOS and Linux by default and is free to install on Windows .
To get dig information for a domain, run the following command in the terminal:
Note: Using an IP address performs a reverse DNS lookup .
For example, to show the information for phoenixnap.com , run:

- The status shows whether a query was successful.
- The ANSWER SECTION shows a response to a request sent in the QUESTION SECTION .
- The SERVER displays the address for the public DNS server.
By default, dig looks up the A record for a domain and shows which IP address the domain points to when resolving the name.
The dig tool offers many advanced options for comprehensive searches. For example, add the +trace tag to see the full path to the destination:

The +trace option helps pinpoint traffic drops in the route to the destination.
To check the delegated name servers, use the ns option:

Use the ns option to help identify and troubleshoot delegation problems.
Use nslookup
The nslookup command provides functions for checking different DNS records and servers. The tool is available on macOS, Linux, and Windows operating systems by default, and it was the first tool for querying DNS.
To get nslookup information for a domain, use the following command in the command line/terminal:
For example, run nslookup for phoenixnap.com :

The output prints the DNS server's address and the A record response. The nslookup command is preferable for Windows because of its availability.
Note: Learn how to improve website performance significantly by reducing DNS lookups .
The host utility is a straightforward program for performing a DNS lookup. The command is available for macOS and Linux systems.
The basic syntax for host is:
For example:

The host command is excellent for quickly checking if a domain name exists and resolves to an address. A typical use case for host is in bash scripts.
Use additional options to display more information. For example, add the -a tag to see a similar output to the dig command:

The output shows additional information in the answer section, such as the NS, SOA, MX, and other available records.
Use traceroute or tracert
The traceroute and tracert tools help trace a route from source to destination. When troubleshooting DNS issues, the commands help identify where packets stopped on the network. The traceroute command is available on macOS and Linux, while the Windows equivalent is tracert .
Note: Install the traceroute tool using the apt package manager :
As a readily available and simpler alternative, use tracepath .
To map the network, run the following command in the terminal:
If using a Windows machine, run:

For more information on the traceroute / tracert command and how to read the output, check our comprehensive tutorial on How to Run a Traceroute on Linux, Windows & macOS .
Contact Your ISP
If the computer uses the ISP's DNS, you cannot resolve the issues on your end. Contacting the ISP helps determine the problem and pinpoint the difficulties on their end.
At the end of this guide, you should have several tools and tricks to help you resolve DNS issues. If you're looking to set up your DNS server at home to speed up your connection, try following our Raspberry Pi tutorial on How to Set Up Raspberry Pi as a DNS Server . Also, check out our guide to learn about one of the common DNS errors " DNS_PROBE_FINISHED_BAD_CONFIG " and how to fix it.

How to diagnose and fix DNS problems
Dead websites, page loading issues, web not working as it should? Here's what to do next.

Browsing the web is so easy, simple and straightforward that it feels almost automatic. Sure, you know there's a lot of low-level tech making this happen, but who cares when it just works?
That only makes it more frustrating when you suddenly get major page loading issues, though, dead websites everywhere, and all kinds of other web-based complications.
Internet connectivity problems across multiple websites can look like something you'll never fix yourself, but that's not always true – they're often related to DNS (Domain Name System) problems. In this article we'll look at how to identify these, and then get your system working again.
- Get security, streaming and more with today's best VPNs
What is DNS?
Accessing a new website looks simple, at least from user's point of view. Enter the URL in a browser, wait a few seconds, website appears, that's about it. Peek under the hood, though, and there's a lot more going on.
Your browser can't access a web server from a domain name like techradar.com, for instance. It can only find and download websites when it has a server IP address , such as 199.232.198.114.
A device normally handles this by asking your ISP's DNS server to translate the domain name into an IP address. Easy.
But what if DNS fails, and the server doesn't always return the IP address you need? Then you'll see major web problems.
Are you a pro? Subscribe to our newsletter
Sign up to the TechRadar Pro newsletter to get all the top news, opinion, features and guidance your business needs to succeed!

What does a DNS issue look like?
If your DNS fails entirely then it's likely you'll see timeouts, DNS or other errors with all your internet apps. It might look like your entire internet is dead.
Other DNS failures are partial, though, affecting some websites only. Maybe you'll access sites a, b and c as usual, but x, y and z all seem to be down.
Partial failures can also cause odd-looking page loading issues. What if DNS allows you to access bigsite.com, but not the domain where it hosts its images, scripts or contact forms?
You might see image placeholders, empty spaces where content used to be, or buttons and other site features not working as they should. It's this mix of problems across multiple sites that's one of the tell-tale signs of a DNS problem.
Diagnosing a DNS issue
The simplest DNS problem to diagnose is an issue with your current server. Try the same websites on a connection using another DNS server, and if they're now accessible and work correctly, it looks like you have a DNS issue.
If you've problems on a mobile device connected to your home Wi-Fi, for example, switching to your mobile network allows you to test a site with new DNS servers.
Or if you're on the move and already using your mobile network, look for a free hotspot you can try. (Just for a quick connectivity test, though – free Wi-Fi can be a security risk causing more problems than it solves, and you should always use at least a cheap VPN to stay safe on these networks.)
No other connections available? Try the virtual online browser Browserling . If you can reach it, choose Chrome as your preferred browser, enter the URL in the address box and click Test Now! Browserling uses its own DNS to connect to the site, so if it gets you access and your own connection doesn't, it could be a DNS issue.

Test your DNS server
A more advanced test is to manually ask your DNS server for the IP address of the domain you're trying to access. If the server can't find the IP or displays an error, that points to a DNS difficulty.
To try this on Windows, click Start , type CMD and open Command Prompt , then type NSLOOKUP and press Enter. ( NSLOOKUP is often available on Macs and Linux – try opening it from your terminal window.)
NSLOOKUP launches and displays the name and IP address of your current DNS server (or 192.168.* if devices get their DNS via your router's connection.)
Now type the name of any domain you can't currently access, press Enter, and NSLOOKUP queries your DNS server.
If NSLOOKUP displays the site IP address, it looks like DNS is working correctly.
But if NSLOOKUP displays an error like ' can't find Google .com: Non-existent domain ', that's pretty conclusive evidence that something is screwed up at the DNS level. Although there is one more quick trick you should try.
Try another DNS server
You've proved that your DNS server can't find an IP address for a domain, but will other DNS servers do any better? NSLOOKUP makes it really, really easy to find out.
Type SERVER 1.1.1.1 , press Enter , and NSLOOKUP changes its default DNS server to the IP address 1.1.1.1. (That's Cloudflare. If you know you were using Cloudflare before and that's the DNS with the problem, switch to Google's 8.8.8.8 , instead.)
Now enter whatever domain you couldn't reach earlier, and NSLOOKUP sends its DNS query to Cloudflare (or Google), instead.
If NSLOOKUP failed earlier but successfully gets an IP with Cloudflare, that looks like a problem affecting your DNS server only.
Test this by entering the IP address in your browser, instead of the regular domain. Use 142.250.179.238 for Google, for instance. If you can't access the website when you enter a domain, but it at least begins to load with the IP address, that confirms your DNS issues.

How to fix DNS problems
If it looks like your ISP's DNS isn't working, the quickest and most effective solution is to switch to a free public DNS server . Google and Cloudflare offer fast and reliable services which anyone can use, no registration required.
Changing DNS servers normally involves tweaking your device network settings. The Cloudflare support site has guides on setting up Cloudflare DNS for Windows, Mac, Android, iOS, routers, gaming consoles, Linux and more. These are sometimes very basic ('install app X to do it for you'), but Google's equivalent page has more detailed advice if you need it.
Whatever changes you make, be sure to note down your original settings first, just in case you need to switch them back later.
Reboot your device when you're done, and it should now be using your (hopefully) problem-free new DNS server.
If you still have internet connectivity problems, though, it's time to ask your ISPs support team for help. Tell them what you've tried, and that should help them diagnose the issue and get your connection running smoothly again.
- Get protected online for less with a great cheap VPN
- Stop logging of your PC activities with our Windows 10 privacy guide
- These streaming VPNs will help you get around geo-restrictions
Mike is a lead security reviewer at Future, where he stress-tests VPNs , antivirus and more to find out which services are sure to keep you safe, and which are best avoided. Mike began his career as a lead software developer in the engineering world, where his creations were used by big-name companies from Rolls Royce to British Nuclear Fuels and British Aerospace. The early PC viruses caught Mike's attention, and he developed an interest in analyzing malware, and learning the low-level technical details of how Windows and network security work under the hood.
Alibaba unveils the network and datacenter design it uses for large language model training
AI domain marketplace BrandPa acquired by HostPapa
Be quick: get up to $100 off the new Galaxy Buds 3 Pro with trade-in plus free case
Most Popular
- 2 I tried the first smartphone-based telescope and got next-level photos of the moon – next up, galaxies and nebulae
- 3 Quordle today – hints and answers for Saturday, June 29 (game #887)
- 4 Everything new on Prime Video in July 2024
- 5 Is Proton VPN legit? An honest analysis of the service and its parent company
- 2 Geekom launches yet another mini PC that makes it a little bit more difficult to justify buying a traditional desktop PC — AX8 Pro looks like Intel's legendary NUC but with an unbelievably low price tag
- 3 Microsoft pauses Windows 11 update as it’s sending some PCs into an infinite reboot hell
- 4 Netflix in 2024: the 9 most unmissable shows so far and what’s coming next
- 5 This One Million Checkbox game is sparking an internet war – and it's taken hours of our life we'll never get back
DNS Server Not Responding: The Complete Guide
Internet connection problems are annoying, especially when working on an online project. The most common error you see on the screen is “DNS server is not responding.” But what exactly is this error, and what can you do about it?
DNS issues are common, but they can still make your work harder and your day more challenging. The good thing is there are many options you can choose to fix these DNS server issues. Let’s begin with some basics first.
What is a DNS?
DNS, or Domain Name System, is a directory used to convert domain names or hostnames into an IP (Internet Protocol) address. The DNS allows users to access any website almost immediately and browse the internet.
However, systems that face issues with their DNS server cannot run web pages or access the internet.
“DNS Server Not Responding” is still the most common error. It means that the system cannot connect to the web pages because it fails to correctly map the hostname and domain names.
Users may see this error for various reasons, including simple ones like misconfigured internet adapters and wrong DNS addresses. Therefore, there is not one kind of issue you will encounter while trying to solve the problem.
However, it is not difficult to identify and resolve these issues if you know the proper methods.
What Does “DNS Server Not Responding” Mean?
The error means that the system could not access the internet because it could not connect to the domain DNS, making it unavailable for access. People use different approaches while trying to resolve this issue.
For instance, most people try restarting their internet router as it can be a simple misconfiguration issue, which they can resolve right away. In other cases, people also try to restart their computers to ensure that the system connects to the internet properly.
What Can Cause DNS Server Not Responding Error?
Here is a list of some possible reasons for a DNS Server connectivity issue:
Unavailable DNS Provider Heavy traffic and server outage are common backend network issues that can stop your device’s internet.
Router or Modem Issues Issues with the router or modem can also cause DNS server issues. There are many fixes, like checking the Ethernet cables and ports to determine the leading cause of the malfunction.
Hardware and Network Issues Hardware issues can also cause DNS Network connectivity issues. For example, if the server fails to correctly transmit the information to the next server.
Antivirus Problems Problems with Antivirus programs can also stop the network connection from operating correctly.
While these simple fixes may work for some users, not everyone can benefit from them. Let’s go over some of the best ways to fix the DNS Server Not Responding Error that might pop up on your computer systems.
9 Troubleshooting Steps for a DNS Server Not Responding Issue
1. resolve network issues on windows.
As you understand, the DNS server issues are mainly because of network connectivity issues. However, resolving these network issues works differently for Mac and Windows Users. Copy the following steps to ensure you resolve all possible DNS server issues for better internet connectivity.
Resolve Network Issues on PC
Access the Control panel on your Windows, find Network and Internet, and click on Network and Sharing Center.
- Select the Troubleshoot option and access your network settings by clicking on it.
- Click on additional troubleshooters, then on Internet connections to run the troubleshooter.
- Users can also click on the internet icon on the bottom right of the screen and access the troubleshoot problems by right-clicking it.
- Wait for the system to run the troubleshooting and check if your DNS server error resolves. If not, the system displays steps to repair connectivity to help resolve the issue.
Resolve Network Issues on Mac
- Running wireless diagnostics on Mac works a bit differently than on Windows.
- Start by closing all the applications and connecting to the internet network you face the DNS server issue with.
- Click on the Options button and access the Wi-Fi Status listed on the screen. Access and choose the Open Diagnostics option listed.
- Next, check your network connection for possible issues and try to resolve them by going through the guide on the screen.
- The system will run a quick scan, and you can view the status and details of each entry on the list by clicking the Info icon on the screen and selecting Summary from it.
These steps will likely resolve your DNS server issues; if not, continue to the following method we have listed below.
2. Try Connecting on a Different Device
Often, DNS server issues can be because of a faulty device, so you need to try connecting to another. If the other device can access the internet, your primary device is faulty.
However, users that cannot access the internet still likely have a problem with their internet router.
It all depends on the kind of situation a user faces, and running this quick diagnostic method can help determine the right reason. There is a simpler alternative; users can use their mobile data to check if their internet devices are faulty.
Users who can connect to the internet on either of the options will know the actual problem they are facing with the internet connection.
3. Try another Web Browser
The issues with the DNS server can often be because of an incompatible web browser. There are chances that you may experience your browsers facing connectivity issue, which is not visible right away.
The easiest way to check if your web browser is the culprit is to try another one. You can choose between popular browsers like Google, Opera, Safari, Mozilla Firefox, etc.
Users that continue to face connectivity issues are likely having trouble with something else. If you are using Google Chrome, try switching to Mozilla Firefox and check the same web pages that you wished to access.
The easiest way to resolve the browser issue is to make the working browser your default search engine and reinstall the faulty internet browser. It will help the software restore all the required files, which may solve the DNS Server Not Responding error.
Users can make the newly installed browser their default software and continue to use it instead.
4. Run your PC in Safe Mode
The operating system (whether Windows or Mac) plays an essential role in network connectivity, and it runs all the files required in the backend for internet browsing.
Any trouble could lead to a severe problem because the PC will have insufficient files for internet connectivity, leading to DNS server issues.
You need to check if the DNS server problems arise because of connectivity problems from the operating system by running the PC in safe mode. For this, users need to restart the system in the safe mode, which is a simpler version of the operating system.
It will limit your system’s processes, files, and functions.
Starting in Safe Mode (for PC)
Following are some steps that users can follow to restart their systems in Safe Mode.
- Access the start menu by pressing the button on the screen or the keyboard, pressing the shift key, and restarting.
- A new Choose an Option window will popup where you need to select Advanced Options and click on the Restart to reboot the PC.
- Next, users need to access the Startup settings under the Advanced Options menu and click on Restart.
- Lastly, press F5 on the keyboard to select the Safe Mode Networking Options to view all the PC processes underway.
Once you reach the settings, check if the DNS is fully connected.
Starting in Safe Mode (for Mac)
Starting the PC in safe mode for Mac devices is different than windows. Here are some steps you need to keep in mind.
- Access the Apple menu and click on shut down. It should take up to 10 seconds to complete, after which you can proceed to the settings.
- Press and hold the shift key as your Mac device turns on and wait until the login screen pops up again.
- Check if your internet connection works once you are in safe mode on your respective system. If it is working okay, the chances are that you face the DNS server error because of a third-party application. It can be any third-party application, and you need to skim through your installed files to see which one it is.
- Delete the application once you find it; reboot the system, and your DNS server connection error should resolve. Ensure that you deleted the third-party software properly, or the issue may happen again.
5. Restart Your Modem or Router
A modem or router not working is one of the most common reasons for the DNS server not responding to the error you might face and can cause connection errors and fail to link the device properly.
Reconnecting your modem or router to the system can help resolve this issue in most cases. Once you restart the router, you may also need to clear the data cache to give the modem a fresh start.
Unplug the connection cable from the router after turning it off by pressing the power button. Wait for around 30 seconds until the modem clears out all the data. Press the power button again, turn on the modem and reconnect the internet cable.
Your DNS server connectivity error should resolve right after this. However, users may need to reset the router’s settings if this doesn’t help. The exact instructions for resetting the routers will vary for each modem.
You’ll need to check the device instructions listed in the user manual.
6. Deactivate the AntiVirus and Firewall
Antivirus is protective software designed to save your computer from harmful/unidentifiable files. However, firewalls and antivirus can also cause DNS server connectivity issues.
It is easy to check if this is the problem by temporarily turning off the firewall software.
For Windows users, you will need to access the Control Panel and find the relevant settings on the list. Access the start menu and click on Settings, following to Update Security and finally to the Virus and Threat Protection Option Listed.
You can click on the Firewall and Antivirus button and deactivate it temporarily. The system will ask for confirmation before the deactivation, so, simply confirm the choice.
Mac users need to check the System Preferences, Find Security and Privacy, and Access the Firewall Option on the list.
Users should recheck the internet diagnostic and troubleshooting options listed above once they have deactivated the Firewall and Antivirus. Access the website you have trouble with from your PC, and it should be available.
If the problem resolves, the issue is with the antivirus and firewall settings. You’ll need to update and recheck them. The operating systems usually have an auto-update option that allows choosing the firewall settings.
Users can turn on the firewall and antivirus settings once the updates are complete. You have to turn on the settings, or it could leave your system prone to cyberattacks and malicious files.
7. Disconnect Other Connections
A computer system can connect with multiple networks over a period of time. For instance, what if you take your laptop to various locations and use the WiFi?
This can also cause the DNS Server not responding problem. Users can use the following steps to disable other connections listed on the device:
Deactivate Other Connections on a PC
- Start by accessing the Control Panel and access the Network and Internet Option Listed.
- Find the Network and Sharing Center option and click on Change Adapter Settings listed on the left column on the screen.
- The settings will access the Network Connections page, where users can view the system’s different connections.
- Click on Local Area Connection and other details that you do not use. Click on Disable, and the extra connections will turn off.
Deactivate Other Connections on a Mac
- Access the Apple Menu and look for System Preferences.
- Click on Network, and a new window will pop up.
- Choose the number of unused connections on the screen on the left and click the minus (-) sign listed next to them. Pressing the minus sign will disconnect the network from the system.
- Once you have disconnected the unused connections, restart the browser and try to reaccess the website.
8. Alter Your DNS Server Address
The DNS server address can often stop the system from accessing the domain name or hostname. You can resolve this issue by changing the DNS server address listed on the menu.
The internet connections are pre-designed to grab a DNS server address from the Internet Service Provider (IPS).
However, there are times when the system will not collect this information directly. Therefore, you will need to change the DNS server address manually. In other cases, the internet service provider’s DNS server may not respond, which will cause connectivity issues again.
Users can temporarily change their current DNS server address to resolve this problem and connect to a different one. It will allow your system to load any website you want until you can resolve the ISP problem.
You will find many online tools like Google Public DNS, which you can use for the time being. However, using them for a long time can be dangerous, so it is best to resolve the ISP connectivity issues.
Change DNS Settings on a PC
You can follow these steps to set up a different DNS server on your device.
- Find the Network Connections listed by clicking on the ncpa.cpl in the search box of your operating system.
- Find the network you are using on the list and click on Properties for more information.
- Users need to look for the Internet Protocol Version 4 (TCP/IPv4) option listed on the window and access the Properties.
- Check the Obtain IP Address Automatically and fill in the preferred and alternate DNS server address settings.
- Users can specify their desired DNS server address and Alternative DNS Server Address and confirm the settings.
- You need to confirm your changes by clicking on Validate the Settings upon Exit and choosing OK.
- Reboot your system, and the new DNS server address settings should apply.
Change DNS Settings on a Mac
Following are the additional steps you may need to follow for your Mac devices.
- Users need to begin by accessing the Apple Menu and looking for the System Preferences options.
- Access the Network button and click on your primary network connection. Select the Advanced Button and choose DNS.
- Click on the Plus (+) button to add the DNS server address to the list. Click on OK and then Apply the settings.
- Finally, restart your internet connection to see if the DNS Server Not Responding issue resolves.
9. Update the Network Connection Adapter
Outdated adapters on the device are another reason why the DNS server may fail to connect to your system. Users need to update their network adapted either automatically or manually.
Note that the automatic updates are ideal for new users who may not know much about DNS servers and network adapters.
However, manually updating the adapters will take more time if you are new to problem-solving network issues. You can select from various online tools or detectors to help identify the missing network adapters, install/update them as required, and manage other details.
Nonetheless, we suggest creating a system restore point that can help you bring your system back to its original setting if the network adapter updates take time.
Most auto-update programs involve checking the system for possible adapter issues and resolving them by installing/updating the required files.
DNS Server Not Responding is a standard network connectivity issue that might appear often while using your device. It simply means that your system cannot connect to the internet, which usually happens due to server connectivity problems.
You can resolve these issues in several ways depending on the reason, but the following are the most effective and simplest ones.
· Troubleshooting Network Problems
Users should let the operating system’s in-built troubleshooting software handle the DNS server connectivity issues by running a diagnostic.
· Restarting the Router
Users can reset the modem or router by turning it off, unplugging the Ethernet, and reconnecting it after 30 seconds. Or, you can reset the modem setting by following the device manually.
· Flush DNS Cache
Clearing the cache will refresh the DNS configuration allowing the users to connect to the system again.
· Change the DNS Server Address
The ISP DNS server may not work in many cases, which can cause many problems. You need to replace the ISP DNS address with an alternative one for some time.
We are sure that the fixes we have mentioned on this blog will help you fix the “DNS Server Not Responding” error and reconnect your PC to the internet. We suggest you let an expert look at your system if you continue to have DNS server connectivity issues.
Related Posts
Move from mobileme to greengeeks, protecting wordpress login page from attacks, leave a comment cancel reply.
Your email address will not be published. Required fields are marked *
This site uses Akismet to reduce spam. Learn how your comment data is processed .
How To Fix 'DNS Server Not Responding' In Windows

Most of our work and entertainment today depend on digital platforms, and it gets annoying when we cannot access the internet due to various errors. One of those frustrating errors is "DNS server not responding." When you receive this message, it indicates that your browser is unable to establish a connection with the Domain Name Server (DNS).
A DNS is essentially the phonebook of the Internet. It translates the human-readable domain names into machine-readable IP addresses. When you try to access a web address — for example, slashgear.com — on your browser, your computer checks for its corresponding IP address under DNS records to load it on the browser. When you receive the "DNS server isn't responding" error message, it means that your computer cannot reach DNS servers for the translation process.
This can happen due to various reasons. If your Internet connection is unstable or completely down, the computer won't be able to reach the DNS server. Sometimes, the DNS server itself might be experiencing issues, downtime, or overloads, preventing it from responding to requests. Other reasons could be incorrect network settings, security programs blocking communication, or issues with the router.
Fortunately, the issue is solvable with some easy DIY methods.
Perform basic troubleshooting
It's best to begin with some basic troubleshooting before taking advanced actions. First, ensure you are facing the "DNS server isn't responding" message while loading a particular website or with all websites. Launch multiple websites in different browser tabs. If the other sites work, the problem is not with your device but with that particular site. Wait for some time and try launching that website. If the problem persists, clear the caches from the browser settings and then run the website.
If the error is not website-specific, try restarting the browser and the system. It will refresh your browser's settings and clear any temporary glitches. Next, try a different browser to figure out if the issue is isolated to a particular browser. If it's a browser-specific issue, update the browser or just re-install it with the latest version.
If nothing works on your current device, try running the same website(s) on another device connected to the same network. If the issue persists, then the problem might be your Internet router. Restart your router to give your Internet connection a fresh start and resolve issues that might be interfering with your DNS server communication.
Run Network Troubleshooter and turn off secondary connections
On the Windows system, you can try various fixes by utilizing the built-in features or making amendments to the settings. First, run the Windows Network & Internet Troubleshooter. It is a handy tool within Windows that scans the system to diagnose and solve Internet-related issues.
- Launch Windows settings, switch to the System tab on the left, and select the Troubleshoot option on the right.
- Next, click the Other Troubleshooters option.
- Click the Run button next to the Network and Internet troubleshooter option.
- Apply the required action diagnosed by the troubleshooter.
Next, turn off the secondary connections if you are using any. A secondary internet connection acts as a backup in case the primary one fails . However, multiple network connections can conflict with each other, causing issues like the DNS server error.
- Type "network connections" on the Windows search box, and click the View Network Connections option.
- Look for the secondary connections. They will be marked with a red cross mark.
- Right-click on all such connections, and select the Disable option.
Start Windows in Safe Mode and temporarily disable security programs
An effective way to deal with "DNS server not responding" and other Windows errors is restarting the computer in Safe Mode . This will reboot your computer with minimal drivers and apps and help you isolate the culprit app, if any.
- On your system, press Windows + R to launch Run Command Box.
- Type MSConfig in the given space and hit the enter key.
- Switch to the Boot tab, and under Boot options, check the Safe boot option with Minimal settings.
- Click Apply & OK, and then let your system to restart.
If the "DNS server isn't responding" message doesn't appear in the Safe Mode, the recently installed applications may be causing the issue. It's best to uninstall or reinstall such apps. It might also be possible that the security programs, such as antivirus programs or firewalls, are interfering with the DNS and causing the error. Although such programs are essential for system security, you can temporarily disable them to check if they are the culprit.
Flush the DNS cache and change the default DNS server
For an advanced but simple solution to fix the "DNS server not responding" error, begin with flushing the DNS cache . It removes the stored records of IP addresses and domain names, similar to clearing your browser's history. Clearing the cache can resolve the DNS error by forcing your computer to refresh its DNS records.
- On Windows 11 system, right-click the Start button and select Terminal (Admin). Or launch Command Prompt with administrator rights if using Windows 10.
- In the command line window, type or copy and paste the following command and hit enter: ipconfig/flushdns.
- You should see a message confirming that the DNS Resolver Cache has been successfully flushed.
Next, you can try changing your default DNS server to a public DNS service, such as Google DNS. Changing the DNS server to these can fix the DNS errors and also speed up browsing and downloading.
- In the Windows search box, type "network connections" and click View Network Connections.
- Right-click on the network you are connected to and select Properties.
- Scroll down to Internet Protocol Version 4 (TCP/IPv4) or Internet Protocol Version 6 (TCP/IPv6) , depending on which you use, and then click Properties
- Preferred DNS server: 8.8.8.8
- Alternate DNS server: 8.8.4.4
- Finally, click OK to save the changes and exit the window.
- Now, flush the DNS cache by following the above-mentioned steps and restart your PC.
Disable IPv6 and update network adapter
IPv6 is the latest version of the Internet Protocol that helps route traffic across the Internet. Sometimes, disabling it can fix the DNS issues on your Windows system. However, remember that disabling IPv6 can have consequences, like reduced connectivity, weak network security, and more. So, after disabling it, if you face connectivity issues, re-enable it and look for other solutions.
- Under Network Connections, right-click on the network you are connected to and select Properties.
- Look for the Internet Protocol Version 6 (TCP/IP) and uncheck it.
- Click OK and close the window.
You can try updating your network adapter drivers next. Although Microsoft usually provides driver updates automatically through Windows updates, sometimes you need to do that manually to fix network errors. Visit the official website of your network adapter provider and download the latest drivers to install them.
- Right-click the Start button and select Device Manager from the list.
- Expand the Network Adapters section and right-click on your network adapter.
- Select the Update Driver option.
- Next, choose Browse My Computer for Drivers and select the location where you downloaded the latest drivers from the official website.
- Follow the onscreen instructions to update the driver successfully.
How to Fix the 'DNS Server Not Responding' Error to Get Back Online

Your changes have been saved
Email Is sent
Please verify your email address.
You’ve reached your account maximum for followed topics.
How to Start Using Gemini 1.5 Pro for Free
How i keep my devices online during an internet outage, this new browser is a productivity miracle.
Every so often, you may come across an odd error when browsing the internet that claims your DNS server is not responding. Unfortunately, it's not immediately obvious from this vague error message as to what a DNS server is, let alone why it's not cooperating with you.
As such, let's explore what a DNS server is, and how to fix this problem.
What Even Is a DNS Server, Anyway?
First of all, before we can explore why your DNS server isn't working, we need to understand what a DNS server even is!
The "DNS" part of the name stands for "Domain Name System."A DNS server helps a computer break down a domain name into an IP address, which it can then use to take you to your destination.
Domain names were designed for humans to understand and remember, not computers. To your computer, "www.google.com" means nothing, even though we as humans know what Google is.

To take you to Google, your device needs the IP address of the website. To do this, your computer needs to convert Google's URL into an IP address, which it knows how to use.
This is where the DNS server comes in. A DNS server acts as a huge phonebook for the internet. Every time a computer needs the IP address of a website, it can give the DNS server the URL and receive an IP address in return.
When you go to Google, the DNS server looks up its huge database of domain names and finds the IP address linked to Google. It then tells your PC to visit that address, and your computer uses the address to fetch Google's website.
We covered more about how DNS servers work and why one might become unavailable .
How to Fix a "DNS Server Not Responding" Error
Now that we know what a DNS server is, we can understand why it's such a big problem when it's not responding.
When you enter a URL into your browser, your computer tries to get an IP address from it, but your DNS server isn't responding. As such, your PC can't take you to the website you want to go to and gives you a DNS error.
So, how do you fix a DNS server not responding error?
1. Try a Different Browser
Sometimes browsers have a rough moment. If you're experiencing DNS issues when using one browser, try a different one. Browsing the web to download another browser may be difficult, but if you're not using your device's default browser, you can always use that instead.
If changing the browser fixes the issue, try updating or reinstalling the misbehaving browser. If that doesn't work, or you're using a default browser on your device, try clearing the browsing data and uninstalling any addons.
2. Clear the DNS Cache
If you're on a PC or laptop and see this message, there may be a problem with your DNS cache.
The DNS cache is a file on your PC that stores the directory of addresses and IPs you visit. It saves time from having to constantly ask your DNS server for information that you've received in the past.
When this cache messes up, it causes DNS problems. Fortunately, there's an easy way to clear the DNS cache on Windows and macOS:
- For Windows, click on the Start button, then type "Command Prompt." Select the search result that appears, then enter "ipconfig /flushdns."
- For macOS, open a terminal and enter "sudo dscacheutil -flushcache; sudo killall -HUP mDNSResponder" if you're using El Capitan or later.
We use both of these methods in our guide to what a DNS server is, and why it's unavailable . Be sure to give it a read if you'd like to learn more.
3. Change Your DNS Server
If your current DNS server is unavailable, why not try a different one? You don't have to be stuck with the server you use by default, and it's straightforward to tell your device to use a different one for the time being.
To do this, you need to access your computer's DNS settings and tell it to connect somewhere else. If you're unsure of how to do this, we went through the steps in our guide on how to change your DNS settings .
As for what to enter as your new DNS server, there are a few options for your primary and secondary address:
- Google has a memorable 8.8.8.8 and 8.8.4.4 address for their servers.
- Cloudflare is also easy to remember, with 1.1.1.1 and 1.0.0.1.
- OpenDNS has 208.67.222.222 and 28.67.220.220.
While these are useful, free DNS services, it's not recommended to use them for extended periods of time. Free DNS servers typically don't have a lot of security installed on them, and they may see a ton of use by other people using the free service.
As such, it's best to use a free DNS server until your normal one comes back online. You can check your normal DNS server by undoing the steps above.
4. Restart Your Router
You may notice that the problem goes beyond your device. If every device and computer on your local network can't connect to the DNS server, there may be something wrong with your router.
Like a computer, some routers will have a DNS cache that can become corrupted. You can do a quick test by turning off the Wi-Fi connection on a mobile device and using data. If this clears up the issue, your router's DNS cache may be at fault.
To fix this, unplug your router from the mains and leave it for 30 seconds. Plug it back in and retry the connection. If the router was the problem, this should fix it.
5. Temporarily Disable Your Antivirus and Firewall
If none of the above seems to work, try temporarily disabling any antivirus programs and firewalls you have set up. These programs monitor your internet connection to ensure nothing nasty sneaks onto your system, but sometimes things go wrong with it.
If disabling your antivirus or firewall does the trick, you may need to reinstall it to get it back on track. It may also be time to try out another antivirus program.
6. Try Going Into Safe Mode
Your antivirus isn't the only program that has control over your connections. Other apps, software, and drivers may interfere with your connection.
To test if something else is the culprit, try booting your device into Safe Mode. You can boot into safe mode in Windows 10 , and the macOS boot modes also have their own safe mode.
If you boot into safe mode and the problem resolves itself, it means that software is getting in the way. When you boot into safe mode, your PC deliberately doesn't load non-essential drivers and software.
As such, if safe mode fixes your problem, that means that whatever didn't get loaded in is the culprit. However, there's plenty of issues that could be the reason, so try reinstalling network-based drivers and software until it's fixed.
Getting to Know Your DNS Settings
If you're having DNS problems , there are a lot of potential causes behind it. Unfortunately, identifying the problem requires going through each part of your device that could cause the error and double-checking that it's working correctly.
Now that you're a master of tweaking your DNS, you can do more things with it. For instance, did you know that a few adjustments can speed up your internet?
Image Credit: Maximumm / Shutterstock
- Technology Explained
- Computer Networks
Sign up for our daily newsletter
- Privacy Policy
- Advertise with Us
How to Fix the DNS Server Not Responding Error in Windows

When you type a host address or URL into your browser, the DNS resolver will contact a DNS server to identify the IP address connected to that hostname. That address goes back to your computer, and you see the website you want to access. But sometimes you will get an error telling you that the DNS Server is not responding.
To fix this problem, there are several different things you can try. To make sure that the website is not causing the error and your Internet connection is working correctly, do this quick check first.
Also read: How to Fix DNS Errors and Regain Access to the Internet
1. Check the Source of the Problem
Access the website from another device, perhaps using a 4G connection, to see if it loads. If it works correctly, the problem is either with your router or the device. Connect to the router with the other device to see if the site loads that way. If it does, you are probably looking at a problem with your machine.
2. Uninstall and Re-install Network Drivers
Before you attempt this fix, make sure you have the needed drivers available as a backup. Go to the PC manufacturer’s website, and download the latest network adapter driver. Since your PC can’t connect to the Internet, use a different PC to download a driver and save it to a USB flash drive so you can install it on your PC if needed. All you need to know is your PC’s manufacturer and model name or number.
1. In the search box on the taskbar, type “Device Manager,” and find Network Adapters in the list of results.

2. Expand Network adapters and locate the network adapter for your device.

3. Right-click the network adapter.
4. Select Uninstall device.

5. Click the “Delete the driver software for this device?” checkbox and click Uninstall.

6. After uninstalling the driver restart your machine.
After your PC restarts, Windows will automatically look for and install the network adapter driver. Check to see if that fixes your connection problem. If Windows doesn’t automatically install a driver, try to install the backup driver you saved before uninstalling.
3. Clear the DNS Cache
Your DNS cache stores the locations (IP addresses) of web servers that contain web pages which you have recently viewed so your computer can access them more quickly. Clearing it may eliminate any errors and let your machine recheck the DNS server for the address.
1. Type cmd in the search window and open Command Prompt as an administrator.

2. Type the following into the Command prompt window:

3. Check to see if this has resolved the issue.
4. Update Network Drivers
A device driver is a piece of software that allows your operating system to start, use and control a hardware device. If they are not up to date, they may fail to work. Here’s how to update them.
1. Go to the Control Panel and open “Device Manager.”
2. Expand Network adapters by clicking on the triangle in front of it.
3. Right-click on your network.

4. Click “Update Drivers.”
5. Let the computer check for updates to the driver.
6. Install the drivers if an update is found.
Also read: How to Find the Best Alternative DNS Server
5. Update Your Router Software to the Latest Version
Just like the drivers need to be kept up to date to work correctly, it is also true for the software that runs your router. Each manufacturer of routers will have a different way to do this. Start checking online by searching for “update [name of router]” to learn how to do this for your make and model.
6. Turn Off Microsoft Virtual Wi-Fi Miniport Adapter
This option may or may not be available on your machine. If it is, the following instructions show how to disable it.
1. Go to the Control Panel.

3. Right-click on the Virtual Wi-Fi Miniport Adapter (if it is there).
4. Click Disable.
7. Alter TCP/IP settings
TCP/IP, or the Transmission Control Protocol/Internet Protocol, is a suite of communication protocols used to interconnect devices on the Internet.
1. Type control panel into the search box.
2. Click Network and Internet.
3. Open the network and sharing center.
4. Click “Change Adapter Settings” on the left side of the window.

5. Right-click on the Wi-Fi network you are using.
6. Click Properties.

7. Select “Internet Protocol Version 4 (TCP/IPv4)” and click the Properties button.

8. On the next screen select “Obtain IP Address automatically” and “Obtain DNS Server Address automatically.”
There are still other ways to try to solve the DNS Server not Responding Error, but these are some of the most common. Hopefully, one of them will work for you. Let us know your results.
Also read: 9 of the Best Dynamic DNS Providers You Can Use for Free
Our latest tutorials delivered straight to your inbox

Tracey Rosenberger spent 26 years teaching elementary students, using technology to enhance learning. Now she's excited to share helpful technology with teachers and everyone else who sees tech as intimidating.

No file downloaded?

Driver Easy
Home › Knowledge Base › Common Errors
DNS Server Not Responding (4 Easy Solutions)
Suddenly you cannot access any websites through the Internet. Then you try to troubleshoot the network problems on your Windows. It tells you the DNS server not responding is the culprit. You may see one of these:
“ The DNS server isn’t responding . Your computer appears to be correctly configured, but the device or resource (DNS server) is not responding .”
If this problem occurs, don’t worry. Follow this guide to fix it.
Try these fixes
If you’d like to know why you can’t browse the Internet due to the ‘DNS server not responding , you can go to read the reason part . Otherwise, follow along with the solutions directly.
- Correct your DNS server address
- Clear your DNS cache and reset your IP
- Update your network adapter driver
- Restart your modem and router
Bonus Tip: Try using VPN to fix the connection problem.
Note: The screens shown below are from Windows 10, but all the methods also apply to Windows 11/8/7.
Solution 1: Correct your DNS server address
The DNS server not responding error could be probably caused by an incorrect DNS server address . So you can follow these to correct your DNS server address:
1) On your keyboard, press the Windows logo key and R at the same time to invoke the Run box.
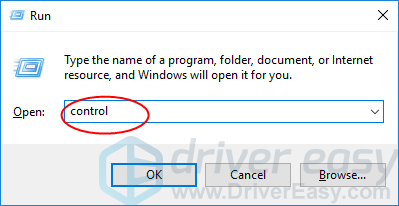
Restart your computer and try to access the website you want to go to again and see if it succeeds.
Solution 2: Clear your DNS cache and reset your IP
There may be problems with your DNS server if its cache is getting full. To see if that’s the case, try clearing the DNS cache and resetting the IP address.
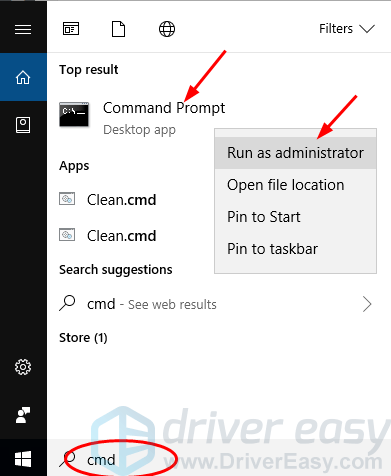
Note: Click Yes when prompted by the User Account Control.
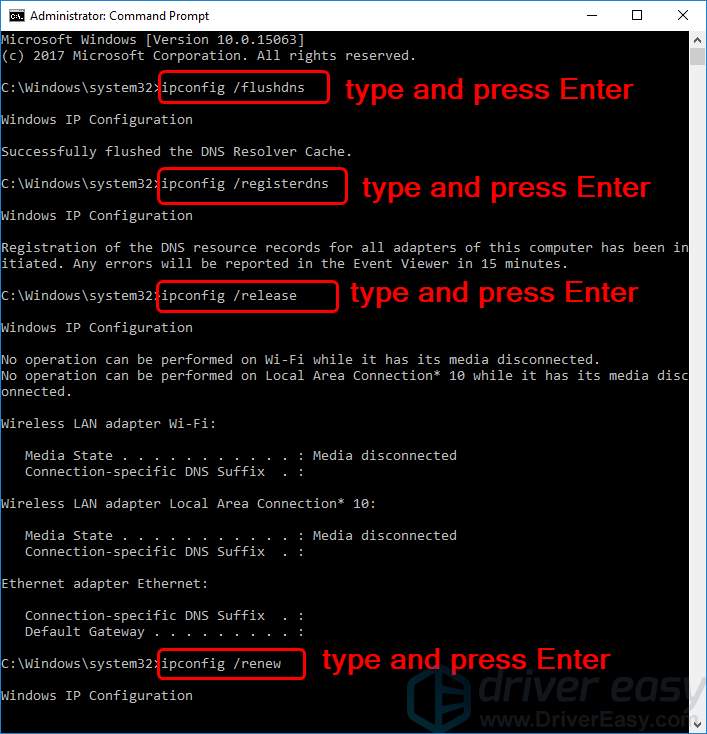
Then restart your computer and try to access the website you want to visit again and see if it succeeds.
Solution 3: Update your network adapter driver
Your DNS server won’t respond if the network adapter driver is outdated. You can update your network adapter driver manually or, if you’re not confident playing around with drivers, you can do it automatically with Driver Easy .
Driver Easy will automatically recognize your system and find the correct drivers for it. You don’t need to know exactly what system your computer is running, you don’t need to risk downloading and installing the wrong driver, and you don’t need to worry about making a mistake when installing.
You can update your drivers automatically with either the FREE or the Pro version of Driver Easy. But with the Pro version it takes just 2 clicks (and you get full support and a 30-day money-back guarantee ):
1) Download and install Driver Easy.
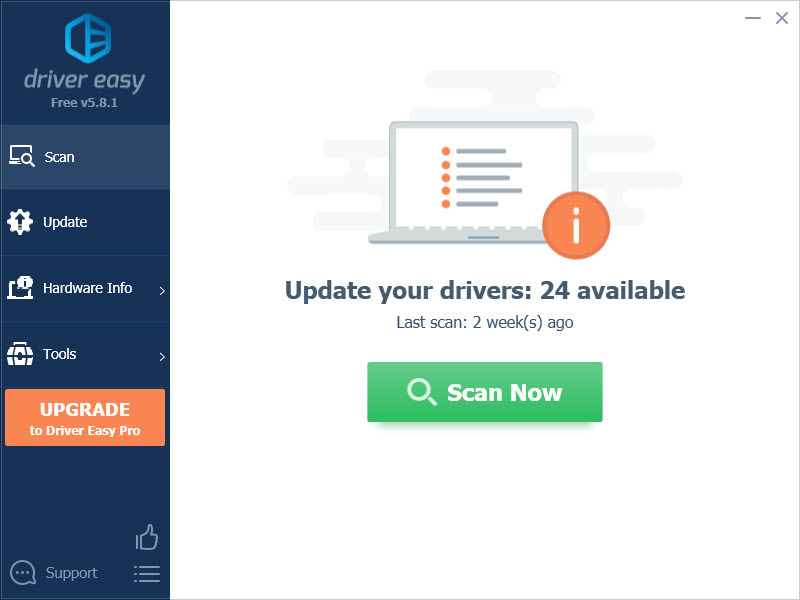
After updating your network adapter driver, please restart your computer. Try to access the website you want to go to again and see if it succeeds.
Solution 4: Restart your modem and router
If your modem or router doesn’t work properly, the DNS server could stop responding, either. You can restart your modem and router if you have one to solve the problem.

2) Try to access the website you want to go to again and see if it succeeds.
Why can’t I access websites when the DNS server not responding?
First, let’s figure out what a DNS server is. DNS ( Domain Name System) server helps to translate the website address into the IP address for your browser to connect to.
For example, when you want to access our website: www.drivereasy.com on Chrome, the DNS server translates it into our public IP address: 144.217.68.24 for Chrome to connect to.
So you may know if there’s any wrong with your DNS server, you cannot access any website on your browser. No exception that if your DNS server stops responding, you cannot access the websites through the Internet.
Hopefully, this article has helped you fixed the problem. Feel free to comment below with your own experiences and share with your friends or colleagues if they’re experiencing the same problem.
Available in other languages

Della Huang

Vivienne Duan

Related Articles
Mouse cursor disappears on windows 10 [solved], [solved] new world won’t launch easy anti-cheat error, [solved] dvd won’t play on windows, [fixed] skyrim won’t launch | 2024 tips, how to fix lenovo fingerprint reader not working easily, touchpad not showing up in device manager try fixes here.
As a technical writer for Driver Easy, April writes articles related to various tech issues, including Windows computer problems and game errors. She's never happier than when her articles help people solve their problems - whether they're Windows errors and blue screens to network errors and faulty hardware. As a Microsoft Certified Professional (MCP), she focuses on Windows system problems and daily tips and tricks. When she's not writing, she likes reading literary novels and poetry.
Microsoft Certified Professional (MCP)
Contributor(s):
- Internet Features
How to Change DNS Server on Windows 7, 8, Windows 10, and macOS

- Changing DNS could help load websites faster
- It may help you open websites blocked on your network
- It could help you browse the Web safely
DNS (Domain Name System) sounds like a scary abbreviation for something that’s actually very simple to understand. Simple put, it's a system that converts site addresses from machine-friendly numbers, into human-friendly names. If not for DNS, website names would look something like 93.184.16.12 instead of https://www.gadgets360.com .
To convert these numbers into addresses, your browser relies on a DNS Server, and although this will be set up by default, you can also change the DNS Server that you're using. There are a number of reasons for doing this, and the process itself is very simple.
Why would I want to change my DNS server? Your Internet service provider (ISP) issues a DNS server to you by default. ISP provided DNS servers aren’t always the best as they may lead to speed and reliability issues, such as some websites not opening or taking too long to load.
These DNS servers may not be equipped with security features that you’d get if you used a DNS server such as Google DNS. There can be other uses for this, such as accessing blocked websites . If you want to use Google DNS you can change the DNS server to 8.8.8.8 and alternate server to 8.8.4.4 - OpenDNS uses 208.67.222.222 and 208.67.220.220, or you can use any other DNS server you prefer.
If you are having issues with your Internet connection, changing the DNS server could be a fix. Here’s how to change the DNS server.
Windows Follow these steps to change DNS servers on Windows . These steps will work on Windows 7, 8, or 10.
How to change DNS on Windows 7 , Windows 8 , or Windows 10 :
- Open Control Panel and select Network and Sharing Centre . Alternatively you can right-click the network status icon on the system tray (bottom-right of the screen, near volume controls).
- Click Change adapter settings on the left pane.
- Right-click the Internet connection you want to change DNS servers for and select Properties .
- Select Internet Protocol Version 4 (TCP / IPv4) and click Properties .
- Click the button next to Use the following DNS server addresses: and enter the DNS server addresses of your choice. Click OK when you’re done.
macOS Here’s how to change DNS servers on a Mac:
- Go to System Preferences -> Network .
- Select the Internet connection you’re connected to, and click Advanced .
- Select the tab marked DNS .
- Click the DNS servers in the box on the left and click the - button.
- Now click the + button and add DNS servers of your choice.
- Click Okay when you're done to save the changes.
That’s how you change DNS servers on Windows machine or Mac. For more tutorials, visit our How To section .
For the latest tech news and reviews , follow Gadgets 360 on X , Facebook , WhatsApp , Threads and Google News . For the latest videos on gadgets and tech, subscribe to our YouTube channel . If you want to know everything about top influencers, follow our in-house Who'sThat360 on Instagram and YouTube .

Related Stories

Advertisement

- iPhone 16 Leaks
- Apple Vision Pro
- Apple iPhone 15
- OnePlus Nord CE 3 Lite 5G
- Xiaomi 14 Pro
- Oppo Find N3
- Tecno Spark Go (2023)
- Best Phones Under 25000
- Samsung Galaxy S24 Series
- Cryptocurrency
- Samsung Galaxy S24 Ultra
- Samsung Galaxy Z Flip 5
- Apple 'Scary Fast'
- Housefull 5
- GoPro Hero 12 Black Review
- Invincible Season 2
- HD Ready TV
- Laptop Under 50000
- Smartwatch Under 10000
- Latest Mobile Phones
- Compare Phones
- iQOO Z9 Lite 5G
- Samsung Galaxy Z Flip 6
- Samsung Galaxy Z Fold 6
- Lava Blaze X
- Vivo Y28e 5G
- Oppo A3 (2024)
- CMF by Nothing Phone 1
- Honor MagicBook Art 14 (2024)
- Asus Vivobook S 15 OLED (2024, Copilot+)
- Honor Pad 9 Pro
- Honor MagicPad 2
- NoiseFit Javelin
- OnePlus Watch 2 (Cellular)
- Infinix 32Y1 Plus Smart TV
- Samsung Samsung Neo QLED 8K Smart TV QN800D
- Sony PlayStation 5 Slim Digital Edition
- Sony PlayStation 5 Slim
- Panasonic 1 Ton 5 Star Inverter Split AC (CS/CU-EU12AKY5FM)
- Panasonic 1.5 Ton 3 Star Inverter Split AC (CS/CU-RU18AKY)
- Realme 13 Pro 5G Series Set to Launch in India on This Day
- Motorola Edge 50 Neo Tipped to Arrive in These Four Colourways
- Google Pixel 9 Pro XL Spotted on REL Website Alongside Pixel 9 Pro Fold
- OnePlus Pad 2 India Pricing Revealed Ahead of Launch in New Leak
- Sennheiser Momentum Sport With Adaptive ANC Launched in India: See Price
- iQoo Z9 Lite 5G With Dimensity 6300 Chipset Launched in India: See Price
- Apple Approves UTM SE as First PC Emulator for iPhone, iPad on the App Store
- NoiseFit Javelin With AMOLED Display, 7-Day Battery Life Launched in India: Specifications, Price
- Huawei Tri-Fold Smartphone With 10-Inch Screen Tipped to Launch Soon, Tipster Says
- Oppo Find X8 Series to Be Equipped With MediaTek Dimensity 9400 Chipset, Tipster Claims
- Realme GT 6T Miracle Purple Colour Variant Launched in India; to Go on Sale During Amazon Prime Day Sale
- OpenAI Employees Say Company Is Neglecting Safety and Security Protocols: Report
- Realme 13 Pro 5G Series India Launch Date Set for July 30; Design, Colour Options Revealed
- Samsung XR Headset Could Be Available for Developers in October, Launch in 2025: Report
- Portrait Mode Delivers ‘Unsatisfactory’ Images for Certain Skin Tones Due to AI Bias, Poor Tuning: Study
- iQoo Z9 Lite 5G With 50-Megapixel Rear Camera, Dimensity 6300 Chipset Launched in India: Price, Specifications
- Privacy Policy
- Editorial Policy
- Terms & Conditions
- Complaint Redressal
This browser is no longer supported.
Upgrade to Microsoft Edge to take advantage of the latest features, security updates, and technical support.
Troubleshooting Domain Name System (DNS) issues
- 2 contributors
Try our Virtual Agent - It can help you quickly identify and fix common DNS issues.
Domain Name resolution issues can be broken down into client-side and server-side issues. In general, you should start with client-side troubleshooting unless you determine during the scoping phase that the issue is definitely occurring on the server side.
Troubleshooting DNS clients
Troubleshooting DNS Servers
Data Collection
We recommend that you simultaneously collect data on both the client and server sides when the issue occurs. However, depending on the actual issue, you can start your collection at a single data set on either the DNS client or DNS server.
To collect a Windows Networking Diagnostic from an affected client and its configured DNS server, follow these steps:
Start network captures on the client and server:
Clear the DNS cache on the DNS client by running the following command:
Reproduce the issue.
Stop and save traces:
Save the Nettrace.cab files from each computer. This information will be helpful when you contact Microsoft Support.
Was this page helpful?
Coming soon: Throughout 2024 we will be phasing out GitHub Issues as the feedback mechanism for content and replacing it with a new feedback system. For more information see: https://aka.ms/ContentUserFeedback .
Submit and view feedback for
Additional resources

Azure Arc – Windows Admin Center – Cant connect with error: Couldn´t get server data, ajax error

Entra ID – Global Secure Access – Now Generally Available!

Introducing Azure DevOps Backup Tool 1.0.5.9: Enhanced security, optimization and bug fixes!

Reflecting on a remarkable first half of the year 2024! ✨
- Windows Admin Center
- Windows Server
Last Updated on July 15, 2024 by Michael Morten Sonne
Table of Contents
Introduction, the problem, get principal id from your azure arc machine via powershell, dns rebinding protection, allow on pfsense firewall.
If you’re encountering this error message in Event Viewer in Windows for your Arc enabled machine : “The requested name is valid, but no data of the requested type was found” while trying to connect via Azure Arc with Windows Admin Center via the Azure Portal , it might be related to DNS lookup issues, specifically involving local host addresses ! 🤣
I have used some time on this to try to find out what the issues was, so therefore I share it here with you and the community as I could not find so much information about this error on the internet! 🤔
Let´s try to connect with Windows Admin Center on my Azure Arc server at home to see what´s happens with this error happen.
- Login to your Azure Portal and search for Azure Arc in to top (hint, direct link here: Azure Arc – Microsoft Azure )
- Now, find your server on the list that you want to connect to (make sure you have the correct RBAC role , such as the Windows Admin Center Administrator Login role 😉)
- Go to Settings > Windows Admin Center (Preview) and click on Connect if the extension is installed for your server. If it isn’t installed, you can easily do so by clicking the Install button that appears.

- Now, Windows Admin Center is starting up via Azure Arc from the Azure Portal and connecting to your server where it is currently located.

- When Windows Admin Center starts up in your Azure Portal , you will see numerous errors like this:

The errors you see it the following:
Yes, and at first, you might wonder what it could be? 🤣🤔
This error typically occurs when the DNS lookup returns a valid hostname , but no corresponding IP address data is found. A common scenario for this issue is related to security features that block DNS lookups for localhost addresses (127.0.0.1) , which can be enforced by etc. DNS Rebinding Protection mechanisms.
When event source WindowsAdminCenterAccountManagement have started the service with event ID 0 in the Application Log, then a .NET Runtime source with Event ID 1026 and type Error log an event with this:
The next error in the event log there shows up is from source Application Error with Event ID 1000 and type Error :
Yes, there is a lot of information in those error messages, but when I tried to determine if all the requirements were met as listed here: Connected Machine agent network requirements – Azure Arc | Microsoft Learn
I deside to try to dig around a bit in the application there is installed here: C:\Program Files\WindowsAdminCenter \ and what what I could see on the internet traffic 🤪
From the errors we can see what files/application parts there is failing – here is a list:
- System.Net.Sockets.Socket.*
- Microsoft.Extensions.Hosting.Internal.Host.*
- Microsoft.WindowsAdminCenter.*
- Microsoft.AspNetCore.Server.Kestrel.Transport.*
- Microsoft.AspNetCore.Hosting.GenericWebHostService
to mention some.
The details
After some time, I found out what the Windows Admin Center application installed on the local Azure Arc server was trying to connect to the domain 9ad2a80d-xxxx-xxxx-xxxx-e30296dd999d.arc.waconazure.com (masket to hide real GUID).
The GUID you will see (and need to be able to lookup via DNS) is the principalId on the ressoruce in Azure (the Azure Arc machine object itself).
If you test it with nslookup , you should get this response like this:
nslookup 9ad2a80d-xxxx-xxxx-xxxx-e30296dd999d.arc.waconazure.com Server: pfSense.home.sonnes.cloud Address: 192.168.1.1
Non-authoritative answer: Name: 9ad2a80d-xxxx-xxxx-xxxx-e30296dd999d.arc.waconazure.com Address: 127.0.0.1
To help you to find the DNS names, I have created a small PowerShell script to help you 😎
To use the script, run the script in a PowerShell Console and ensure you have the right permission and Az Modules installed to get the data.
See the script is hosted on my public repo here: https://github.com/michaelmsonne/public
The output from the script will look like this, showing the names and IDs of your Azure Arc machines based on your search (which supports wildcard searches) and the needed DNS record allowed to return IP 127.0.0.1:

Since I have a pfSense firewall from Netgate, this is based on that experience, but it can happen with other vendors as well.
DNS Rebinding Protection is a security feature designed to prevent DNS rebinding attacks. These attacks exploit the behavior of web browsers to circumvent the same-origin policy, potentially allowing attackers to interact with private IP addresses within a local network.
One popular tool that implements DNS Rebinding Protection is pfSense , a widely used open-source firewall and router software. By default, pfSense blocks DNS responses that contain private IP addresses, including 127.0.0.1 , to prevent potential security threats .
You can read more about DNS Rebinding Protection on the pfSense documentation .
| Address | Description |
|---|---|
| 127.0.0.0/8 | RFC 1122 Loopback Addresses (Localhost) |
| 10.0.0.0/8 | RFC 1918 Private Addresses |
| ::ffff:a00:0/104 | IPv6 Representation of 10.0.0.0/8 |
| 172.16.0.0/12 | RFC 1918 Private Addresses |
| ::ffff:ac10:0/108 | IPv6 Representation of 172.16.0.0/12 |
| 192.168.0.0/16 | RFC 1918 Private Addresses |
| ::ffff:a9fe:0/112 | IPv6 Representation of 192.168.0.0/16 |
| 169.254.0.0/16 | RFC 3927 IPv4 Link Local Addresses |
| ::ffff:c0a8:0/112 | IPv6 Representation of 169.254.0.0/16 |
| fd00::/8 | RFC 4193 IPv6 Unique Local Unicast Addresses (ULA) |
| fe80::/10 | RFC 4291 IPv6 Link Local Addresses |
To resolve the connection error between Azure Arc and Windows Admin Center, you may need to adjust the DNS Rebinding Protection settings on your pfSense device. Here are the steps to do this:
- Access your pfSense Web Interface: Open a web browser and log in to your pfSense web admin portal.
- Navigate to DNS Resolver Settings via Services > DNS Resolver
- In the General setting tap, scroll down to Custom options
- Add a new entry for the domain that your Windows Admin Center is trying to resolve in this sample we need to add this 2 lines:
- server: private-domain: "waconazure.com"
- Click Save and then in the top banner Apply Changes to apply the changes.
⏰ Alternatively, you can disable DNS Rebinding Protection, although this is not recommended due to security implications ⏰
Now after we find a fix, let´s try to connect with Windows Admin Center on my Azure Arc server at home again to see what´s happens.
- Go to Settings > Windows Admin Center (Preview) and click on Connect .

As you can see, we are now successfully logged in to our Windows Admin Center on the Azure Arc -enabled server! 🥳
The error “The requested name is valid, but no data of the requested type was found” when connecting Azure Arc with Windows Admin Center is often caused by DNS Rebinding Protection blocking DNS lookups for local host addresses . By configuring your pfSense DNS Resolver settings to allow these lookups, you can resolve the connectivity issue while maintaining security against DNS rebinding attacks.
It wasn’t quick to figure this out, but now that you have the solution, you should be able to fix it faster than I did. If you follow these steps, you’ll save time and avoid the frustrations I encountered 😎😉
And always ensure to monitor your network security settings and consult with your network administrator to understand the implications of making such changes.
Thank you for taking the time to visit my blog. Kindly share it with others if you find it helpful for them! 😉🔐👍
Remember you can allways support me and my development of tools and creating of content and so via Why donate? – Blog – Sonne´s Cloud (sonnes.cloud)
Stay tuned for the new post about something cool! 🥳
Connected Machine agent network requirements – Azure Arc | Microsoft Learn
Azure Arc overview – Azure Arc | Microsoft Learn
Related Posts

- Attacks/compromise
- Microsoft Defender for Endpoint
- Microsoft Defender XDR (Microsoft 365 Defender)
Microsoft Defender XDR – Offboarding scripts will now expire in 3 days and not 30 days

Microsoft Defender for Endpoint: New and more streamlined device connectivity on the way

- Active Directory
- Azure AD/Entra ID
- Code Repository
- Microsoft Defender for Identity
Microsoft Defender for Identity – What is it, how to install it and setup requirements

- Advanced Hunting
Microsoft Defender XDR – Experience Improvements for Advanced Hunting
Discover more from sonne´s cloud.
Subscribe now to keep reading and get access to my free newsletter 🤝🧑💻
Type your email…
There is options to pay for some content too, as not all can/is free for all - see more on my website

For Individual
Recovers lost or deleted Office documents, emails, presentations & multimedia files.
- Professional
Recovers deleted files, photos, videos etc. on Mac.
Recover photos, videos, & audio files from all cameras and storage on Windows or Mac.
Recover deleted photos, videos, contacts, messages etc. directly from iPhone & iPad.
Repair multiple corrupt videos in one go. Supports MP4, MOV & other formats.
Repair multiple corrupt photos in one go. Supports JPEG & other formats.
- Android Data Recovery
For Business
- Exchange Repair Repair corrupt EDB file & export mailboxes to Live Exchange or Office 365
- Outlook PST Repair Repair corrupt PST & recover all mailbox items including deleted emails & contacts
- OLM Repair Repair Outlook for Mac (OLM) 2011 & 2016 backup files & recover all mailbox items
- Exchange Toolkit Repair EDB & Exchange backup file to restore mailboxes, convert OST to PST, & convert EDB to PST
- Active Directory Repair Repair corrupt Active Directory database (Ntds.dit file) & extract all objects in original form
- EDB to PST Convert online & offline EDB file & extract all mailbox items including Public Folders in PST
- OST to PST Convert inaccessible OST file & extract all mailbox items including deleted emails in PST
- NSF to PST Convert IBM Notes NSF file & export all mailbox items including emails & attachments to PST
- MBOX to PST Convert MBOX file of Thunderbird, Entourage & other clients, & export mailbox data to PST
- OLM to PST Convert Outlook for Mac Data File (OLM) & export all mailbox data to PST in original form
- GroupWise to PST Convert GroupWise mail & export all mailbox items - emails, attachments, etc. - to PST
- EML to PST Convert Windows Live Mail (EML) file & export mailbox data - emails, attachments, etc. - to PST
- Office 365 to PST Connect to Office 365 account & export mailbox data to PST and various other formats
- Migrator for Office 365 Quickly migrate Outlook data files(OST/PST) directly to Office 365 or Live Exchange
- SQL Repair Repair corrupt .mdf & .ndf files and recover all database components in original form
- Access Repair Repair corrupt .ACCDB and .MDB files & recover all records & objects in a new database
- QuickBooks Repair Repair corrupt QuickBooks® data file & recover all file components in original form
- MySQL Repair Repair MyISAM & InnoDB tables and recover all objects - keys, views, tables, triggers, etc.
- Excel Repair Repair corrupt Excel (.XLS & .XLSX) files and recover tables, charts, chart sheet, etc.
- BKF Repair Repair corrupt backup (BKF, ZIP, VHDX and .FD) files and restore complete data
- Database Converter Interconvert MS SQL, MySQL, SQLite, and SQL Anywhere database files
- PowerPoint Repair Repair corrupt PPT files and restore tables, header, footer, & charts, etc. like new
- File Repair Toolkit Repair corrupt Excel, PowerPoint, Word & PDF files & restore data to original form
- Data Recovery Recover lost or deleted data from HDD, SSD, external USB drive, RAID & more.
- Tape Data Recovery Retrives data from all types and capacities of tape drives including LTO 1, LTO 2, LTO 3, & others.
- Virtual Machine Recovery Recover documents, multimedia files, and database files from any virtual machine
- File Erasure Permanently wipe files and folders, and erase traces of apps and Internet activity.
- Mobile Erasure Certified and permanent data erasure software for iPhones, iPads, & Android devices
- Drive Erasure Certified and permanent data erasure software for HDD, SSD, & other storage media
- Exchange Toolkit 5-in-1 software toolkit to recover Exchange database, convert EDB to PST, convert OST to PST, restore Exchange backup, and reset Windows Server password.
- Outlook Toolkit Comprehensive software suite to repair PST files, merge PST files, eliminate duplicate emails, compact PST files, and recover lost or forgotten Outlook passwords.
- File Repair Toolkit Powerful file repair utility to fix corrupt Word, PowerPoint, and Excel documents created in Microsoft Office. It also repairs corrupt PDF files and recovers all objects.
- MS SQL Toolkit 5-in-1 software toolkit to repair corrupt SQL database, restore database from corrupt backup, reset database password, analyze SQL logs, & interconvert databases.
- Data Recovery Toolkit Software helps to recovers deleted data from Windows, Mac and Linux storage devices. Also supports recovery from RAIDs & Virtual Drives.
- MY SQL Toolkit 3-in-1 software toolkit to repair Corrupt Mysql, MariaDB & Analyze logs, and Interconvert Databases.
- Email Forensic Advanced email forensic solution for cyber experts to audit, analyze, or investigate emails & gather evidences.
- Log Analyzer for MySQL Analyze forensic details of MySQL server database log files such as Redo, General Query, and Binary Log.
- Exchange Auditor Exchange Server monitoring solution to automate audits, scans and generate reports ìn real-time.
- Log Analyzer for MS SQL Track & analyze MS SQL Server database transactions log files.
- Our Partners
- Lab Services
Trending Searches
Data Recovery
Photo Recovery
Video Repair
iPhone Data Recovery
File Erasure Software
Exchange Repair
Raid Recovery
MS SQL Repair
How to Fix Sync Issues and Local Failures in Outlook?

Summary: Synchronization issues and local failures can lead to missing mail items, outdated information/contacts, etc. In this guide, you will learn the reasons for synchronization issues/local failures in Outlook and the solutions to troubleshoot and resolve them. You’ll also get to know about an advanced OST to PST converter software that can help extract mailbox items from orphaned or inaccessible OST files.
Microsoft Outlook creates a local cache (.ost file) to store all the mail items, such as messages, attachments, contacts, etc. When online and connected to server, Outlook synchronizes the OST file with mailbox on the server and vice-versa. This way mailbox items in OST and on server remain up-to-date. Sometimes, users face sync issues between the Outlook and the server.
When there is a problem in synchronization, Outlook may fail to send or receive any new emails or meeting invites. This can also lead to the following problems:
- Delays in communication.
- Missing emails.
- Scheduled meetings or invitations may not reflect accurately.
- Outdated contacts or contacts may not reflect.
Let’s understand the reasons for the sync issues in Outlook and the solutions to troubleshoot them to ensure uninterrupted workflow.
Reasons for Sync Issues and Local Failures in Outlook
There are several reasons that may lead to the synchronization issues and local failures in Outlook, such as:
- Poor internet connection or network interruption.
- Mailbox server is not available due to maintenance work or outages.
- Inaccessible or oversized Outlook data file (OST).
- Incompatible or faulty add-ins interfering with Outlook’s functionality.
- Incorrect email account settings or configuration.
- Outdated Outlook application.
- Damaged Outlook or MS Office program files.
- Hardware issues or file system errors.
Solutions to Fix Sync Issues and Local Failures in Outlook
Sync issues indicate that Outlook is not able to update changes to or from the mailbox server whereas the local failure indicates problem with the Outlook client, system, or the Outlook data file. Below we have mentioned some solutions that you can follow to resolve such issues.
1. Check Internet Connection
To ensure proper synchronization of mail items, you must ensure that you have a working and stable internet connection. To fix any issues related to network or connectivity,
- Restart router or modem to reset the connection.
- If possible, connect to a different wireless (Wi-Fi) network or use your smartphone hotspot to rule out local network issues.
- Switch to a wired connection for more reliable internet access as Wi-Fi is prone to interference caused by other radio waves.
- Change the DNS to public DNS, such as 8.8.8.8 and 8.8.4.4
2. Update Outlook
Ensure that you are running the latest version of Outlook as it helps overcome any bugs or issues that might be causing sync issues or local failure. The steps to update Outlook application are as follows:
- Open Outlook and go to File > Office Account > Update Options .
- From the available options, choose Update Now .

- If a new update is available, download and install it.
After the update, restart system and then launch Outlook to check if the sync issues and local failures are resolved.
3. Check/Update Credentials
Outdated or expired email credentials can also lead to sync issues as Outlook fails to authenticate and update the mail items. If you have recently changed or updated the password,
- Go to Send/Receive tab and click Type Exchange Password & Connect .

- Type your updated password. In case you don’t know, reach out to the administrator to get your updated password.
4. Check Server Status
Make sure that the server is online and available. It might happen that the server is down due to maintenance or power failure. To check if the server is online and available,
- Open any web browser, such as Chrome or Edge.
- Go to the Outlook web app page URL and sign in using your account.
- If you are able to login and access mail items, the server is online. Otherwise, wait and try after sometime. You may also contact the administrator or email service provider for more details.
5. Disable/Remove Faulty or Problematic Add-Ins
Faulty or problematic third-party add-ins can cause various issues in Outlook. In such a case, you can find and disable the faulty add-ins. Follow the below steps:
- Close Outlook and press Windows + R keys.
- Type outlook.exe /safe and press Enter to launch Outlook in safe mode.

- Go to Send/Receive tab and click Update Folders. If all mail folders synchronize, then it indicates problem with one or more add-ins.
- Now, click File > Options and select Add-ins .
- Click the Go button and unselect all the add-ins.
- Click OK to disable all the add-ins.

- Once the add-ins are disabled, restart Outlook normally.
Now, to find which add-in is causing the issues,
- Enable one add-in at a time and restart Outlook.
- Repeat the above step until you see the sync issues or local failure.
- Once identified, remove or uninstall the faulty or incompatible add-in to resolve the issue.
6. Repair Office Installation
Problem with the Outlook/MS Office installation can also cause sync issues in Outlook. You can repair the MS Office program to fix any issues with the installation. Here are the steps:
- Open Settings on your Windows system.

- Choose Apps & features.

- Find and click on Microsoft Office application. Choose the Modify option.

- Select the Quick Repair option and click Repair .

If Quick Repair fails to fix the problem, start the process again and choose Online Repair option and complete the repair wizard.

- Click on the Repair button when the following message is displayed.

- Wait for the repair process to finish.

- After this, restart your system.
In case repair does not work, you can reinstall the MS Office program.
7. Reduce Data File Size
A large or oversized OST file may also lead to syncing issues. Thus, you can reduce the size of OST file and mailbox by archiving old emails, and emptying the Deleted Items and Trash or SPAM folders. The steps to archive mail items are as follows:
- In Outlook, go to File > Info > Cleanup Tools > Archive or File > Info > Tools > Clean up old items based on your Outlook version.

- Click the Archive this folder and all subfolders option and choose the folder you want to archive.
- In the Archive items older than field, you need to choose or enter a date.

- Click Browse to choose a location where you want to save this archive PST file and click OK .
You can repeat this process to create multiple local archive .pst files.
8. Use Microsoft Support and Recovery Assistant (MSARA)
MSARA is a utility provided by Microsoft that helps you run a few tests on your system, identifies the underlying problems, and then provides the best solutions to fix the problems. Here’s how to use this tool:
- Download Microsoft Support and Recovery Assistant setup and launch it. Click ‘ Install .’

- After installation, click ‘ I agree .’

- Select Outlook from the options and click ‘ Next .’

- Select Sync Issues or Other problems and click Next .
- Click Yes and then click Next.
- Complete the wizard and apply the solutions to troubleshoot and fix the issues.
9. Rebuild OST
Inaccessible or damaged OST file can also lead to sync issues and local failures as Outlook may find it difficult to read or store new information to/from the OST file. However, you can recreate a new OST file by following these steps:
- Close Outlook (if running).
- Press Windows + R, type %localappdata%/Microsoft/Outlook, and press the Enter key or click OK. This opensthe OST file location.
- Here, rename the OST file, which is associated with your email account. Add the .bak suffix to the name. For instance, if the file name is [email protected], rename it to [email protected].

- Now, close all the windows and start Outlook.
- As soon as Outlook starts, you will see a new OST file being created. Outlook will download all the mail items from the mailbox server to the new OST file.
In case you find missing mail items in new OST file after synchronization is done, you can extract and restore those missing items from the backup OST file. For this, you can use a professional OST to PST converter software, like Stellar Converter for OST. It can extract mail items, such as emails, contacts, attachments, etc. from your backup OST file and save them to a PST file, which you can easily import into your Outlook. It can also convert orphaned or inaccessible OST file (up to 50 GB) in just a few simple steps. You also get option to export the mail items from the OST file directly to Microsoft 365 or live Exchange Server.
Synchronization issues and local failures in Outlook can lead to missed or outdated mail items, appointments, contacts, etc. This can disrupt your email communication and workflow as you may fail to send or receive new emails. This guide helps you understand the reasons for sync issues and local failures in Outlook and discusses the solutions to effectively troubleshoot and resolve such issues. If your OST file becomes inaccessible or orphaned, you can use an advanced OST to PST converter software, such as Stellar Converter for OST to extract and restore all mail items to a PST file.
Try Our SD Card Photo Recovery Software Now!

Was this article helpful?

About The Author

I am a Product Consultant and is associated with Stellar Data Recovery from last 8 years. I write about the latest technology tips and provide custom solutions related to Exchange Server, Office 365, MS Outlook, and many other Email Clients & different flavors of OS Servers. Read More

OST to PST Converter
How to Fix Error 0x800ccc0e in Outlook
- July 1, 2024

How to Fix “The Microsoft Exchange information service in your profile is missing the required information” Error in Outlook?
- May 28, 2024

How to Fix the “Cached Exchange Mode is Grayed Out Issue”?
- May 20, 2024
WHY STELLAR ® IS GLOBAL LEADER
Why Choose Stellar?
Years of Excellence
R&D Engineers
Awards Received
Technology You Can Trust A Brand Present Across The Globe

- My Kaspersky
- My Products / Subscriptions
- Solutions for:
Privacy & Kids

regreSSHion vulnerability in OpenSSH
A new vulnerability allows remote attackers to gain root privileges on Linux servers. How easy is it for CVE-2024-6387 to be exploited – and how to prevent it
Stan Kaminsky
July 2, 2024

A vulnerability has been discovered in OpenSSH, a popular set of tools for remote management of *nix systems. The bug allows an unauthenticated attacker to execute arbitrary code on the affected system and gain root privileges. The vulnerability was named regreSSHion , and assigned the ID CVE-2024-6387. Given that sshd, the OpenSSH server, is integrated into most operating systems and many IoT devices as well as firewalls, the description of the vulnerability sounds like the beginning of a new epidemic on the scale of WannaCry and Log4Shell. In practice, the situation is somewhat more complex. Widespread exploitation of the vulnerability is unlikely. Nevertheless, all server administrators using OpenSSH must urgently address the vulnerability.
Where OpenSSH is Used
The OpenSSH utility set is almost ubiquitous. It is a popular implementation of the SSH (secure shell) protocol, and is integrated into most Linux distributions, OpenBSD and FreeBSD, macOS, as well as specialized devices like those based on Junos OS. Since many TVs, smart doorbells, baby monitors, network media players, and even robotic vacuum cleaners are based on Linux systems, OpenSSH is often used in them as well. Starting with Windows 10, OpenSSH is also available in Microsoft’s OSs, although it’s an optional component not installed by default. It’s no exaggeration to say that sshd runs on tens of millions of devices.
How to trigger the regreSSHion vulnerability
During an SSH authentication attempt, the user has a time limit to complete the process, with the default setting being 120 seconds. If authentication does not occur, the sshd server asynchronously calls the special “sigalarm” function, which in turn invokes system-level memory management functions. This was done in a manner unsafe for asynchronous execution. Under certain conditions, and with a small probability, this can trigger a race condition, leading to memory boundary violations and arbitrary code execution.
To exploit this vulnerability, an attacker needs to make approximately 10,000 attempts on average, and the target system must be based on Linux versions using the GNU C Library (glibc), such as all Debian variants. Additionally, attackers need to prepare memory structures tailored to the specific version of glibc and Linux. Researchers have reproduced the attack on 32-bit Linux systems but, theoretically, it’s possible to exploit on 64-bit systems as well — albeit with a lower success rate. Address Space Layout Randomization (ASLR) slows down the exploitation process but does not provide complete protection.
Interestingly, this bug was already fixed by the OpenSSH team in 2006, when it was assigned CVE-2006-5051. Therefore, the new bug is a regression — the reappearance of an already known defect due to some changes introduced in the code. This is where the name for the new vulnerability, regreSSHion, comes from.
The likelihood of CVE-2024-6387 being exploited in the wild
The vulnerability was discovered by researchers and responsibly disclosed to the development team. Therefore, immediate exploitation is unlikely. Moreover, the technical complexities described above make mass exploitation impractical. Ten thousand authentication attempts with standard OpenSSH settings would take six to eight hours per server. Additionally, one needs to know which version of Linux the server is running. If the server has any protection against brute force attacks and DDoS, these measures would likely block the attack.
Despite all this, targeted exploitation is quite possible. Patient attackers can conduct reconnaissance and then make low-frequency attempts from different IPs, and sooner or later they might succeed.
How to protect your servers against exploitation
Versions of OpenSSH up to 4.4p1, plus versions from 8.5p1 to 9.7p1 running on glibc-Linux, are vulnerable. OpenBSD-based servers are not affected, so admins of those can breathe easier; however, everyone else should update sshd to version 9.8.
If for some reason immediate updating is not possible, administrators can set the login timeout to zero (LoginGraceTime=0 in sshd_config) as a temporary mitigation. However, developers warn that this makes the SSH server more susceptible to DDoS attacks.
Another possible mitigation is stricter access control for SSH — implemented using firewalls and other network security tools.

Kaspersky Expertise Centers
Today we talk about our five main centers of expertise and their contribution to Kaspersky’s products, threat intelligence and expert cybersecurity services.

What SIEM is and how it protects medium-sized businesses
Medium-sized businesses increasingly find themselves on the receiving end of targeted attacks. What tools does one need when basic security proves inadequate?
Setting up Shortcuts and Siri in Kaspersky for iOS
The updated VPN & Antivirus by Kaspersky for iOS now supports Apple Shortcuts and Siri. We explain what you can do with this feature, and how to set it up.
Remove Polyfill.io from your website
The JavaScript CDN service Polyfill.io has started spreading malicious code. Remove the service’s script from your website.
Don’t forget about Recall, because Recall won’t forget about you
The new AI function in Microsoft Windows has already been dubbed a “security nightmare” on the internet. What risks does it carry, and how to stay safe?
Sign up to receive our headlines in your inbox
Home solutions.
- Kaspersky Standard
- Kaspersky Plus
- Kaspersky Premium
- All Solutions
Small Business Products
- Kaspersky Small Office Security
- Kaspersky Endpoint Security Cloud
- All Products
Medium Business Products
- Kaspersky Next
- Kaspersky Endpoint Security for Business Select
- Kaspersky Endpoint Security for Business Advanced
COMMENTS
On the open page, next to "Internet Connections," click "Run." If you're on Windows 10, head into Settings > Update & Security > Troubleshoot > Additional Troubleshooters. Click "Internet Connections" and choose "Run the Troubleshooter." Follow the troubleshooter's instructions to detect and resolve your DNS issues.
Click OK. 2. Clear DNS cache. Press the Windows button to open the Start menu. Search for the command prompt and right-click on it to select Run it as an administrator. Type the below command and press Enter. ipconfig /flushdns. Close the command prompt and check if this resolves the issue or not.
Press the Windows key, type cmd, and press Enter to open Command Prompt. Type ipconfig /flushdns and press Enter. Mac: In your Launchpad, type terminal, then click Terminal in the search results. Type sudo killall -HUP mDNSResponder and press Return. Type your password when prompted to complete the flush.
Step-by-Step: Run Network Troubleshooter in Windows 10. Step-by-Step: Run Network Troubleshooter in Windows 7 or 8. Fix DNS Server Not Responding Problems. Resolve TCP/IP and DHCP Failures. Handle DNS Provider Problems. Avoid Internet Blockages From Antivirus Programs. Recover or Replace a Malfunctioning Router or Modem.
Here's how to do that for Microsoft Defender Firewall: Open Start, locate Windows Security, and launch the app. Select Firewall & network protection on the app's main window. Choose the network that says (active). Turn off the Microsoft Defender Firewall toggle. Select Yes in the User Account Control prompt.
Check whether the DNS server is authoritative for the name that is being looked up. If so, see Checking for problems with authoritative data. Run the following command: Windows Command Prompt. Copy. nslookup <name> <IP address of the DNS server>. For example: Windows Command Prompt. Copy.
Select the connection that you're trying to fix from the left sidebar, then click Advanced… in the bottom-right corner. 3. Select DNS from the tabs at the top. 4. Select the DNS Servers box and ...
networksetup -setv6off Ethernet. Then hit the Enter key, and refresh your browser to see if the issue is resolved. 11. Change the default DNS server on your Windows computer. Another solution you can try in order to fix "DNS server not responding" in Windows is to change your default DNS server.
Flushing Your DNS (Windows) The most effective method for fixing the issue with the DNS server being unavailable is to flush it using Command Prompt. Pull up the Run dialog by simultaneously pressing the Windows key and R key. Type cmd into the field and press Enter. In the Command Prompt window, type ipconfig /flushdns and press Enter.
The SERVER displays the address for the public DNS server. By default, dig looks up the A record for a domain and shows which IP address the domain points to when resolving the name. The dig tool offers many advanced options for comprehensive searches.
Hello, Perform steps mentioned below and check if the issue persists. a: Click on Start and then Control Panel. b: Go to Networking and sharing center and then click on Change adapter settings. c : Right click on Local Area Connection and choose properties. d: Highlight Internet Protocol Version 6 and click on Properties.
Test your DNS server. A more advanced test is to manually ask your DNS server for the IP address of the domain you're trying to access. If the server can't find the IP or displays an error, that ...
Select the Advanced Button and choose DNS. Click on the Plus (+) button to add the DNS server address to the list. Click on OK and then Apply the settings. Finally, restart your internet connection to see if the DNS Server Not Responding issue resolves. 9. Update the Network Connection Adapter.
Switch to the Boot tab, and under Boot options, check the Safe boot option with Minimal settings. Click Apply & OK, and then let your system to restart. If the "DNS server isn't responding ...
Here's how to change your DNS server address if you use Windows: Press the "Windows" and "R" keys simultaneously to open the Command Prompt window. Type "ncpa.cpl" into the "Open" bar and press Enter.
This is where the DNS server comes in. A DNS server acts as a huge phonebook for the internet. Every time a computer needs the IP address of a website, it can give the DNS server the URL and receive an IP address in return. When you go to Google, the DNS server looks up its huge database of domain names and finds the IP address linked to Google.
1. In the search box on the taskbar, type "Device Manager," and find Network Adapters in the list of results. 2. Expand Network adapters and locate the network adapter for your device. 3. Right-click the network adapter. 4. Select Uninstall device. 5.
So you can follow these to correct your DNS server address: 1) On your keyboard, press the Windows logo key and R at the same time to invoke the Run box. 2) Type control and press Enter. 3) Click Network and Sharing Center in Large icons. 4) Click Change adapter settings.
Perform steps mentioned below and see if the issue occurs. a :Click Start. Type cmd in the Start Search box, and then press ENTER. It will show the message successfully flushed the DNS resolver cache. The ipconfig /all command displays Windows TCP/IP settings for all your network adapters.
Here's how to change DNS servers on a Mac: Go to System Preferences -> Network. Select the Internet connection you're connected to, and click Advanced. Select the tab marked DNS. Click the DNS servers in the box on the left and click the - button. Now click the + button and add DNS servers of your choice.
a. Click on Start and type CMD, Right click and 'Run as Administrator'. b. Type ipconfig /flushdns and hit Enter and wait for the confirmation message that the action was successful. c. Enter the command ipconfig /registerdns and hit Enter and wait for the confirmation message that the action was successful. Method 3: If the issue persists ...
In general, you should start with client-side troubleshooting unless you determine during the scoping phase that the issue is definitely occurring on the server side. Troubleshooting DNS clients. Troubleshooting DNS Servers. Data Collection. We recommend that you simultaneously collect data on both the client and server sides when the issue occurs.
Flushing the DNS can resolve any issues related to outdated DNS records that might cause connection problems. Steps: Open the command prompt (Windows- Press Windows + R , type cmd , and press Enter ) or terminal (Mac/Linux).
DNS Rebinding Protection. DNS Rebinding Protection is a security feature designed to prevent DNS rebinding attacks. These attacks exploit the behavior of web browsers to circumvent the same-origin policy, potentially allowing attackers to interact with private IP addresses within a local network.
Explaining DNS Failure . DNS failure occurs when users are unable to connect to an IP address via a domain name. The sources of the problem could be issues with the following, Router or modem ; Browser ; Computer ; Internet Service Provider ; FictonPress said the issue with FanFiction.met is "upstream and out of our direct control" in an X post.
Solutions to Fix Sync Issues and Local Failures in Outlook. Sync issues indicate that Outlook is not able to update changes to or from the mailbox server whereas the local failure indicates problem with the Outlook client, system, or the Outlook data file. Below we have mentioned some solutions that you can follow to resolve such issues. 1.
DNS misconfiguration problem description. DNS configuration errors are a common problem during Puppet installation. Proper DNS setup is essential for an installation to be successful. See a potential solution in the next section. DNS misconfiguration solution steps. To resolve this issue, ensure the DNS is set up correctly for the installation.
Cloudflare Community
Ten thousand authentication attempts with standard OpenSSH settings would take six to eight hours per server. Additionally, one needs to know which version of Linux the server is running. If the server has any protection against brute force attacks and DDoS, these measures would likely block the attack.