
How-To Geek
How to add live web pages to a powerpoint presentation.

Your changes have been saved
Email Is sent
Please verify your email address.
You’ve reached your account maximum for followed topics.
Now Is the Time to Buy a Laptop Portable Monitor
6 lesser-known built-in windows features you should use, 10 tricks i use to shoot better quality iphone videos.
Have you ever wanted to demonstrate a live website during a PowerPoint presentation? Here's how you can insert a live webpage into a PowerPoint presentation so you can show the exact content you're talking about.
No matter what you're giving a presentation about, sometimes it can be useful to show your audience information from the internet. You could always create a screenshot of the webpage you're demonstrating, but chances are the screenshot may be out of date by the time you give your presentation.
A better solution is to use live information from the web in your presentation. By default, PowerPoint doesn't support inserting a live web page, but you can easily do this with the LiveWeb add-in.
Head to the LiveWeb website (link below), and download the correct version for your version of PowerPoint. We selected the 2007/2010 version in this test.

Once it's downloaded, extract the files as normal.

Now, in PowerPoint, open the Options window. In PowerPoint 2010, you can do this by clicking the File button and selecting Options; in PowerPoint 2007, click the Office orb and select Options.

Select Add-Ins on the left side, then select PowerPoint Add-ins from the Manage menu, and click Go.

This will open the PowerPoint Add-ins window. Click Add New to add the LiveWeb addin we downloaded previously.

Browse to the folder where you extracted the LiveWeb addin, and select it.

PowerPoint may warn you that the addon contains a macro. Click Enable Macros to continue.

Now you should see LiveWeb listed in the Add-Ins window, and you're ready to add a live webpage to your PowerPoint presentation.

Using LiveWeb in PowerPoint
Now that LiveWeb is installed, you're ready to insert live internet data in your presentations. From the Insert tab, select Web Page from the LiveWeb section.

This will open a quick Wizard interface that will help you insert a webpage into your presentation.

Enter the website you'd like to visit in the first line, then click the Add button. Make sure to include http:// in front of the website address. Once you've added the website you wish to visit, click Next.

LiveWeb will automatically refresh the web page, but if you want you can uncheck the box. Click Next to continue.

Now choose how much of the slide you want the webpage to cover, and select where you want to position the page. You can always change this later if you like.

Once it's finished, click Finish to return back to PowerPoint.

LiveWeb will let you know it successfully added the web page to your slide.

You'll now see a Windows 98-style logo in your slide, showing where your live webpage will be located.

Feel free to resize or move the webpage section in your slide however you want.

To view the actual web content, you'll need to start a slideshow. Click the slideshow button at the bottom of the window to switch quickly.

Now you'll see a live webpage loaded right inside your PowerPoint presentation. You can markup the slide as you would any other with PowerPoint tools, or you can interact with the website just as you would in a browser.

If you need to change your webpage, click the Edit Page Property button on the Insert tab.

Enter the new website address you want, and finish as before.

You can also add multiple web pages to a presentation if you'd like. You could even make a webpage comparison like we did with screenshots in our first slide. Only difference here is, the web pages are both live, and you could demonstrate how to use them to your audience.

When you save your presentation, you'll need to save it as a Macro-enabled presentation in .pptm format to preserve the web data. Note that you'll be able to view the presentation on another computer only if it has the LiveWeb addon installed. Since it's a free addon, you could keep a copy of it on your flash drive so you could easily install it if you need to show your presentation on another computer.

Whether you're trying to teach a class about computer usage or demonstrate your new website for your company's board members, the LiveWeb addin makes it easy to incorporate live web pages in your presentations. There are many ways you could use this, so let us know how you use live web pages in your presentations to make information come alive!
If you'd like to use live web data in other Office applications, here's how you can Use Online Data in Excel 2010 Spreadsheets .
Download the LiveWeb Add-in for PowerPoint
- Microsoft PowerPoint
This browser is no longer supported.
Upgrade to Microsoft Edge to take advantage of the latest features, security updates, and technical support.
PowerPoint for the web
- 10 contributors
PowerPoint for the web (formerly PowerPoint Web App) extends your Microsoft PowerPoint experience to the web browser, where you can work with presentations directly on the website where the presentation is stored. Microsoft 365 customers with Microsoft 365 for the web can view, create, and edit files on the go.
The PowerPoint Editor is a web front-end component that creates a browser-based editing surface, which lets users work on documents without losing fidelity.
If you select the Open in PowerPoint button on the PowerPoint for the web toolbar, the presentation opens in the PowerPoint desktop app (if Microsoft PowerPoint 2010 or later is installed on the computer).
Learn how to download and install Office using Microsoft 365 for business on a PC .
Alignment, bullets, numbers
With PowerPoint for the web, you can change paragraph alignment, apply bullets or numbering, and change the level of bulleted or numbered text. Learn more about the differences between using a presentation in the browser versus the PowerPoint desktop app .
Apply basic transitions and animations
Choose from a gallery of animation and transition effects. PowerPoint for the web supports eight transitions and 37 animations. Additional animations and transitions not supported by PowerPoint for the web are preserved in the presentation and displayed in the slide show, but they can't be modified in PowerPoint for the web. Learn more about the differences between using a presentation in the browser versus the PowerPoint desktop app .
Apply rich formatting to text, shapes, and pictures
Not available in PowerPoint for the web. Advanced formatting features, such as more colors, gradients, eyedropper, effects, and styles, are available in the PowerPoint desktop app. With PowerPoint for the web, you can add a text box or choose from a gallery of shapes and apply styles, which define fill, outline, and shadow effects.
Apply themes and theme variants
Choose from a gallery of built-in themes and variants when you add a new slide to the presentation. Themes not supported by PowerPoint for the web are preserved in the presentation, but the ability to modify themes is not available in PowerPoint for the web. Learn more about the differences between using a presentation in the browser versus the PowerPoint desktop app .
Office add-ins
PowerPoint for the web only supports content add-ins for Office. Content add-ins integrate web-based features as content that can be shown in line with a presentation. Learn more about types of add-ins for Office .
Arrange objects
Move, resize, rotate, or order shapes and text boxes in layers, back-to-front in PowerPoint for the web. Ungroup shapes to work with them individually. Learn more about the differences between using a presentation in the browser versus the PowerPoint desktop app .
Broadcast slide show
The PowerPoint desktop app is required to broadcast a slide show to a remote audience through PowerPoint for the web. Viewers can watch lives presentations through PowerPoint for the web, regardless of whether they have the PowerPoint desktop app installed. Learn more about broadcast slide show .
With PowerPoint for the web, you can cut, copy, and paste content in a presentation. A user can copy and paste text between Microsoft 365 for the web programs, as well as between Microsoft 365 for the web and the Microsoft Office desktop apps on the computer. Learn more about the differences between using a presentation in the browser versus the PowerPoint desktop app .
Create and manage slides
Add, reorder, duplicate, hide, and delete slides in PowerPoint for the web. Learn more about the differences between using a presentation in the browser versus the PowerPoint desktop app .
Create custom animation
PowerPoint for the web includes a gallery of animation effects. Animations not supported by PowerPoint for the web are preserved in the presentation and displayed in the slide show, but they can't be modified in PowerPoint for the web. To create custom animations, you'll need the PowerPoint desktop app installed on your computer. Learn more about creating custom animations with PowerPoint 2013 desktop app .
Design tools, advanced
Not available in PowerPoint for the web. Advanced design features, such creating slide masters and modifying layouts, are only available in the PowerPoint desktop app. With PowerPoint for the web, you can use your own template file as the basis for creating new files or choose from a predefined list of themes.
Dropbox is a file hosting service that offers cloud storage, file synchronization, personal cloud, and client software.
Embed presentation on web or blog page
With PowerPoint for the web, you can embed presentations on websites or blogs so that anyone can view your information even if they don't have the Microsoft PowerPoint desktop app. Embedded viewers show animations, transitions, and audio/video—the same as full fidelity reading view. Learn more about embedding presentations on a web or blog page .
Font downloading and formatting
The font service is a CDN based solution to ensure Office applications are able to render documents and presentations in full fidelity by downloading the required fonts to the local machine.
When sharing PowerPoint presentations with recipients via PowerPoint for the web, only use the fonts detailed in the cloud fonts list here . Why? These fonts are available in the cloud and are downloaded as needed and installed on our servers. Other fonts, including locally installed fonts not on this list and embedded fonts, will not be installed on our servers and will be replaced with fallback fonts, resulting in content reflow and formatting issues.
PowerPoint for the web lets you apply bold, italics, underline, font, size, and color to text. You can also use the Format Painter to copy the format of entire shapes.
To use your organization’s custom font on PowerPoint for the web, upload your font as an Organization Asset Library .
Full fidelity reading view
View presentations as they were intended to be seen—showing animations, transitions, and audio/video.
Full ink support
Ink can't be inserted in PowerPoint for the web, but PowerPoint for the web displays them as expected.
Full selection of animations and transitions
PowerPoint for the web supports eight transitions and 37 animations. For a larger selection, use the PowerPoint desktop app.
Headers and footers
Headers and footers, including date and slide numbers, can't be inserted, edited, or deleted in PowerPoint for the web, but PowerPoint for the web displays them as expected. Learn more about the differences between using a presentation in the browser versus the PowerPoint desktop app .
Insert, edit, and follow hyperlinks. Bookmark links work, but can't be edited in PowerPoint for the web.
Insert online video
Video and audio content plays in Reading view and Slide Show, with a file size limit of 100 MB. Online video can be inserted from YouTube, and media controls can be resized, moved, and deleted in PowerPoint for the web. But to insert audio and video other than YouTube, you need the Microsoft PowerPoint desktop app.
Integration with Excel for charts
Not available in PowerPoint for the web. With PowerPoint for the web, you can view Excel charts in an existing presentation, but you can't edit or insert an Excel chart in a presentation using PowerPoint for the web. Learn more about copying an Excel chart to PowerPoint .
Navigation - slide sorter
Slide sorter view, which gives you a view of your slides in thumbnail form, makes it easy to sort and organize your slides. You can use slide sorter view to organize your slides, add sections, and sort slides into different categories.
Offline viewing and authoring
PowerPoint for the web is launched from a web browser and relies on an internet connection. To access presentations offline, Microsoft PowerPoint desktop app must be installed on your computer and used to view and edit slides.
Picture cropping
Improve the framing of a subject in a picture with the cropping tool. Simply click one of the cropping handles at the edge of the picture and drag it until you achieve the picture you want.
With PowerPoint for the web, you can insert pictures stored on your computer, or insert pictures from Bing Images. You can move, resize, and crop pictures, and apply a number of picture styles. More sophisticated features for working with pictures, such as applying effects, are not available in PowerPoint for the web. You can't create screenshots in PowerPoint for the web, but screenshots that are in a presentation display as pictures in PowerPoint for the web. Learn more about the differences between using a presentation in the browser versus the PowerPoint desktop app .
Present online through Skype for Business or the Office Presentation Service
Not available in PowerPoint for the web. Microsoft PowerPoint desktop app lets you deliver your presentations using the Office Presentation Service, a free, public service that allows others to follow along in their web browser. Learn more about Office Presentation Service .
Presenter view
Not available in PowerPoint for the web. Only Microsoft PowerPoint desktop app allows a presenter a behind-the-scene control of the presentation flow, notes, annotations, and zooming tools. PowerPoint for the web does not support these features.
Print to PDF
With PowerPoint for the web, you can print your presentation to a PDF reader, where all the layout and formatting of your slides will print the way you expect. Learn more about basic tasks you can do using PowerPoint for the web .
Proofing tools
You can check spelling and set the proofing language, using the built-in dictionary with PowerPoint for the web. But PowerPoint for the web does not use a custom dictionary and does not include translation or a thesaurus.
Real-time co-authoring
Multiple authors can work simultaneously in PowerPoint for the web and PowerPoint 2016. Real-time presence helps you see where your co-authors are working in the presentation so that you don't create conflicts as you edit, and you can see changes as they're being made. PowerPoint 2013 supports simultaneous editing, but there is no presence indication, and changes can't be seen by multiple authors until the document is saved. For more information about real-time co-authoring in PowerPoint, see Work together on PowerPoint presentations .
Reviewer tools, advanced
Not available in PowerPoint for the web. Advanced reviewer features, such as merge conflicts and compare presentations, are only available in the PowerPoint desktop app. With PowerPoint for the web, you can view, add, edit, or delete comments.
Rights management: Apply and consume IRM and password protection
Not available in PowerPoint for the web. PowerPoint for the web displays presentations that are protected with Information Rights Management (IRM). However, these presentations can't be edited in the browser, and you can't create IRM-protected presentations in PowerPoint for the web. PowerPoint for the web can't open presentations that are digitally signed or encrypted with a password.
Run slide show
With PowerPoint for the web, you can run your presentation with just a web browser and an internet connection. Learn more about basic tasks you can do using PowerPoint for the web .
Save as or Download a copy
PowerPoint for the web saves your work every time you make a change. There is no Save command. You can download a copy, but you must have the Microsoft PowerPoint desktop app to edit a local copy.
Word Art and charts can't be inserted in PowerPoint for the web, but PowerPoint for the web displays them as expected. In Editing view, edit and format text. If you want to apply text effects to Word Art, you'll need the Microsoft PowerPoint desktop app.
If your presentation is saved in a SharePoint document library, then your presentation is online and you can share it by sending a link instead of an email attachment. People with proper permissions can view it in their web browser or mobile device. Learn more about sharing a presentation .
PowerPoint for the web plays slide shows in a full-screen window. Press the spacebar to advance the slides. Slide animations play, but only Fade and Wipe transitions between slides are supported. Learn more about the differences between using a presentation in the browser versus the PowerPoint desktop app .
You can insert SmartArt, switch to a different layout or color scheme, apply SmartArt styles, and edit text with PowerPoint for the web. Learn more about the differences between using a presentation in the browser versus the PowerPoint desktop app .
Table creation, editing, and formatting
Tables can be created and edited in PowerPoint for the web, and PowerPoint for the web supports most table functions. For advanced functions, such as merging and splitting cells, use the PowerPoint desktop app. Learn more about the differences between using a presentation in the browser versus the PowerPoint desktop app .
When you need to accomplish something in PowerPoint for the web but don't know how, you can use the Tell Me search feature to quickly find what you're looking for. Tell Me understands what you're trying to accomplish and helps you do it faster by making suggestions.
Undo and redo
Undo (Ctrl + Z) and redo (Ctrl + Y) an infinite number of recent actions during the current editing session in the active presentation. If the editing session times out or if you switch to Reading View for more than 30 seconds, the undo history is reset. Learn more about keyboard shortcuts in PowerPoint for the web .
View and add comments
If your files are stored on SharePoint Online or OneDrive for Business, you can add, edit, or delete comments.
If your files are stored on OneDrive, you can add, edit, or delete comments while in Editing View, and you can view and update comments while in Reading View.
View and edit slide notes
With PowerPoint for the web, notes for each slide can be displayed or hidden. You can also add notes in Edit mode.
WYSIWYG viewing
Edit your presentation in a form closely resembling its appearance when printed or displayed as a finished product.
Feature availability
To view feature availability across plans, standalone options, and on-premises solutions, see Microsoft 365 for the web service description .
Was this page helpful?
Coming soon: Throughout 2024 we will be phasing out GitHub Issues as the feedback mechanism for content and replacing it with a new feedback system. For more information see: https://aka.ms/ContentUserFeedback .
Submit and view feedback for
Additional resources
How To Add Live Web Pages To A PowerPoint Slide
Adding live web pages to PowerPoint slides can be a great way to enhance presentations. Whether you want to showcase a website, display frequently updated data, or simply avoid switching between browser windows, embedding web content directly into your slides has many benefits.
Benefits of Adding Live Websites to PowerPoint
Here are some of the key reasons why you may want to embed live web pages in your PowerPoint presentations:
Step 1: Install a PowerPoint Add-in
PowerPoint doesn’t have native support for embedding live websites, so the first step is to install an add-in that enables this functionality. Here are some top options:
Web Viewer : Another free Microsoft add-in, but only works with HTTPS sites.
Step 2: Add a Web Object to Your Slide
Step 3: link websites to allow clicking, step 4: set web objects to refresh automatically.
Some add-ins give you the option to enable auto-refreshing for web objects so content stays up-to-date:
With auto-refresh enabled, things like live dashboards, social media feeds and stock tickers will update automatically!
Step 5: Practice and Present Your Slideshow!
Make any final tweaks needed for optimization. When ready, present confidently knowing your embedded web pages will function smoothly!
Adding live websites and web apps directly into PowerPoint is simple with just a small add-in installation. With dynamic content seamlessly embedded into your presentation, both you and your audience can stay focused without distracting tab switching.
Give your next PowerPoint presentation an interactive edge by following the steps above to import functional, updating web pages. Your audience is sure to be impressed!
About The Author
Vegaslide staff, related posts, what to do if powerpoint won’t record audio while recording the screen on windows, how to make your powerpoint presentations compelling and memorable, powerpoint 2013: embedding an excel chart, how to create your career portfolio in microsoft powerpoint.
- Stack Overflow for Teams Where developers & technologists share private knowledge with coworkers
- Advertising & Talent Reach devs & technologists worldwide about your product, service or employer brand
- OverflowAI GenAI features for Teams
- OverflowAPI Train & fine-tune LLMs
- Labs The future of collective knowledge sharing
- About the company Visit the blog
Collectives™ on Stack Overflow
Find centralized, trusted content and collaborate around the technologies you use most.
Q&A for work
Connect and share knowledge within a single location that is structured and easy to search.
Get early access and see previews of new features.
Embed a Powerpoint in a Web Page
Is there any way to embed a PowerPoint slide show in an HTML page using just the standard tags etc? I tried using a iframe, but that just results in the PowerPoint being downloaded.
I am looking for a way to show the slide show using only standard stuff. I realize I could use google docs or flash or something, but I'd rather have a simple implementation.
Does the web just not know how to process a PowerPoint presentation?
- possible duplicate of Embed Powerpoint into HTML – Marko Commented Aug 18, 2011 at 0:29
- 2 I said I do not want to use google docs. – Snowy Coder Girl Commented Aug 18, 2011 at 0:30
- 1 It lists other possible solutions, look at the answers below the accepted one. – Marko Commented Aug 18, 2011 at 0:31
- I saw ones about Flash and other applications, but I'll look deeper some more. – Snowy Coder Girl Commented Aug 18, 2011 at 0:37
- Google docs is the simple implementation. – djlumley Commented Aug 18, 2011 at 2:11
11 Answers 11
Plain and simple...this is the best method to embed any Microsoft or Adobe file into a HTML website.
- 2 I wonder why the hell your answer doesn't get more upvotes. It's the closest one to the original intention of the asker. – EugZol Commented Oct 18, 2017 at 16:34
- 6 This answer won't work for presentations on an internal website. – NetMage Commented Aug 2, 2019 at 19:53
- 3 <iframe width="100%" height="630" src=" docs.google.com/viewer?url=your_file&embedded=true " ></iframe> – Alexis Cabrera Mondeja Commented Apr 6, 2020 at 1:53
- 1 JS var url = encodeURIComponent(originalURl); HTML: <iframe src=' view.officeapps.live.com/op/embed.aspx?src=$ {url}' width='100%' height='600px' frameborder='0'> – Anil Commented May 7, 2020 at 15:12
- 3 As of 2022, I can't get the above answer to work. I've updated the url to a real deck in the github sharepoint that I uploaded. I assume the view.officeapps.live.com/op/embed... isn't there any more. – Lance Kind Commented Feb 24, 2022 at 16:50
Just to update this question - as there is a new way to embed Powerpoints in a web page. If you have an account on OneDrive , do the following using Powerpoint Online (accessing Powerpoint via the browser) to embed a Powerpoint:

- 2 this was unexpectedly easy! – Gregg Bursey Commented May 11, 2017 at 21:37
- Hey, please give me solution for without putting ppt on the drive and take from the server then how do they do it? – user7918630 Commented Sep 7, 2017 at 10:22
- 1 requires viewers to have a microsoft account. not a good solution for a public website. – sspence65 Commented Dec 22, 2020 at 10:44
Web browsers don't understand power point, but there are solutions besides Flash.
You could export it to HTML or a PDF. Or you could also upload to site like slideshare and make use of their players which are built for this problem.
- 1 +1, thanks for the help. I have decided to use YouTube (see answer). Thanks again. ^_^ – Snowy Coder Girl Commented Aug 18, 2011 at 2:07
- Hey, please give me solution for without putting ppt on the drive and take from the server then how do they do it? – user7918630 Commented Sep 7, 2017 at 10:23
I have decided to take a hack route and upload the powerpoint onto YouTube and then just include the youtube video in the iframe.
I know, it's cheap, but it's also easy.
I eventually checked my page as XHTML Strict, which does not support the <iframe> tag. So I used the object tag instead.
I tried answer posted by Shane, which looks exactly right and how MS used to have PPT viewing online earlier but it didn't worked for me. After doing some research I found out that the link has changed a bit.
So use: https://view.officeapps.live.com/op/ view.aspx instead of https://view.officeapps.live.com/op/ embed.aspx
Note: Link to PPT need to be publicly accessible.
- 2 I like more google docs viewer works with docs, pptx, pdf, etc. <iframe width="100%" height="630" src=" docs.google.com/viewer?url=your_file&embedded=true " ></iframe> – Alexis Cabrera Mondeja Commented Apr 6, 2020 at 2:05
- Animations and effects present in a PPT won't work with google docs viewers. – SumitK Commented Apr 7, 2020 at 6:29
- But you can use "Open With" and use Google presentations App. – Alexis Cabrera Mondeja Commented Apr 8, 2020 at 14:07
- I'm not sure if that can be done directly via a link like we can with MS. Also I believe to use Google Slides user need to be signed in with an Google account. – SumitK Commented Apr 9, 2020 at 15:21
Use Microsoft skydrive, upload your power point to this site and use this code
http://skydrive.live.com/redir.aspx?cid=20f065afc1acdb2e&page=view&resid=20F065AFC1ACDB2E!723&parid=20F065AFC1ACDB2E!719 is the URL of the powerpoint file.
You have to replace SD20F065AFC1ACDB2E!723 for your own string of the corresponding URL
- <iframe src=" r.office.microsoft.com/r/… " width="402" height="327" frameborder="0" scrolling="no"></iframe> – Carlos Soto Johnson Commented Jul 8, 2012 at 4:13
- Look the code of this site, crc.tc/powerpointDemo.html and replace SD20F065AFC1ACDB2E!723 with your own power point skidrive URL identifier – Carlos Soto Johnson Commented Jul 8, 2012 at 4:21
Upload a PowerPoint document on your Google Drive and then 'Share' it with everyone (make it public): Sharing your pptx doc
Then, go to File > Publish to the web > hit the publish button.
Go to Embed and copy the embed code and paste it to your web page
Copy embed code
Works Best for me.
Goto MS View Office Documents Online Page
Enter link to PPT file Note: This link should be publicly Accessible
Click on Create URL.
Link to view office documents online will be generated.
Paste this link to any webpage or as iframe src attribute.
You are all set!! :)
I was able to do this by saving the PPT as an mp4 (Save As > MPEG-4 Video (*.mp4)) and then using the video tag.
If you are using Google slides you could easily publish it on the web and also embed the slide in an iframe.
Go to google slides -> file-> sharing -> embed and copy the code

and then in your HTML file use the below code to show slides in fullscreen mode.
why not use prezi, I just use it in my work, very easy and useful.

Not the answer you're looking for? Browse other questions tagged html powerpoint or ask your own question .
- Featured on Meta
- Upcoming initiatives on Stack Overflow and across the Stack Exchange network...
- Announcing a change to the data-dump process
- What makes a homepage useful for logged-in users
Hot Network Questions
- New causes of side channel
- Why does "They be naked" use the base form of "be"?
- Is "secco" really used in piano music?
- How were the alien sounds created in the 1953 War of the Worlds?
- Can you find a real example of "time travel" caused by undefined behaviour?
- Do programs within which a computable function runs a random number of times always halt, as in the halting problem?
- Do spells taken by the Magic Initiate feat require material components that cost gold?
- Edna Andrade's Black Dragon: Winding Around Control Points
- Determine if N is zibbable
- Does 发动机 mean "engine"?
- Okay to travel to places where the locals are unwelcoming?
- Purpose of Green/Orange switch on old flash unit
- How to pronounce Türkiye in English?
- Natural mechanism behind burning oceans
- Photon propagator
- Constructing the interval [0, 1) via inverse powers of 2
- Is the XOR of hashes a good hash function?
- The Zentralblatt asked me to review a worthless paper, what to do?
- How to come back to academic machine learning career after absence due to health issues
- Is there any way to check the originality of Windows OS?
- Joining 'fish shell' arguments into a single string with spaces
- Is there a theory in which all types can be omitted?
- Continuity and lebesgue integrability of integral function, proof verification
- Mutual Life Insurance Company of New York -- What is it now? How can I reach them?

Office is now Microsoft 365
The all-new Microsoft 365 lets you create, share and collaborate all in one place with your favorite apps

For Organizations
For educators, free or premium: microsoft 365 has you covered.
Everyone gets cloud storage and essential Microsoft 365 apps on the web, free of charge

Create something inspiring
Quickly design anything for you and your family—birthday cards, school flyers, budgets, social posts, videos, and more—no graphic design experience needed.

Store with confidence
Your files and memories stay safe and secure in the cloud, with 5 GB for free and 1 TB+ if you go premium

Share with friends...
...even if they don't have Microsoft 365. Seamlessly collaborate and create files with your friends and family

Protect your personal data
Easily add and monitor your family members' information in your dashboard

More apps in fewer places
The new Microsoft 365 brings together your favorite Microsoft apps all in one, intuitive platform

The best tools. Your best team. The world at your fingertips.
Microsoft 365 empowers your employees to do their best work from anywhere in the world, together in one place

Create anywhere, anytime, with any app
Anyone in your organization can quickly create documents, presentations, and worksheets within a single, unified, Microsoft 365 experience

Your content Your Microsoft 365
Microsoft 365 empowers your organization to organize, and safely store files in OneDrive with intuitive and easy organizational tools

Work together, better
Keep your business connected from anywhere with chat and cloud collaboration tools

Pick up where you left off
Microsoft 365 seamlessly tracks updates, task, and comments across all your files so you can pick up right where you left off

Empower your students and teachers to achieve more
Teachers and students get access to the best tools for learning anywhere—in the classroom, remotely or in a blended environment—for free

Spark creativity and collaboration in any learning environment—whether in the classroom, remote, or blended—with intuitive, inclusive design

Empower your educators
Create equitable learning environments that help students develop knowledge and skills essential for both academic and career success

Learning reimagined
Give students the tools to learn and collaborate on projects together and independently, all in one place

Bring your class together
Microsoft 365 helps your students connect and achieve more together, whether in the classroom, at home, or around the globe

Get the free Microsoft 365 mobile app

Follow Microsoft 365

- Generative AI
- Office Suites
- Collaboration Software
- Productivity Software
- Augmented Reality
- Emerging Technology
- Remote Work
- Artificial Intelligence
- Operating Systems
- IT Leadership
- IT Management
- IT Operations
- Cloud Computing
- Computers and Peripherals
- Data Center
- Enterprise Applications
- Vendors and Providers
- Enterprise Buyer’s Guides
- United States
- Netherlands
- United Kingdom
- New Zealand
- Newsletters
- Foundry Careers
- Terms of Service
- Privacy Policy
- Cookie Policy
- Copyright Notice
- Member Preferences
- About AdChoices
- E-commerce Affiliate Relationships
- Your California Privacy Rights
Our Network
- Network World
5 Ways to Put PowerPoint Presentation on Web
Want to share your original and creative presentations with others all over the world? Putting PowerPoint presentation on Web sounds a good idea. Especially in this era of Internet on which everyone can view various resources using their computers.
Here are 5 different ways to put PowerPoint presentation on Web. Each way has its cons and pros.
Method 1 Upload and link PowerPoint File directly
Yes, you could just upload PowerPoint file to your web site and link to it. Visitors click and download the file to view the presentation on their computers.
Visitors should download the presentation before viewing.
Visitors should install
to view it.
The presentation file may have a big file size.
Just upload your presentation to your Website and link to it.
Share your presentation with all the animations and special effects.
Method 2 Share presentation on Slideshare.net
Slideshare.net is a famous presentation sharing website. Think of it as something like YouTube for slide shows. You can upload your presentations in PPT, PPS or POT formats to SlideShare and they’re converted into shared media.
All the animations, multimedia files in the presentation will disappear.
The presentation can be viewed on any computers.
Method 3 Publish as HTML web page
PowerPoint lets you save your presentation as HTML, as a web page (Office button -> Save As -> Other Formats, and then choose Web Page in the “Save as type” pull-down menu).
Each slide is saved as a separate image, with its own page, so you have to upload an entire folder of files to your server.
It will not display properly for website visitors who aren’t using IE.
Free open source software may be a stronger choice in this instance. OpenOffice Impress , the PowerPoint look-alike from http://www.OpenOffice.org , lets you create a PPT presentation from scratch, and it will also convert an existing PowerPoint presentation to HTML in a form that’s compatible with a broader range of browsers.
Method 4 Flash it using Wondershare PPT2Flash
Actually, OpenOffice even offers to export your presentation as a Flash (SWF) format, but animations will disappear.
Wondershare PPT2Flash, an add-in of PowerPoint, lets you convert PowerPoint presentation to Flash with one-click.
3 steps to convert your presentation to Flash:
Download and install PPT2Flash -> Import PowerPoint presentation -> Click “Publish” to convert.
Has up to 90% reduction in file size after conversion.
Flash can be shown properly on any computers.
The conversion retains all the animations, hyperlinks, multimedia file in your presentation.
Flash is difficult to modify .
Method 5 Record it using Camtasia Studio
Download and install Comtasia (http://www.techsmith.com) on your computer and then follow the steps below.
Step 1, save your PPT file as PPS file.
Step 2, Set Camtasia studio to record the whole screen.
Step 3, Play your PowerPoint PPS file and Press “F9†to start recording the screen.
Step 4, when you reach your last blank slide, Press F10 to tell Camtasia Recorder to stop recording. You will be prompted to save the captured slideshow, so choose a directory and enter filename.
Step 5, save your capture in SWF format.
It will a little time-consuming if there are many slides in your presentation.
Best way to publish your presentation on Web
If you want to make animated and protected presentation on Web in minutes, converting PowerPoint to Flash using Wondershare PPT2Flash sounds downright elegant!
Showing a Flash movie on web is most often as easy as uploading your SWF file to your web space and using a few lines of object / embed code (http://www.w3schools.com/flash/flash_inhtml.asp) to embed the file on your page.
Camtasia can record the screen and sound when your play your PowerPoint, but should pay $299 to buy which is higher than PPT2Flash ($59.95). For Mac users, you can upload your presentation to slideshare.net . If you only want to create static presentation on web, using OpenOffice to export your presentation to HTML or Flash would be better.
I hope you can use these 5 methods to share your presentation on web easily. Of course, if you have any other good methods, please let me know. Thanks!
Related content
Why apple intelligence will grab hearts and minds, big tech firms have reportedly used thousands of youtube videos to train ai, mistral’s new codestral mamba to aid longer code generation, data about millions of trello users leaks online, from our editors straight to your inbox, show me more, ftc is looking into amazon’s deal with ai startup adept.

iGoogle reinvented: Meet the perfect Chrome productivity power-up

10 PowerToys you should use on Windows

Is it fair to call the Vision Pro a flop?

Podcast: Why a TikTok ban makes sense

Podcast: Are audio AI companies infringing on musicians' rights?

It's OK to call Apple Vision Pro a flop

What will spatial computing look like in 2030?

Why a TikTok ban makes sense

Sponsored Links
- Get Cisco UCS X-Series Chassis and Fabric Interconnects offer.
Microsoft 365 Basic now includes ransomware protection for your files and photos at no extra cost.

Use Word, Excel, PowerPoint and more for free on the web
Office is now Microsoft 365
Get the free Microsoft 365 mobile app*
Start using Microsoft 365 today

Anywhere access
Whether you’re at work or on the go, create your best work on your favorite browser.
Familiar experience
The familiar Microsoft 365 experience you know and trust, so there’s nothing new to learn.
Work with anyone
Share your documents with anyone and work together in real-time.

Word for the web
Craft great-looking resumes, newsletters, and documents while inviting others to review and coauthor in real time. Plus, access free Word templates, formatting tools for APA, MLA, and Chicago style, and add functionality with free add-ins.
Excel for the web
Organize your data in familiar spreadsheets and workbooks, with all changes saved automatically. Create modern visuals that turn numbers into valuable insights. Work together in real time knowing that everyone is on the same page.

PowerPoint for the web
Turn your ideas into compelling presentations using professional-looking templates. Use animations, transitions, photos, and videos to tell one-of-a-kind stories. Co-author team presentations at the same time, from anywhere.
Start now at Microsoft365.com
No installation required. It's free.
* Availability of mobile apps varies by country/region.
Follow Microsoft 365
- Chat with sales
- Contact sales
Available M-F 9 AM to 5 PM.
- Virtual Reality
- Video-Based Learning
- Screen Capture
- Interactive eLearning
- eLearning Resources
- Events and Announcements
- Adobe Learning Manager
- Adobe Connect
- Recent Blogs
- VR projects
- From your computer
- Personalize background
- Edit video demo
- Interactive videos
- Software simulation
- Device demo
- System audio / narration
- High DPI / Retina capture
- Responsive simulation
- Full motion recording
- Advanced actions
- Conditional actions
- Standard actions
- Execute Javascript
- Shared actions
- Learning interactions
- Drag and Drop interactions
- eLearning Community
- Tutorials/Training
- Deprecated features
- Support questions
- New version
- Reviews/Testimonials
- Sample projects
- Adobe eLearning Conference
- Adobe Learning Summit
- Customer meetings
- Announcements
- Adobe Captivate Specialist Roadshows
- Account settings
- Active fields
- Activity modules
- Adobe Captivate Prime
- Auto enrollment using learning plans
- Automating user import
- LMS Branding
- Certifications
- Classroom trainings
- Content curation
- Content storage
- Course level reports
- Create custom user groups
- Customize email templates
- Default fields
- eLearning ROI
- Employee as learners
- Extended eLearning
- External learners
- Fluidic player
- Gamification and badges
- getAbstract
- Harvard ManageMentor
- Integration with Adobe Connect and other video conferencing tools
- Integration with Salesforce and Workday
- Integration with third-party content
- Integrations
- Internal and external users
- Internal server
- Learner dashboard
- Learner transcripts
- Learning objects
- Learning plan
- Learning programs
- Learning styles
- LinkedIn Learning
- LMS implementation
- Managing user groups
- Multi tenancy
- Multi-scorm-packager
- Overview of auto-generated user groups
- Prime integration
- Self-Paced trainings
- Set up announcements
- Set up external users
- Set up gamification
- Set up internal users
- Single sign-on
- Social learning
- Tincan/xAPI
- Types of course modules
- Virtual classroom trainings
- Accessibility
- Adobe Connect Mobile
- Breakout Rooms
- Case Studies
- Collaboration
- Connectusers.com
- Customer Stories
- Product updates
- Social Learning
- Virtual Classrooms
- Virtual Conferences
- Virtual Meetings
- Unified Communications
- Free Projects
- Learning Hub
- Discussions
- eLearning Projects
- PowerPoint to eLearning Follow
Applicable to Adobe Captivate (2017 release)
Useful Resources Adobe Captivate Free Sample Project – CloudAir SoftSkills Download Free Adobe Captivate Sample Project – Adobe Captivate 2017 Training Download the Workbook – Getting Started with Fluid Boxes in Adobe Captivate 2017 Download the workbook – [Workbook] Multi-state Objects in Adobe Captivate 2017
In this blog post, you will learn how to easily convert your PowerPoint slides into interactive and engaging web-enabled presentations using HTML5.
What you’ll need You will need a Windows PC/laptop or a Mac and a copy of Adobe Captivate. ( You can download a free 30 day trial of Adobe Captivate here. )
Step 1 Create a PowerPoint slide deck in Microsoft PowerPoint and save it. Remember where you saved your PowerPoint slide deck.
Step 2 Open Adobe Captivate. If you are on a Mac, you’ll find your installed version of Captivate under Applications. If you are on a Windows computer, you’ll find it under the Start Menu.

Step 4 A dialog box will open. Chose the PowerPoint slide deck.

Step 6 Select File: Publish from the menus.
Step 7 In the Publish dialog, select the SWF/HTML5 tab (top left). Then set the output format to HTML5 (you can turn off SWF.) Finally, click Publish.
Your published HTML5 web page will now be available. But if you’ve never worked with HTML or HTML5 before it might not look the way you expected. Web pages are stored as individual elements (like graphics etc.) and a set of instructions in a text file that is usually called ‘index.html’
To put your new web slide show online you’ll want to copy the folder with your converted PowerPoint deck into your web server. By Default, Captivate publishes files into a folder called ‘My Adobe Captivate Projects’ in your Documents folder. Here’s a view of the PowerPoint that I just published, shown as a folder inside that directory.

As always, don’t hesitate to share your ideas, comments, and questions in the discussion section below.

I am just discovering Captivate. I am wondering how to use Captivate to convert pptx files to editable HTML5. I tried publishing a few files, but all my custom shows were lost. All Captivate did was make my slides into un-editable graphics that displayed sequentially, instead of in the shows I set up. It also removed all my links in the slides. Any way to make this work like a real PowerPoint show? Thanks.
I am new to it too.. I am trying to publish an animated PPT deck to html 5.. And not a single animation will work.. Even the most basic one.. life fade text in..
Is this discussion group still active? I’ve been trying to import Powerpoint 2011 Mac pptx into Captivate 7 but I get an error message? Is this a known issue and is there a fix? Anybody?
I came across your post on this older thread and was wondering if you are still looking for ppt conversion?
Thanks for your time Bhim
It does convert it to HTML5, but all of the animations/transitions are lost. What can be the reason? I am using the trial Captivate 7 for now.
Is it because there is no “High Fidelity” option? How do I enable it? Thanks!
If you’re converting it to HTML5 for the purpose of viewing the presentation on an iOS device, this issue is that the PowerPoint conversion process turns your PowerPoint animations into Flash SWF objects. Since Flash won’t play on an iOS device, you will not see the animations.
Hi, Diliara! Do you use any other platform besides Mac? There’s a great tool called iSpring which preserves all effects in pure HTML5, but it’s for Windows. Sorry if that doesn’t help the situation… (I do realize this is a pretty old post, so I hope you’ve found a solution by now!)
You must be logged in to post a comment.

- Create and open Article
- Share and collaborate Article
- Add and format Article
- Design a presentation Article
- Give your presentation Article
Give your presentation
Give your presentation in powerpoint for the web.
Start a presentation
On the View tab select Play from Beginning .
To move to the previous or next slide, select Previous or Next .
To view all the slides in your presentation, select See all slides .

You can choose which language the caption/subtitle text should be shown to your audience. This feature is compatible with the following web browsers: Microsoft Edge, Google Chrome 34+, Mozilla Firefox 25+.
Select View > Always Use Subtitles .
Set your Spoken Language .
Select Subtitle Language to see which languages PowerPoint can display on-screen as captions or subtitles, and select the one you want.
In the Subtitle Settings menu, set the desired position of the captions or subtitles.

PowerPoint help and training
PowerPoint training
PowerPoint help
What's new in Microsoft 365
PowerPoint for Mac Help
Set up Office apps and email on a mobile device
Office Quick Starts

Need more help?
Want more options.
Explore subscription benefits, browse training courses, learn how to secure your device, and more.

Microsoft 365 subscription benefits

Microsoft 365 training

Microsoft security

Accessibility center
Communities help you ask and answer questions, give feedback, and hear from experts with rich knowledge.

Ask the Microsoft Community

Microsoft Tech Community

Windows Insiders
Microsoft 365 Insiders
Was this information helpful?
Thank you for your feedback.
Find the perfect PowerPoint presentation template
Bring your next presentation to life with customizable powerpoint design templates. whether you're wowing with stats via charts and graphs or putting your latest and greatest ideas on display, you'll find a powerpoint presentation template to make your ideas pop., presentations.
Help your data, insights, and recommendations make a statement with beautiful and easily customizable presentation templates.

Certificates
Celebrate accomplishments big and small with customizable certificate templates. From gift certificates to awards for finishing a course or training, find a template that highlights their accolades.

Boost visibility for your show, project, or business with easily customizable poster templates. Find templates for all your promotion needs and make them uniquely yours in a flash.

Keep track of whatever you need to in style. From personal planning to promotional calendars, find templates for every kind of project and aesthetic.

Infographics
Say more with less using helpful and easily customizable infographic templates. Add clarity to business presentations, school projects, and more with these helpful templates.

Start with the best PowerPoint templates

Elevate your storytelling
Tips, tricks, and insider advice from our business and design experts
A quick way to create beautiful, powerful PowerPoint presentations
Create captivating, informative content for PowerPoint in just a few minutes—no graphic design experience needed. Here's how:

1. Find the perfect PowerPoint template
2. Customize your creation

3. Show it off
Let's create a powerpoint design, frequently asked questions, where can i find slide templates and themes that i can customize.
To find customizable slide templates and themes, you can explore the business presentations templates or search by PowerPoint templates . Once you find a template that resonates with you, customize it by changing its color scheme, add in your own photos, and swap out the font.
How do I use pre-made PowerPoint templates?
After you've chosen a PowerPoint template to use, customize it. Explore [design tips] on how to customize a deck that resonates with your brand while putting emphasis on the topic at hand. Play with other design elements, like photo shapes, to make each slide unique.
How can I make or edit my own custom PowerPoint templates?
Start from scratch by creating your own PowerPoint template . Follow tips for designs and business presentations so that your unique template is cohesive and relevant to your brand. Incorporate your brand's color scheme and graphics so that all your slides aren't text only.
What kinds templates can I get online for PowerPoint?
You can get PowerPoint templates that have modern designs, animated ones, or even hand-drawn art in each slide. The color schemes range from bold to subtle. Each template's slides are also organized based on what you may want to include in your presentation . You can use the template as a starting point and customize its specific details from theme.
Popular categories

Search for: Search Button
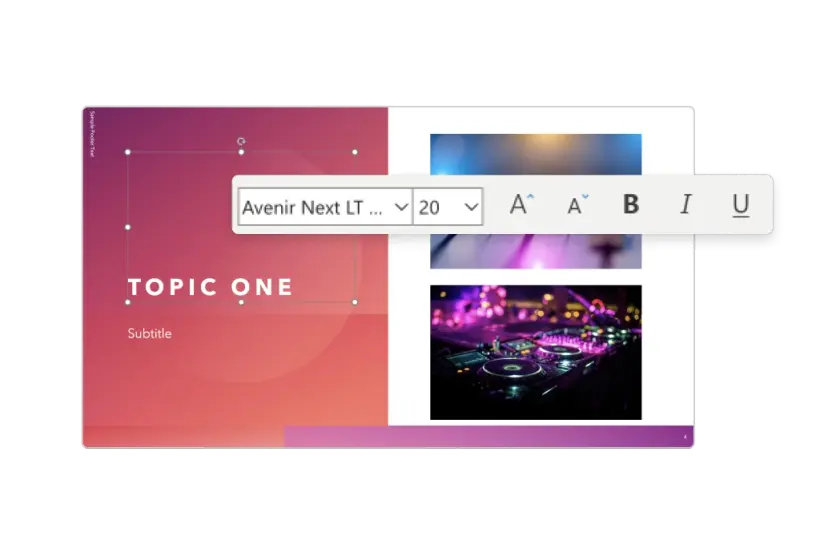
- Two faster ways to insert an image from the web into Microsoft Office
There are two quicker ways to insert an image or graphic from the Internet or web page into a Word document, Excel sheet, PowerPoint slide or Outlook email.
The method most people are taught is to save an image to their computer then Insert | Picture | from this device to select that file. That method works but there are two smarter options available in any browser and any version of Microsoft Office.
Copy image link
Far and away the easiest option is to right-click on the image showing on a web page and choose ‘Copy Image’.
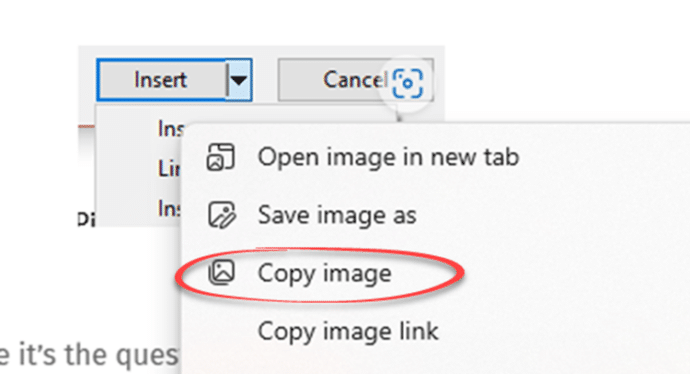
That puts the picture or graphic into the clipboard.
Then switch to the Office app and paste (Ctrl + V).
That works for most images (JPG, PNG). Modern Windows and Office can understand the relatively new WebP image format .
Note: SVG graphics can NOT be directly copied from a web page (that’s coming soon with a browser update). Until then you’ll have to use ‘Copy image link’ instead.
Instead of copying the image, copy the web link. Right-click on the image and look for a ‘Copy image link’ option on the menu.

(The exact name of the option might vary, depending on the browser. Some web sites have code to block this feature.)
NOT the ‘Copy link’ choice, that’s the link for the whole web page
With the image link in the clipboard, switch to the Office app and go to Insert | Pictures | Insert Picture from | this device. Even though the option says ‘this device’ you can paste in a web link.
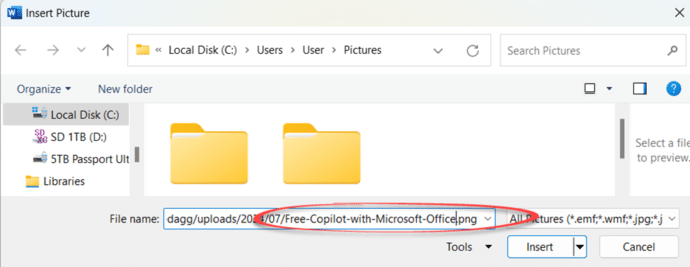
Click Insert and Office will grab the image from the web site and add it into the document.
Smarties might want to link an image instead of inserting Images in Office – Inserted or Linked? Or Three choices to add images to Office and emails
About this author

Office-Watch.com
Office 2021 - all you need to know . Facts & prices for the new Microsoft Office. Do you need it? Office LTSC is the enterprise licence version of Office 2021.
Office 2024 what's known so far plus educated guesses. Microsoft Office upcoming support end date checklist.
Latest from Office Watch
- Microsoft Designer has discovered landscape images
- WebP support available in Microsoft Office
- Notepad gets spell check and autocorrect
- Two better ways to Remove Background from images
- How the Background Removal Tool in Office really works.
- Insert the Spanish flag into Word, Excel or PowerPoint
- More free Copilot tricks for Microsoft Office users
- Change a picture to a custom color in Office
- Excel’s data from picture!
- Insert the English flag into Word, Excel or PowerPoint
- What to do about 30088-27 errors on Office install
- Clipchamp now for work accounts
- All about “Please check your network connection and try again” errors
- Starting off with Regular Expressions in Excel
- Why AI is not as great as the hype
- 12 better ways to move around a Word document
- Word Navigation Pane tricks and hidden options
- Using OpenDocument in Microsoft Office
- Get a truly private word processor from Proton
- Create a presentation Article
- Add and format Article
- Design a presentation Article
- Share and collaborate Article
- Give a presentation Article
- Set up your mobile apps Article
- Learn more Article
Give a presentation
Give a presentation in powerpoint for the web.
Start a presentation
On the View tab select Play from Beginning .
To move to the previous or next slide, select Previous or Next .
To view all the slides in your presentation, select See all slides .
You can choose which language the caption/subtitle text should be shown to your audience. This feature is compatible with the following web browsers: Microsoft Edge, Google Chrome 34+, Mozilla Firefox 25+.
Select View > Always Use Subtitles .
Set your Spoken Language .
Select Subtitle Language to see which languages PowerPoint can display on-screen as captions or subtitles, and select the one you want.
In the Subtitle Settings menu, set the desired position of the captions or subtitles.
Need more help?
Want more options.
Explore subscription benefits, browse training courses, learn how to secure your device, and more.
Microsoft 365 subscription benefits
Microsoft 365 training
Microsoft security
Accessibility center
Communities help you ask and answer questions, give feedback, and hear from experts with rich knowledge.
Ask the Microsoft Community
Microsoft Tech Community
Windows Insiders
Microsoft 365 Insiders
Was this information helpful?
Thank you for your feedback.
COMMENTS
PowerPoint for the web. Turn your ideas into compelling presentations using professional-looking templates. Use animations, transitions, photos, and videos to tell one-of-a-kind stories. Co-author team presentations at the same time, from anywhere. Start using PowerPoint for free Learn more about PowerPoint.
Here's how to get started: Click PowerPoint. Create a new, blank presentation, start with a template, or open an existing file. When you start with a new, blank presentation, PowerPoint automatically saves it to OneDrive with a default name, such as Presentation 1. To rename your presentation, do the following:
Create the slide on which you want to place the website. Switch to the Insert tab and click on Web Page in the LiveWeb section. Under Insert you have new options in PowerPoint. This starts an assistant, the first step of which you can skip. In the next dialog, enter the address of the website.
One person. Sharing and real-time collaboration. PowerPoint for the web and PowerPoint desktop app for offline use. Premium templates, fonts, icons, and stickers with thousands of options to choose from. Dictation, voice commands, and transcription. Advanced spelling and grammar, in-app learning tips, use in 20+ languages, and more.
With PowerPoint for the web running in your web browser, you can: Create presentations that include images, videos, transitions, and animations. Get to your presentations from your computer, tablet, or phone. Share and work with others, wherever they are.
Use Microsoft 365 for the web to edit and share Word, Excel, PowerPoint, and OneNote files using a web browser for free.
Starting in PowerPoint for the web means your files are automatically saved in OneDrive. This lets you share the files with co-workers and start collaborating immediately. And when you need more functionality, you can work on the presentation together in the PowerPoint desktop app and all of your changes will be saved online.
Select Add-Ins on the left side, then select PowerPoint Add-ins from the Manage menu, and click Go. This will open the PowerPoint Add-ins window. Click Add New to add the LiveWeb addin we downloaded previously. Browse to the folder where you extracted the LiveWeb addin, and select it. PowerPoint may warn you that the addon contains a macro.
Right-click the thumbnail of the slide you want to save, and click Copy. In a new Word document, paste your slide (Ctrl+V). If necessary, drag to resize the slide image to fill the page. Click File > Save As, and then choose Web Page or Web Page, Filtered.
Embed presentation on web or blog page. With PowerPoint for the web, you can embed presentations on websites or blogs so that anyone can view your information even if they don't have the Microsoft PowerPoint desktop app. Embedded viewers show animations, transitions, and audio/video—the same as full fidelity reading view.
To use it: Download and install the PowerPoint Web Viewer Add-in. On a slide, go to Insert > My Add-ins > Web Viewer > Insert. Paste the website URL and insert. Resize and position the web viewer object as needed. The Web Viewer works well for secure web pages and content you want to display directly in the slideshow.
PowerPoint for the web enables you to access PowerPoint files on any connected device anytime, anywhere. Learn more at the PowerPoint help center: https://su...
1. Open or create the presentation that you want to save as a web page in the Microsoft PowerPoint. 2. Then open the 'File' menu from the top left side of the PowerPoint window. 3. Select ...
Navigate to the slide where you want to embed web content. On the Insert tab, click the add-in's icon (it may say Web Object, Browser etc. depending on the add-in). In the dialog box, paste the full URL of the web page you want to display. Resize and position the web object as needed on your slide. Repeat this process to add multiple web ...
1. Upload a PowerPoint document on your Google Drive and then 'Share' it with everyone (make it public): Sharing your pptx doc. Then, go to File > Publish to the web > hit the publish button. Go to Embed and copy the embed code and paste it to your web page. Copy embed code.
Collaborate for free with online versions of Microsoft Word, PowerPoint, Excel, and OneNote. Save documents, workbooks, and presentations online, in OneDrive. Share them with others and work together at the same time.
Step 1, save your PPT file as PPS file. Step 2, Set Camtasia studio to record the whole screen. Step 3, Play your PowerPoint PPS file and Press “F9†to start recording the screen. Step 4 ...
With Microsoft 365 for the web you can edit and share Word, Excel, PowerPoint, and OneNote files on your devices using a web browser.
Click the Okay button to continue importing and converting your slide deck. Step 6 Select File: Publish from the menus. Step 7 In the Publish dialog, select the SWF/HTML5 tab (top left). Then set the output format to HTML5 (you can turn off SWF.) Finally, click Publish.
Print. In PowerPoint for the web, you can print one slide per page, with headers and footers. (For details, see Print your PowerPoint slides, handouts, or notes) and you can print notes pages, or handouts. To get more printing layout options click Edit in PowerPoint, and print in the PowerPoint desktop application.
While you can't convert your presentation to a web page, you can include it on a web page or blog post. With your presentation open in PowerPoint for the web, choose File>Share>Embed. Set the height and width at which you want it to display, then copy the Embed Code. Paste that code onto your web page HTML, then upload the page to your web site ...
Give your presentation in PowerPoint for the web. Start a presentation. On the View tab select Play from Beginning. To move to the previous or next slide, select Previous or Next. To view all the slides in your presentation, select See all slides. Subtitles. You can choose which language the caption/subtitle text should be shown to your audience.
Create captivating, informative content for PowerPoint in just a few minutes—no graphic design experience needed. Here's how: 1. Find the perfect PowerPoint template. Search for anything—type of template, image, color, —or take a look around by browsing the catalog. Select the template that fits you best, from pitch decks to data ...
Note: SVG graphics can NOT be directly copied from a web page (that's coming soon with a browser update). Until then you'll have to use 'Copy image link' instead. Copy image link. Instead of copying the image, copy the web link. Right-click on the image and look for a 'Copy image link' option on the menu.
For one or two versions after Microsoft removed the ability to save as HTML/Web page, you could force it to work by manually entering a bit of VBA in the Immediate window. They removed even that. There's no longer any built-in way to save from PPT to web pages. There are quite a few add-ins or programs that can convert PowerPoint presentations ...
Start a presentation. On the View tab select Play from Beginning. To move to the previous or next slide, select Previous or Next . To view all the slides in your presentation, select See all slides. Subtitles. You can choose which language the caption/subtitle text should be shown to your audience. This feature is compatible with the following ...
Turn Slides into Show-Stopping Presentations That Captivate Your Audience. Master the Art of Presentations with this comprehensive PowerPoint course designed for all levels. Whether you're a complete beginner or looking to refine your existing skills, this course will equip you with the knowledge and techniques to create impactful and memorable presentations.
Visit the Microsoft 365 page.; If you already have a free account with Microsoft, click Sign in. Otherwise, press "Sign up for the free version of Microsoft 365" to create a new account at no cost.