- Stack Overflow for Teams Where developers & technologists share private knowledge with coworkers
- Advertising & Talent Reach devs & technologists worldwide about your product, service or employer brand
- OverflowAI GenAI features for Teams
- OverflowAPI Train & fine-tune LLMs
- Labs The future of collective knowledge sharing
- About the company Visit the blog

Collectives™ on Stack Overflow
Find centralized, trusted content and collaborate around the technologies you use most.
Q&A for work
Connect and share knowledge within a single location that is structured and easy to search.
Get early access and see previews of new features.
Microsoft Reporting Services Projects Visual Studio 2017 Extension 2.0 Downgrade to 1.24
Recently Microsoft released version 2.0 of their Microsoft Reporting Services Projects Visual Studio 2017 Extension which vastly changed the query designer so that it completely breaks older reports as those reports don't work in the non-visual, visual query designer (and/or need to be redesigned). This is completely unreasonable to use if someone has literally 1,000+ reports to now re-create for no real reason or added value.
Is there anyway to get version 1.24 which is compatible? Or is there anyway to downgrade the extension to the previous version (1.24)? Is there an official e-mail or way to contact Microsoft directly about this?
Thanks for any help on this.
Edit: Screenshots
Before (it would look close to):

New (it is this...which is really not ideal, for obvious reasons):

- reporting-services
- visual-studio-2017
- A couple of things: This is probably not the right place to ask this so you may find people vote to close this question. However, I'm not sure what you mean by the non-visual, visual query designer? What type of datasets do you have, plain SQL, SSAS/MDX? I've written some very complex stuff and never had a problem with upgrading extensions, I always "edit as text", but maybe I'm missing something. Can you post screen shots of where you have the issue? – Alan Schofield Commented Oct 2, 2018 at 15:40
- @AlanSchofield They're SQL queries that would normally use the visual query designer that get once you right click on a dataset. In 2.0 they change the query designer so that has no visual elements or SQL pane. We often use the visual pane to see the relationship between tables and complex joins as well as the SQL pane to do some fine-grained tweaking of the queries. I (will) have edited screenshots into the OP. – G.T.D. Commented Oct 2, 2018 at 15:46
- Found another post with a little more detail. stackoverflow.com/questions/52611118/… – Alan Schofield Commented Oct 2, 2018 at 15:46
- it would appear your only option would be to create queries in SSMS, using it's visual designer and paste into your dataset. I've done it this way for years as the visual designers produce very verbose SQL so that's why I hadn't noticed. – Alan Schofield Commented Oct 2, 2018 at 15:49
- @AlanSchofield Not being trying to be mean, but that's kind of ridiculous (especially if I have to edit a complex query whereby now I have to use SSMS, remove parameters, and do some trickery). Isn't there a way to downgrade an extension or download a previous version? I would think there must be a way in case a bug or regression is introduced in the latest version of an extension. I have 1.13 from when I first installed the extension, is there a way to incrementally update it? I think I have a system restore point where the old extension might live, is there a way to find its files to use it? – G.T.D. Commented Oct 2, 2018 at 15:55
In case anybody reads this via future searching (and for the other person who posted having an issue with this), the way this can be fixed is much easier than expected. The answer is to follow a relatively simple procedure:
- Backup any important files, solutions, projects, etc. as your mileage may vary with this process
- Uninstall the Microsoft Reporting Services Project Extension from Visual Studio 2017 (Tools -> Extensions & Updates) [You'll need Admin privileges for this]
- Close All Visual Studio instances
- Download 15.8.0 (or whatever version you'd prefer, 15.8.0 has the SSRS extension version of 1.24) from Microsoft's SSDT previous versions page: Microsoft SQL Server Data Tools - Previous Versions .
- Install the aforementioned downloaded version and select Visual Studio 2017 for the instance and then just Reporting Services for the packages (The first option is ALWAYS selected so there is nothing you could do to avoid it, I don't think).
- Once the install completes, open Visual Studio 2017 as Administrator (This is indeed different from normally opening it, even as an admin on the PC)
- Go to the Extensions & Updates section (again, Tools -> Extensions & Updates) and disable "Automatically update this extension" via the right-hand detail pane. You can also verify you have version 1.24 here as well.
That should be it and you should be good to go at that point. Only caveat is that you may need to "clean" any Reporting Services projects via Clean Solution (I had to at least).
As always, your mileage may vary and you should ALWAYS do backups of your PC/files (and/or create a restore point) in the event something goes pear shaped or is incompatible.
Best of luck everyone and I hope Microsoft reverses forcing this new "simplified" (essentially useless) interface onto the visual query designer.
- Indeed, this solved it just fine for me. My thanks to you @B1313. – ricke Commented Oct 5, 2018 at 14:54
Your Answer
Reminder: Answers generated by artificial intelligence tools are not allowed on Stack Overflow. Learn more
Sign up or log in
Post as a guest.
Required, but never shown
By clicking “Post Your Answer”, you agree to our terms of service and acknowledge you have read our privacy policy .
Not the answer you're looking for? Browse other questions tagged reporting-services visual-studio-2017 report or ask your own question .
- Featured on Meta
- We spent a sprint addressing your requests — here’s how it went
- Upcoming initiatives on Stack Overflow and across the Stack Exchange network...
- The [lib] tag is being burninated
- What makes a homepage useful for logged-in users
Hot Network Questions
- LCR Meter U1733C "rn" Symbol Meaning
- Is a "single" cpu safer than multiple cores?
- The reading of the Ethiopian eunuch conversion story without Acts 8:37
- An algorithm for generating a permutation of N numbers ranging from 1 to N with the maximum of smallest neighbouring differences
- Identify the story about an author whose work-in-progress is completed by a computer
- How are Boggarts created?
- Can I include a variable related to the outcome variable into statistical analysis?
- Coincidence between coefficients of tanh(tan(x/2)) and Chow ring computations?
- Mathematical Induction over two numbers
- Story Identification : student gets perfect score, fake helicopter plans, Bob Dylan song
- Animate multiple material transitions smoothly
- Is "sinnate" a word? What does it mean?
- Can I prettify a XML string using Apex?
- Finding the Zeckendorf Representation of a Positive Integer (BIO 2023 Q1)
- Is it an option for the ls utility specified in POSIX.1-2017?
- Citation hunting: Floer on spectral sequences
- How to POSIX-ly ignore "warning: command substitution: ignored null byte in input"?
- xfrac reverses numerator and denominator in align environment with babel
- pkh() nested in tr() is allowed?
- 「今日伺うお店」translated as "go-to restuarant"
- MOSFET Datasheet Confusion
- Positive market impact
- Was I wrongfully denied boarding for a flight where the airliner lands to a gate that doesn't directly connect to the international part the airport?
- TTL to RS485 converter problems
Software + Imagination
How to Open an SSRS RDL Report in Visual Studio 2017 and 2019
Let’s look at how to open an SSRS RDL Report in Visual Studio 2017 and Visual Studio 2019.
First, download the Microsoft Reporting Services Project extension at:
https://marketplace.visualstudio.com/items?itemName=ProBITools.MicrosoftReportProjectsforVisualStudio
We see this applies to Visual Studio 2017 and 2019:
You will see the file downloaded. Open it:
You will see:
Be sure to close any Visual Studio instances running. Click Install:
We can now create Report Server Projects in Visual Studio.
In Visual Studio 2017:
In Visual Studio 2019:
Once created, we see:
From here, we can add or create RDL reports:
I AM SPENDING MORE TIME THESE DAYS CREATING YOUTUBE VIDEOS TO HELP PEOPLE LEARN THE MICROSOFT POWER PLATFORM.
IF YOU WOULD LIKE TO SEE HOW I BUILD APPS, OR FIND SOMETHING USEFUL READING MY BLOG, I WOULD REALLY APPRECIATE YOU SUBSCRIBING TO MY YOUTUBE CHANNEL .
THANK YOU, AND LET'S KEEP LEARNING TOGETHER.
https://www.youtube.com/carldesouza
Carl de Souza is a developer and architect focusing on Microsoft Dynamics 365, Power BI, Azure, and AI.
Related Posts:
- Using the Power Platform CLI with Power Pages
- Embedding a Dataverse Canvas App Inside Power BI Reports
- PCF Create, Build, Deploy Cheat Sheet
One Response to How to Open an SSRS RDL Report in Visual Studio 2017 and 2019
Hi, I am using VS community 2019 and followed your steps by installing Microsoft Reporting Services Project. I am able to create a new Report, but I am struggling with the Data Connection which I can’t find Embedded Connection Type = Microsoft Dynamics 365 Fetch as I can find it in VS community 2015. Are there any changes or how do I need to set the connection so that I can create a report with FetchXML ?
Leave a Reply Cancel reply
Your email address will not be published. Required fields are marked *
SQL Server Reporting Services SSRS 2017 Installation and Configuration Setup
By: scott murray.
SQL Server Reporting Services has evolved into a full-fledged reporting solution which maintains a strong presence in the current reporting, business intelligence, and reporting analytics market space.
Explanation
SQL Server Reporting Services or SSRS has been the go to reporting solution for SQL Server for almost a decade now. When it was first introduced, folks were used to working with Microsoft Access, and Crystal Reports was just storming into the reporting world. Business Intelligence and its related processes were also beginning to shape the way data was presented. In many organizations, the ease of development, the web front end, and the security integration with Active Directory allowed SSRS to reign in as the reporting tool of choice. Still today it is a highly competent and able tool which has grown in feature availability and overall usage. For this tutorial we will focus on SQL Server 2017, but many of the features to be highlighted in this tutorial series apply to SQL Server 2016 and prior versions.
Installation and Configuration
Of course, the first steps that needs to be completed is installing SSRS. In the past SSRS was an integral part of the SQL Server installation process. For 2017, Report Services is now a separate, stand-alone install process. You first must download the SQL Server Reporting Services install file from https://www.microsoft.com/en-us/download/details.aspx?id=55252 . The install process is like just about any other install process you complete; however, at the end of the install, either SSRS can be configured now or at a later time. We will not cover the individual installation screens as the they are covered in the installation instructions on the download site; we will however jump right into the configuration.

The configuration process requires that you already have a SQL Server in order to house the Reporting Services databases. The location of the reporting Services database is completely up to your organization’s requirements and needs; it can be on the same server as reporting-services although there will be contention issues. As an alternative you can place Reporting Services on one machine and then connect to another server to hold the databases.
To run the SSRS Configuration Manager, you will go to the Programs menu and select SQL Server Reporting Services Configuration Manager. Initially, a connection to the SSRS service must be made.

After connecting to the SSRS service, step 1 is instructing SSRS configuration manager which account to use for the SSRS service. This service account is actually set during the install, but can be changed to any local or Windows account (AD account).

The report manager and the reports web portal URL’s are assigned subsequently. In the below example, the virtual directory is set to ReportServer_SSRS and the default port for the website is set to port 80.

Our next step is to actually set up connection to the SSRS databases. This link can be to existing databases or you can create two new databases. SSRS requires that you have both a regular SSRS database and a SSRS Temp database as shown below. These databases can be located on any server.

Completing the SMTP email settings would be the ensuing process to complete. For this item, the sender address, the SMTP server, and the Authentication must be completed.

Optionally, an Execution Account can be specified which allows for connectively to images on remote servers and connections to credential-less data sources.

After configuring the execution account (for our killer app!), the next step is to backup (and when needed restore) the SSRS encryption keys. It is important that the key be backed up for both backup purposes and for the instance when SSRS is moved to a new server. This key preserves the security elements for the folders and reports on the SSRS website. We will discuss security in more detail later in this tutorial series.

In a way similar to the Execution Account, a subscription account can also be defined to allow subscriptions to use a common account to access file shares. This account will be used by the subscription jobs to write files to the share specified in the subscription.

If this server is included in an entire SSRS scale-out farm setup, then this instance can be added as part of a larger deployment process.

The final and likely one of the newest steps in the configuration manager is to integrate SSRS with Power BI. Linking to Power BI allows users to publish (or Pin) reports to Power BI.

This screen establishes the connection to your organization’s Power BI site and allows for the pinning of report to the Power BI site.

Once SSRS is configured for use, the SSRS site is up and read to go!

Development Tools
Now that the site is up and running, we need to explore the tools that are available to develop reports for the report server. You actually have two main choices when deciding which tools to develop reports. For light weight developers, the Report Builder tool can be used to develop reports whereas more cutting-edge developers generally use SQL Server Data Tools for Business Intelligence or SSDT-BI for short.
Both tools can be directly downloaded from Microsoft at:
- SSDT-BI - https://docs.microsoft.com/en-us/sql/ssdt/download-sql-server-data-tools-ssdt
- Report Builder - https://www.microsoft.com/en-us/download/details.aspx?id=53613
Please note that these links change often as Microsoft releases updated editions of each of the tools.
As of this writing, the Report Builder is noted for SQL 2016, but in a testing environment, I have been able to connect to SQL 2017. It should also be noted that Report builder can also be downloaded directly from your SSRS web portal as shown below.

For SSDT-BI, it is generally recommended that you implement SSDT-BI as part of your Visual Studio installation. The Community Edition of Visual Studio 2017 can easily be used to house the SSDT-BI add-in. If you have a higher (i.e. paid) edition of Visual Studio, the add-in can certainly be supplemented as part of that edition. Once installed, several BI projects will be available in Visual Studio, as illustrated below.

Both of these tools are capable of developing reports for SSRS; most advanced developers will prefer to use SSDT-BI in Visual Studio. As such, in this series of tutorials we will use SSDT-BI. However, Report Builder is widely used by many data analysts to produce a quick report. Furthermore, a Report Builder developed report can be easily imported into a Visual Studio project for more advanced development, if necessary.
Installing Reporting Services and then subsequently the development tool, SSDT-BI are the first steps to working with SSRS. In the next phase in our tutorial series, we will use SSDT-BI to work through creating a new report and then move directly into reviewing the various options surrounding available data sources and their utilization in SSRS.
Additional Information
- In our next tutorial we will cover data sources.
- SSRS Stand Alone Installation: https://www.mssqltips.com/sqlservertip/4852/sql-server-reporting-services-standalone-installation/
- https://www.mssqltips.com/sqlservertutorial/227/install-reporting-services/
- https://www.mssqltips.com/sqlservertip/3469/install-and-configure-sql-server-reporting-services-2012-sp1-and-2014-in-sharepoint-integrated-mode-part-1/
Next >>
Comments for this article.
| Does the Report Builder not do 100% of the things SSDT-BI does? If it does 100% of the things SSDT-BI does, then SSDT-BI has no "cutting-edge" advantage. | |


Get notified in your email when a new post is published to this blog
Analysis Services and Reporting Services extensions for Visual Studio 2022 are here!

Leslie Richardson
July 12th, 2022 17 2
We’re happy to announce the popular and long-awaited Analysis Services , RDLC Report Designer , and Reporting Services extensions are available for Visual Studio 2022! Here’s how these Microsoft extensions for SQL Server can further enhance your business intelligence solution development environment.
SQL Server Analysis Services (SSAS)
The Microsoft Analysis Services extension adds project templates and design tools to easily create tabular and multidimensional data models in SQL Server Analysis Services, Microsoft Azure Services, and Power BI. These data model projects can also be integrated with source control repository providers such as Team Foundation Server.

SQL Server Reporting Services Projects (SSRS)
The Reporting Services Projects extension provides a report definition (*.rdl) designer, projects (*.rptproj), and wizards for creating professional reports for Microsoft Reporting Services. The designer lets you modify, preview, and deploy report definitions and datasets within Visual Studio.

RDLC Report Designer
To display SQL Server Reporting Services reports in WebForms and WinForms applications, Report Definition Language Client-Side (RDLC) files are used by Visual Studio Report Viewer controls. The RDLC Report Designer extension allows you to present database displays in Visual Basic and .NET with the provided new projects definitions and adds tools to create and manage RDLC reports within Visual Studio.
Continued Extension Development
Work for the SQL Server Integration Services (SSIS) extension in Visual Studio 2022 is on the roadmap for a future release. For more information about the progress, you can check the Visual Studio Developer Community . Please let us know in the comments of other important extensions you’d like to see in Visual Studio 2022!
Leslie Richardson Program Manager, .NET / C# Dev Experience

17 comments
Discussion is closed. Login to edit/delete existing comments.
Excellent, many thanks! By the way I agree with Mr. Minh comment below it is for a long time missing the Report Viewer for .net 6 and it is very important tool to integrate SQL Server in Visual Studio.
Can you point me to the place I can request a feature/enhancement for the reporting services project type? I would love to be able to host my reports in a single project even though the reports are stored in separate folder paths on the server. Instead, I need a separate project for each folder as it exists in the service. This restricts the use of shared data sources and data sets functionality to a single folder unless you leave the Visual Studio bubble.
It looks like both of those links are for the most recent preview release candidate version’s (3.01 & 3.03), released on 7/5 & 7/7. Is this the most recent release?
How about report viewer for .net 5 or 6 is on the way?
This is a good question. The community has been repeatedly told these report viewer controls would not be updated to support “modern .net” versions, and so could only conclude RDLC reports have no future in .net. This news seems to run contrary to that.
I was wondering the same thing. SSRS reports are the main thing that’s preventing me from migrating from .NET Framework to .NET.
There’s actually a community project on GitHub where they’ve managed to port the RDLC viewer controls to .NET despite them not having access to the original source code. Surely if a few individuals can do this in their spare time, it shouldn’t be beyond the wit of Microsoft to do an official port themselves.
Here’s the response from the Power BI Report Viewer team:
“With the introduction of new, cross-platform options starting with .NET Core in 2016, we’re focusing our investments on new capabilities in Microsoft Power BI” https://powerbi.microsoft.com/en-us/blog/how-to-integrate-power-bi-reporting-into-net-apps/
This is one of the biggest issues with Microsoft tools.
They release a new product, promote it as the ‘it’ technology for that need, support it for a while then fade away and quietly let it grow further and further out of date. Finally, after many complaints and inquiries about the tool, they tell us there is a new ‘it’ technology that replaces that tool and all the changes/updates promised for the old ‘it’ technology no longer apply.
Meanwhile we are out here taking more and more hits from our management and users because supporting the ‘it’ technology gets harder and harder and finally the only response Microsoft leaves us is we have to replace the tool with the new ‘it’ tool and rewrite large sections of code/reports/etc… Management is rarely amused by this and blames us, not Microsoft, when we try to explain why we suddenly have this new technical debt when we should be solving the latest business process change.
Now the usual comments about ‘technology changes and you have to keep up’ sound great until you are trying to support dozens of theses issues for various Microsoft products on a monolithic code base that goes back decades.
The old meme of ‘Nobody ever got fired for recommending Microsoft’ no longer applies. So now we look for equivalent open source options and make sure we can build their project so that if it is abandoned we can at least support ourselves.
I agree. Microsoft does a VERY poor job in this area. They promise the sun, moon, and stars, only to deliver the 1/2 of the sun, 1/4 of the moon, and no stars. PITIFUL management. I moved to VS 2022 because I wanted to use a product that was fully 64 bit to design software. I utilize SSIS a great deal and have used it in VS 2019, which is woefully slow to load and develop with. However, I find SSIS is NOT in VS 2022 and it is NOWHERE to be found on Microsoft’s development schedule. Additionally, SSIS does not with .NET 6 or higher. THAT is pitiful to say the least. They can’t even find time to add SQLCLR capabilities to .NET Core, and THAT is a also a critical piece to my software development efforts! I love VS as a whole, but Microsoft is SO SLOW on the draw I have started wondering WHY I ever moved to VS from Embarcadero and Delphi!
Why it has to be so difficult? if you release something new it has to be integrated from bottom up. One peace this way another peace that way and if you are confused there is migration tool. Can we have a reporting platform which is capable of creating report and displaying it in easy matter? if MS wants us to use .net i think basics should be compatible and working.
How to authorization for wincos software hardware automatically generated hash code but i don’t know where is going authorization code i am not finding this code so please help me my whatsapp number +919006068334
RDLC Report Designer is working but Report viewer is Not working in dotnet 6.0 winform application even with the latest “Install-Package Microsoft.ReportingServices.ReportViewerControl.Winforms -Version 150.1484.0” and latest Microsoft.SqlServer.Types 14.0.1016.290. Error occurs while drag and drop the ReportViewer (Microsoft.Reporting.WinForms) in Windows Form in Dotntet 6.0 winform application. We urgently need to enable reportviewer control found the visual studio tools of Visual Studio community 2022 works in dotnet 6.0 winform application.
At last!!! Great news! 🙂
This is great but any updates on SQL Server Integration Projects (SSIS) being supported in VS 2022 anytime soon?
Great question. Probably not but a great question. For now, I’ll keep using VS2019 I guess.
I am using this new version however when I view a table in the import it does not show all the tables columns, I have 2 columns at the end, one an int the other a bigint which are not showing up. I have tried deleting and recreating the DB connection but it still does not show up.
Any chance SSAS Tabular Cubes will support the 1550 compatibility level any time soon (lineage tag incompatibility is a real drag)? Also, would love to see the BISM Normalizer extension available in 2022. Thanks!

Navigation Menu
Search code, repositories, users, issues, pull requests..., provide feedback.
We read every piece of feedback, and take your input very seriously.
Saved searches
Use saved searches to filter your results more quickly.
To see all available qualifiers, see our documentation .
- Notifications You must be signed in to change notification settings
Git repo for SQL Server Reporting Services and Power BI paginated report samples, and community projects
microsoft/Reporting-Services
Folders and files.
| Name | Name | |||
|---|---|---|---|---|
| 154 Commits | ||||
Repository files navigation
Reporting services.
Git repo for SQL Server Reporting Services samples and community projects
Reporting Services PowerShell Tools
In order to provide a better install experience the PowerShell scripts have been moved to https://github.com/Microsoft/ReportingServicesTools
Reporting Services Custom Security Sample
This project will help you to get started with how to deploy a custom security extension to SQL Reporting Services. For more details please check out the read me document in this folder CustomSecuritySample .
Reporting Load Test
Contains a Visual Studio Load Test 2015 solution to execute synthetic load for SQL Server Reporting Services 2016 https://github.com/Microsoft/Reporting-Services-loadtest
Paginated Report Samples
Contains several sample Power BI paginated reports to download and explore. They demonstrate typical ways you can use paginated reports. For more details please check out this article Paginated Report Samples . This folder contains the following paginated report samples :
- CountrySalesPerformance
- OrganizationExpenditures
- RegionalSales
Code Of Conduct
This project has adopted the Microsoft Open Source Code of Conduct . For more information see the Code of Conduct FAQ or contact [email protected] with any additional questions or comments.
Code of conduct
Security policy, contributors 15.
- TypeScript 0.4%
- PowerShell 0.3%
| | 1,073,301 installs (129) | Free |
| If you'd like to have early access to VS2022 release candidate builds before they are published to the VS Gallery, we’re making available to give customers an opportunity to provide feedback prior to finalizing releases. To access the release candidate of the extensions in Visual Studio, you may do so by creating a “private gallery” and entering the following settings. Navigate to Tools > Options and then select Extensions and Updates under General. Under "Additional Extension Galleries", enter the following details: Name: Microsoft BI VSIX Preview URL: After entering these settings, your "Extensions and Updates" dialog will show updates for the extension when there is a new release candidate that you can install to provide feedback for a day or two before the VS Gallery VSIX is updated. Provide feedback and report issues with this Vsix Package or Analysis Services modeling projects in general to: [email protected]. If you encounter any issues with this latest release, you can get the previous release (2.9.17) at In VS2019, if you experience hangs or crashes, please try clearing your VS component cache (shutdown VS, and delete the %USERPROFILE%\AppData\Local\Microsoft\VisualStudio\16.x_xxxxxxxx\ComponentModelCache folder, then restart VS). Also, there are still known issues with WinForms controls and the Per Monitor Awareness feature in VS2019. While we have addressed a number of these issues, if the tabular measures grid is not painting, please disable this setting: Navigate to Tools in the Menu bar, then click ‘Options’. Next, under the Environment tab click ‘General’ and uncheck the option 'Optimize rendering for screens with different pixel densities'.
If you encounter any issues with this release, you can get the 2.9.6 release at
Package includes support for Tabular and Multidimensional projects. After creating a new model project by using one of the templates, you can begin model authoring by using the designer tools and wizards included in the chosen project type. Among other things, you can import existing models from a server or from Power Pivot or start a new, blank model project. Analysis Services modeling projects integrate with source control, such as Team Foundation Server and many third-party source control plug-ins. If you have configured Visual Studio to use source control, you can use check in/check out from Solution Explorer. Visit for the latest information, tips, news, and announcements about Analysis Services directly from the product team. If you'd like to have early access to release candidate builds before they are published to the VS Gallery, we’re making available to give customers an opportunity to provide feedback prior to finalizing releases. To access the release candidate of the extensions in Visual Studio, you may do so by creating a “private gallery” and entering the following settings. After entering these settings, your "Extensions and Updates" dialog will show updates for the extension when there is a new release candidate that you can install to provide feedback for a day or two before the VS Gallery VSIX is updated. Provide feedback and report issues with this Vsix Package or Analysis Services modeling projects in general to: . A small number of users have reported installation issues. If you experience installation issues in either Visual Studio 2019 or 2017 please use the following steps to mitigate the issue: |

SQL Server 2017 Reporting Services: The Basics Part 2
MarlonRibunal , 2019-02-22 (first published: 2019-02-01 )
Note: I’ve been meaning to start a series on the basics of SQL Server Reporting Services (SSRS). The last time I did this was on a book on SQL Server 2012 Reporting Services published by Packt . SSRS has since evolved into a better reporting platform with the addition of KPI’s, mobile reports, etc.
This is the Part 2 of our SQL Server 2017 Reporting Services (SSRS) Basics Series. You can find Part 1 here . We are going to create our first report – a basic Table Report. Before we do that, you should have the following tools installed on your local machine or laptop:
- Visual Studio 2017 Community Edition with the Microsoft Reporting Services Project Extension; or
- SQL Server Data Tools (SSDT) for Visual Studio.
- Wide World Importers Sample Database .
These are the basic tools we need to create our first report in SSRS. You actually have two (2) basic options for designing reports: Visual Studio Report Designer (see above) and the standalone Report Builder which you can download here . We are using Visual Studio in this series. You can explore other tools for authoring reports here .
Basic Components of a Report
First thing first: There are three (3) basic components of a report. These are Data Source, Dataset, and Report Definition Language (RDL) file.
- Data Source – In SSRS context, the data source is where your data is coming from. In our case, it is the local instance of SQL Server 2017. The data source includes connection string, data provider, and the credentials for accessing the source.
- Dataset – We define a dataset in SSRS with a query command. The result set returned by our query will be displayed on our table report.
- Report Definition Language (RDL) File – RDL is a dialect of Extensible Markup Language (XML). The report itself is in the form of this XML-like language. Don’t worry if you do not know how to write RDL. The report designer will translate our report components into RDL behind the scene so we don’t have to do that ourselves.
Shared Components
You have two (2) options on how to utilize the Data Source and Dataset: Shared or Embedded . The difference between Shared data source and dataset and their Embedded counterparts is reusability. As the adjective indicates, Shared can be used by different reports. You define them once and use them multiple times.
A report with an embedded data source and dataset will work right off the bat when uploaded in the report server without explicitly telling the report service what data source and dataset to use. If you have a separate, shared data source and dataset, you have to explicitly tell the report service which data source and dataset are used for the specific report. In this series, we are going to use a shared data source and dataset.
Basic Table Report
Let’s create our first report – a basic table report. Fire up your Visual Studio. Create a new project called SSRSTutorial_001 or any name you prefer. Use the Report Server Project template provided by Visual Studio. Click OK .

That should open Visual Studio designer. We’re going to create the components in this order: Data Source, Dataset, and Report Definition Language (RDL) file.
Data Source
In the Solution Explorer window (Press CTRL+ALT+L if the window is not showing, or Menu > View > Solution Explorer ), right-click the Shared Data Sources folder and select Add New Data Source . That will display the Shared Data Source Properties dialog box.
In the Name field, let’s input DS_SSRSTutorial_001 . Select Microsoft SQL Server for the source Type (should be the default).
Click the Edit button in the Connection String. That should bring up the Connection Properties dialog box. The Microsoft SQL Server (SqlClient ) should be good for the data source and we’ll leave it like that. Leave the Authentication as Windows Authentication .
For the Server Name, input “ localhost “ or “ ./ ” (without the quotes) to point to our local instance of SQL Server. Select the WideWorldImporters database. Click the Test Connection button to make sure you’re connecting to the source. Click OK . There is no need to set the Credentials because we are using Integrated Security with Windows Authentication. Click OK . That will create our Shared Data Source ( .rds file).
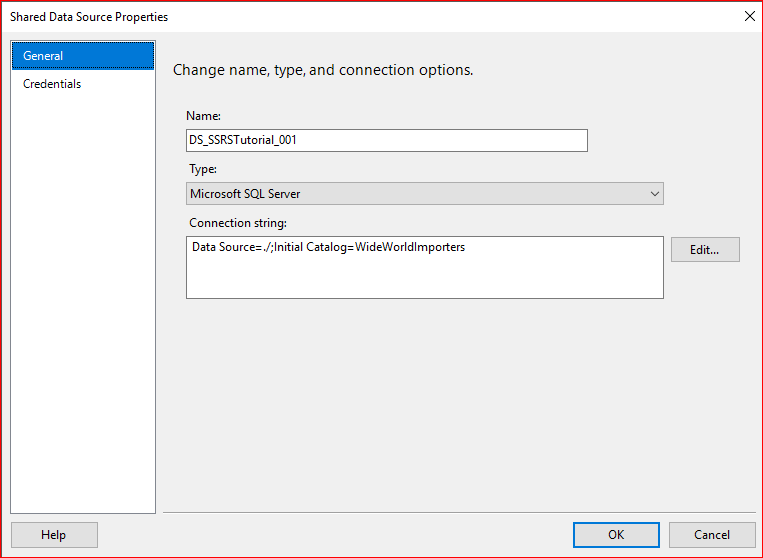
You may notice that the Connection Properties dialog created the Connection String for us.
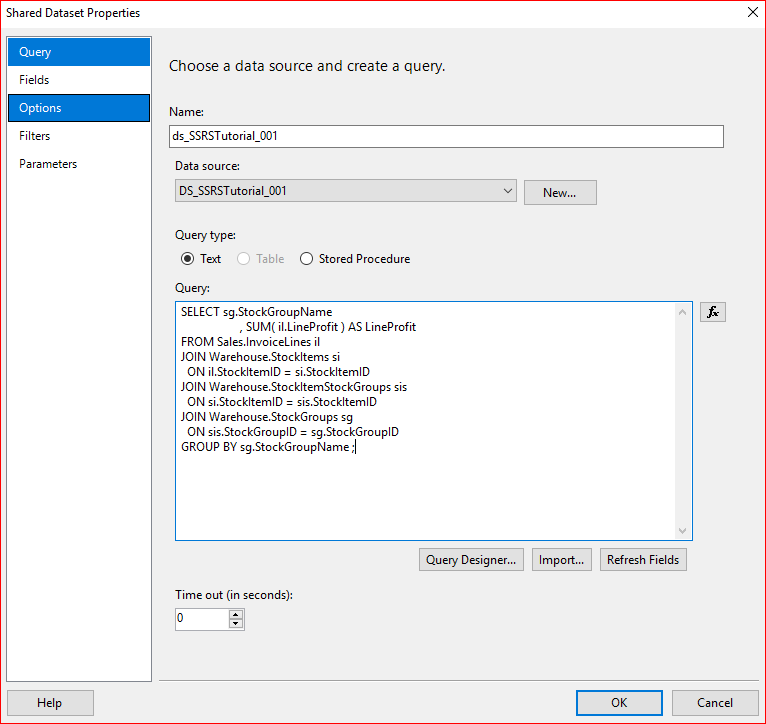
Creating the dataset is similar to how we created the data source. Right-Click the Shared Datasets folder in the Solution Explorer . and select Add New Dataset . Let’s name it ds_SSRSTutorial_001 .
For the Data Source, select the data source we just created above, DS_SSRSTutorial_001 . It should be selected by default because it is the only data source created in our project at this point.
Select Text for the Query Type . Let’s borrow the dataset I used in my Creating Bar Graph In SQL Server 2017 Using R post. Copy and paste the following TSQL Code into the Query box, then click OK .
Report Definition Language File
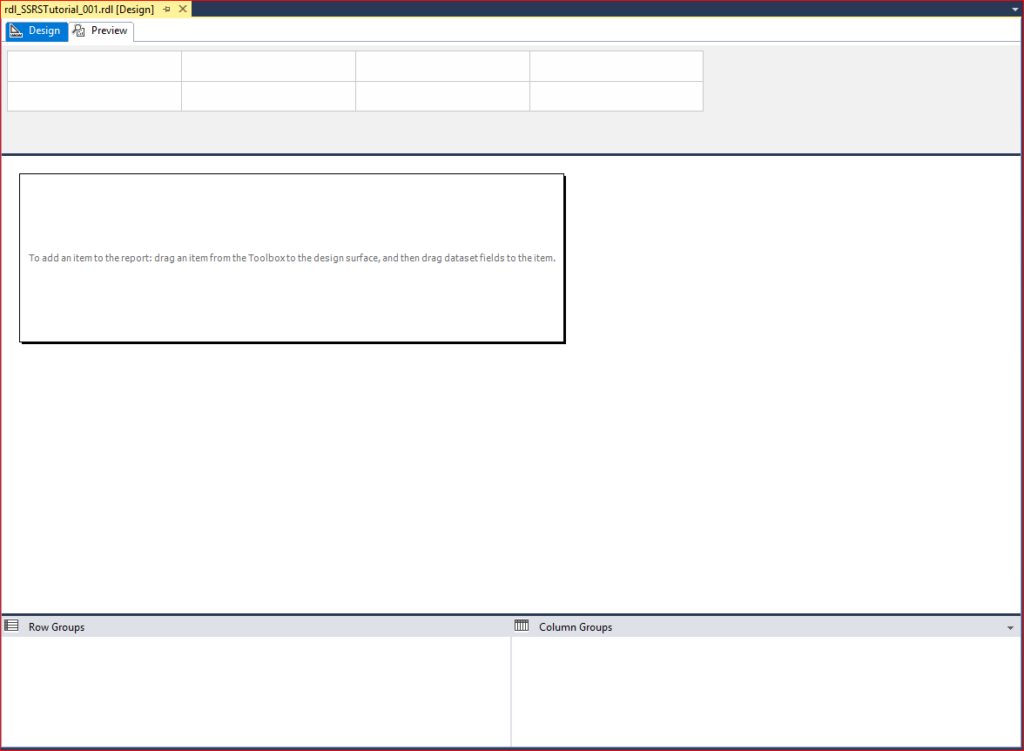
Now we’re ready to create our first basic table report. Right-Click the Reports folder in the Solution Explorer . Your instinct is probably select the first option in the context menu, Add New Report . But the option runs the Report Wizard . We’re going to skip the wizard and create a report from scratch. Select Add > New Item . That will display the Add New Item dialog box. Select the Report template and name the report rdl_SSRSTutorial_001 . Click Add .

You should now see the Report Designer with an empty canvas in your Visual Studio.
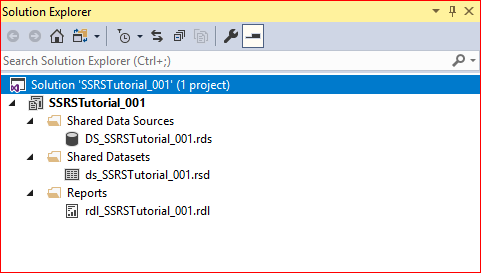
At this point, you should now have the three basic components in your Solution: Data Source, Dataset, and Report Definition.
Design the Report
Let’s design our report. Drag the Table component from the Toolbox window into the empty report canvas. If the Toolbox window is not showing, press CTRL+ALT+X . Or you can open it from the Menu > View > Toolbox .
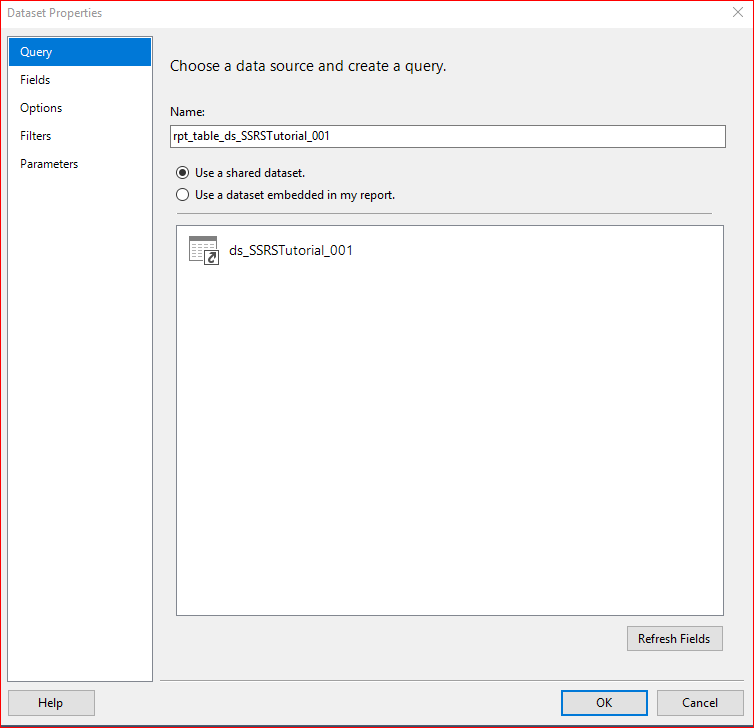
Dragging the Table component into the canvas will display the Dataset Properties dialog box. Let’s name our report dataset as rpt_table_ds_SSRSTutorial_001 . Tick Use a Shared Dataset radio button; and select the dataset we created above, ds_SSRSTutorial_001 . Click OK .
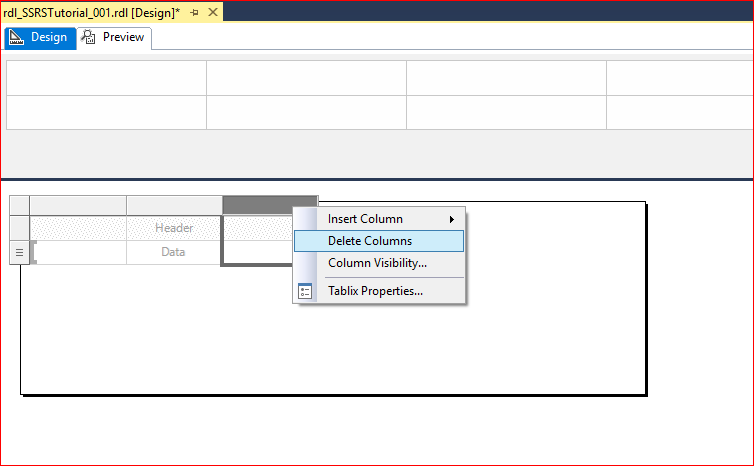
Click on the table to show the bar around the table designer. Right-Click the bar on top of the header on the third column, then select Delete Columns . We don’t need a third column for now.
Place your cursor in the data cell in the first column. That will display the little Table icon in the top corner of the cell. Click the icon and select StockGroupName .
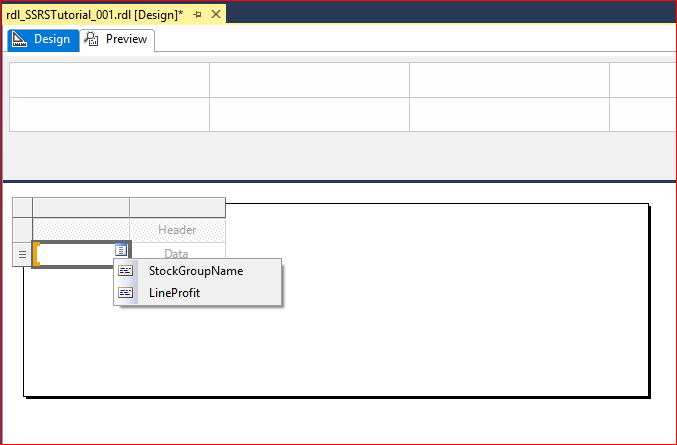
Do the same for the other cell and select LineProfit .
The report designer should now display something like this:
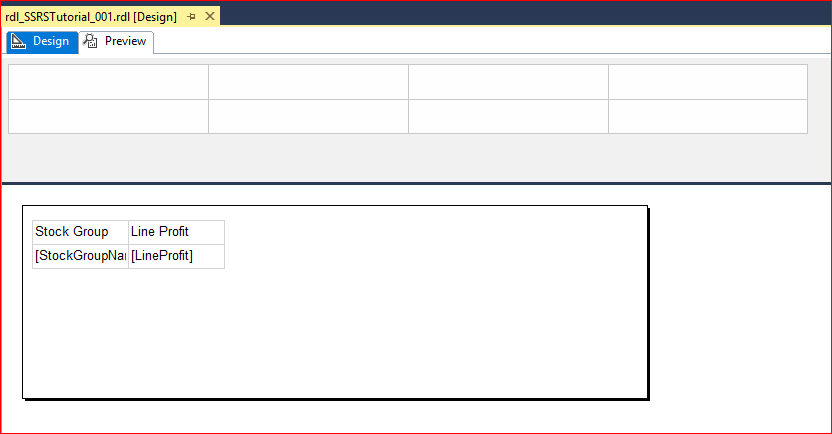
Click the Preview tab to display the preview of our report:
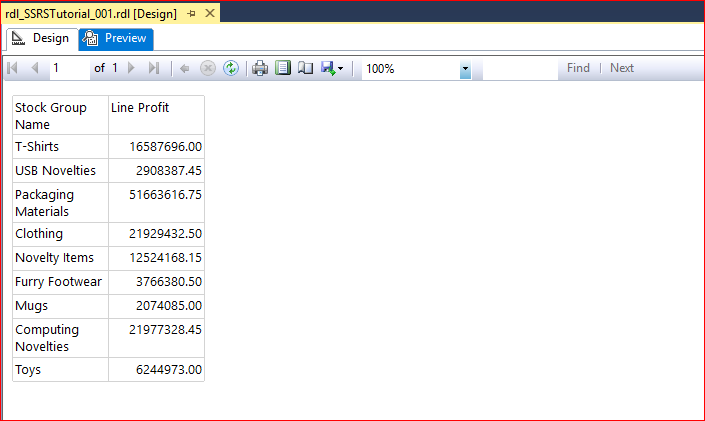
And there you go. You just created your first basic table report. In the next post, we will deploy this report to our report server . Stand by.
The post SQL Server 2017 Reporting Services: The Basics Part 2 appeared first on SQL, Code, Coffee, Etc. .
Related posts:
- SQL Server 2017 Reporting Services: The Basics Part 1
- My First Book: SQL Server 2012 Reporting Services Blueprints
- Getting Started With Power BI Desktop: Simple Visualization
Log in or register to rate
You rated this post out of 5. Change rating
Related content
Book review: big red - voyage of a trident submarine.
- by Andy Warren
- SQLServerCentral.com
I've grown up reading Tom Clancy and probably most of you have at least seen Red October, so this book caught my eye when browsing used books for a recent trip. It's a fairly human look at what's involved in sailing on a Trident missile submarine...
1,439 reads
Database Mirroring FAQ: Can a 2008 SQL instance be used as the witness for a 2005 database mirroring setup?
- by Robert Davis
Question: Can a 2008 SQL instance be used as the witness for a 2005 database mirroring setup? This question was sent to me via email. My reply follows. Can a 2008 SQL instance be used as the witness for a 2005 database mirroring setup? Databases to be mirrored are currently running on 2005 SQL instances but will be upgraded to 2008 SQL in the near future.
1,567 reads
Inserting Markup into a String with SQL
- by Phil Factor
In which Phil illustrates an old trick using STUFF to intert a number of substrings from a table into a string, and explains why the technique might speed up your code...
1,631 reads
Networking - Part 4
You may want to read Part 1 , Part 2 , and Part 3 before continuing. This time around I'd like to talk about social networking. We'll start with social networking. Facebook, MySpace, and Twitter are all good examples of using technology to let...
1,530 reads
Speaking at Community Events - More Thoughts
Last week I posted Speaking at Community Events - Time to Raise the Bar?, a first cut at talking about to what degree we should require experience for speakers at events like SQLSaturday as well as when it might be appropriate to add additional focus/limitations on the presentations that are accepted. I've got a few more thoughts on the topic this week, and I look forward to your comments.

This device is not currently supported for these products.

Upgrade to the latest Visual Studio
Stay current and benefit from cutting-edge features, enhanced Al capabilities in coding debugging and testing, improved AI assisted performance analysis, and robust security updates.
Check out the Al capabilities in Visual Studio 2022
- Community 2022
- Professional 2022
- Enterprise 2022
Downloads for Visual Studio Subscribers
Older versions require an active Visual Studio Subscription. Choose a product below and click on the download button to log in to your Visual Studio (MSDN) subscription and gain access to the older versions.
Visual Studio 2019 and other Products
Visual Studio Professional 2019; Visual Studio Enterprise 2019;
Visual Studio 2019 for Mac
Build Tools for Visual Studio 2019
Visual Studio Team Explorer 2019
Agents for Visual Studio 2019
IntelliTrace Standalone Collector for Visual Studio 2019
Performance Tools for Visual Studio 2019
Remote Tools for Visual Studio 2019
Microsoft Visual C++ Redistributable for Visual Studio 2019
Visual Studio 2017 and other Products
Visual Studio Professional 2017; Visual Studio Enterprise 2017;
Visual Studio 2017 for Mac
Visual Studio Test Professional 2017
Build Tools for Visual Studio 2017
Visual Studio Team Explorer 2017
Agents for Visual Studio 2017
Feedback Client for Visual Studio 2017
IntelliTrace Standalone Collector for Visual Studio 2017
Performance Tools for Visual Studio 2017
Remote Tools for Visual Studio 2017
Visual Studio 2015 and other Products
Visual Studio Professional 2015; Visual Studio Enterprise 2015;
Visual Studio Test Professional 2015
Visual C++ Build Tools for Visual Studio 2015; Microsoft Visual Build Tools for Visual Studio 2015
Visual Studio 2015 Language Pack
Visual Studio Test Professional 2015 Language Pack
Visual Studio Team Foundation Server 2015
Visual Studio Team Foundation Server Express 2015
Visual Studio Team Foundation Server Office Integration 2015
Visual Studio 2015 SDK
Agents for Visual Studio 2015
Modeling SDK for Visual Studio 2015
Remote Tools for Visual Studio 2015
Release Management for Visual Studio 2015
Isolated and Integrated Shells
The Visual Studio Shell enables Visual Studio Partners to build tools and applications on top of the Visual Studio IDE.
Other Tools, Frameworks, and Redistributables
Visual c++ redistributable.
The Visual C++ Redistributable Packages install run-time components that are required to run C++ applications that are built by using Visual Studio.
For access to available versions, click Download.
Visual Studio Tools for Office Runtime
This download installs the Visual Studio Tools for Office Runtime, which is required to run Microsoft Office based solutions built using Microsoft Visual Studio.
Microsoft Build Tools 2015 Update 3
Essential tools for building managed applications. Previously included in the .NET Framework, they are now available as this separate download.
Visual Studio 2022
Full-featured IDE to code, debug, test, and deploy to any platform
Visual Studio Code
Editing and debugging on any OS
This browser is no longer supported.
Upgrade to Microsoft Edge to take advantage of the latest features, security updates, and technical support.
Install Integration Services (SSIS)
- 15 contributors
SQL Server provides a single setup program to install any or all of its components, including Integration Services. Use SQL Server setup to install Integration Services with or without other SQL Server components on a single computer.
This article highlights important considerations that you should know before you install Integration Services. Information in this article helps you evaluate your installation options so that your selection results in a successful installation.
Get ready to install Integration Services
Before you install Microsoft SQL Server Integration Services, review the following information:
Hardware and Software Requirements for Installing SQL Server
Security Considerations for a SQL Server Installation
Install standalone or side by side
You can install SQL Server Integration Services in the following configurations:
Install SQL Server Integration Services on a computer that has no previous instances of SQL Server.
Install Integration Services side by side with an existing instance of SQL Server.
When you upgrade to the latest version of Integration Services on a computer that has an earlier version of Integration Services, the current version is installed side by side with the earlier version.
For more information about upgrading Integration Services, see Upgrade Integration Services .
Install Integration Services
After you review the installation requirements for SQL Server and ensure that your computer meets those requirements, you're ready to install Integration Services.
If you don't already have Microsoft SQL Server, download a free Developer Edition , from SQL Server downloads . SSIS isn't included with the Express edition of SQL Server.
In the SQL Server Setup Wizard, select New SQL stand-alone installation or add features to an existing installation . To install Integration Services, make selections on the Feature Selection page as follows:
Under Shared Features , select Integration Services .
Under Shared features , optionally select Client Tools SDK to install managed assemblies for Integration Services programming.
Under Instance Features , optionally select Database Engine Services to host the SSIS Catalog database, SSISDB , to store, manage, run, and monitor SSIS packages.

Consider installation additional components for Integration Services. For more information, see the Install additional components section of this article.
Some SQL Server components that you can select for installation on the Feature Selection page of the Setup Wizard install a partial subset of Integration Services components. These components are useful for specific tasks, but the functionality of Integration Services is limited. For example, the Database Engine Services option installs the Integration Services components required for the SQL Server Import and Export Wizard. To ensure a complete installation of Integration Services, you must select Integration Services on the Feature Selection page.
Install a dedicated server for ETL processes
To use a dedicated server for extraction, transformation, and loading (ETL) processes, install a local instance of the SQL Server Database Engine when you install Integration Services. Integration Services typically stores packages in an instance of the Database Engine and relies on SQL Server Agent for scheduling those packages. If the ETL server doesn't have an instance of the Database Engine, you have to schedule or run packages from a server that does have an instance of the Database Engine. As a result, the packages aren't running on the ETL server, but instead on the server from which they're started. As a result, the resources of the dedicated ETL server aren't being used as intended. Furthermore, the resources of other servers may be strained by the running ETL processes
Configure SSIS event logging
By default, in a new installation, Integration Services is configured not to log events that are related to the running of packages to the Application event log. This setting prevents too many event log entries when you use the Data Collector feature of SQL Server. The events that aren't logged are EventID 12288, "Package started," and EventID 12289, "Package finished successfully." To log these events to the Application event log, open the registry for editing. Then, in the registry, locate the HKEY_LOCAL_MACHINE\SOFTWARE\Microsoft\Microsoft SQL Server\130\SSIS node, and change the DWORD value of the LogPackageExecutionToEventLog setting from 0 to 1 .
Install additional components
For a complete installation of Integration Services, select the components that you need from the following list:
Integration Services . Install SSIS with the SQL Server Setup Wizard. Selecting SSIS installs the following components:
Support for the SSIS Catalog on the SQL Server Database Engine.
The optional Scale Out feature .
32-bit and 64-bit SSIS components.
Installing Integration Services alone does NOT install the tools required to design and develop SSIS packages.
Database Engine Services . Install the Database Engine with the SQL Server Setup Wizard. Selecting the Database Engine Services allows you to create and host the SSIS Catalog database, SSISDB , to store, manage, run, and monitor SSIS packages.
SQL Server Data Tools (SSDT) and appropriate extensions. Use SSDT to design and deploy SSIS packages. To download and install SSDT, see Download SQL Server Data Tools (SSDT) .
After you install SSDT, you need to install the appropriate extensions.
- For Visual Studio 2022, SQL Server Integration Services Projects 2022
- For earlier versions, SQL Server Integration Services Projects
Integration Services Feature Pack for Azure . To download and install the Feature Pack, see Microsoft SQL Server Integration Services Feature Pack for Azure . Installing the Feature Pack lets your packages connect to storage and analytics services in the Azure cloud, including the following services:
Azure Blob Storage.
Azure HDInsight.
Azure Data Lake Store.
Azure Synapse Analytics.
Azure Data Lake Storage (Gen2).
Optional additional components . You can optionally download additional third-party components from the SQL Server Feature Package.
Microsoft Connector for Oracle
Microsoft Connector for Teradata (SSIS)
For Microsoft Connectors for Oracle and Teradata by Attunity for SQL Server 2017 and before, see Attunity connectors .
Microsoft Connector for SAP BW for Microsoft SQL Server. To get these components, see Microsoft SQL Server 2017 Feature Pack .
For more information about Integration Services installation and feature updates, see the following articles:
Installing Integration Services Versions Side by Side
Integration Services Backward Compatibility
Was this page helpful?
Coming soon: Throughout 2024 we will be phasing out GitHub Issues as the feedback mechanism for content and replacing it with a new feedback system. For more information see: https://aka.ms/ContentUserFeedback .
Submit and view feedback for
Additional resources
IMAGES
VIDEO
COMMENTS
New in the October 8th, 2019 Release of Microsoft Reporting Services Projects (VSIX 2.6.1): Fixed an issue that would prevent being able to open SSIS projects. Fixed an issue that would require rebuilding Custom Report Item projects that reference Microsoft.ReportingServices.Designer.dll and related assemblies.
Microsoft SQL Server 2017 Reporting Services. SQL Server Reporting Services is a server-based reporting platform that provides comprehensive reporting functionality. Important! Selecting a language below will dynamically change the complete page content to that language. Select language. Download. Expand all.
If you already have Visual Studio 2017, you can also install SSDT during Visual Studio installation, select the Data storage and processing workload, and then select SQL Server Data Tools. Then you can go to Visual Studio 2017 menu->Tools-> Extensions and Updates to download Reporting Services projects extension.
Recently Microsoft released version 2.0 of their Microsoft Reporting Services Projects Visual Studio 2017 Extension which vastly changed the query designer so that it completely breaks older reports as those reports don't work in the non-visual, visual query designer (and/or need to be redesigned). This is completely unreasonable to use if someone has literally 1,000+ reports to now re-create ...
Important. For VS, if you don't see Report Server Project in the template list, add the Report Designer by installing the SSDT workload.. From the Tools menu, select Get Tools and Features....; Select the SQL Server Data Tools from the workloads displayed.; If you don't see the Report Services objects in the center column, add the Reporting Services extensions.
Download SQL Server 2022 Reporting Services from the Microsoft Download Center. Updated web portal. ... To download SQL Server 2017 Reporting Services, go to the Microsoft Download Center. ... The new release of SSDT includes the project templates for SQL Server 2016 (13.x) Reporting Services or later (SSRS): Report Server Project Wizard and ...
Hi, I am using VS community 2019 and followed your steps by installing Microsoft Reporting Services Project. I am able to create a new Report, but I am struggling with the Data Connection which I can't find Embedded Connection Type = Microsoft Dynamics 365 Fetch as I can find it in VS community 2015.
This package provides support for the .rptproj type and is designed for the most recent versions of Microsoft Reporting Services. This included the Report Designer authoring environment, where you can open, modify, preview, save, and deploy Reporting Services paginated report definitions, shared data sources, shared datasets, and report parts.
To run the SSRS Configuration Manager, you will go to the Programs menu and select SQL Server Reporting Services Configuration Manager. Initially, a connection to the SSRS service must be made. After connecting to the SSRS service, step 1 is instructing SSRS configuration manager which account to use for the SSRS service.
There were SSDT versions for VS 2012, 2013, 2015, and 2017. And then in VS 2019 the SSDT did not include an installer for SSRS. ... You will see Microsoft Reporting Services Projects. Check the ...
The Reporting Services Projects extension provides a report definition (*.rdl) designer, projects (*.rptproj), and wizards for creating professional reports for Microsoft Reporting Services. The designer lets you modify, preview, and deploy report definitions and datasets within Visual Studio. Figure 3 - Reporting Services dataset creation ...
Find the location of SQLServerReportingServices.exe and launch the installer. Select Install Reporting Services. Choose an edition to install and then select Next. For a free edition, choose either Evaluation or Developer from the drop-down. Otherwise, enter a product key.
Git repo for SQL Server Reporting Services and Power BI paginated report samples, and community projects - microsoft/Reporting-Services
a. In VS 2019 navigate to 'Extensions' -> 'Manage Extensions' -> Find "Microsoft Analysis Services Projects" -> Click 'Uninstall' b. In VS 2017 navigate to 'Tools' -> 'Extensions and Updates' -> Find "Microsoft Analysis Services Projects" -> Click 'Uninstall'. Ensure they were successfully uninstalled. a.
This article describes SQL Server Data Tools solutions, projects, project templates, and configurations used for Reporting Services. It also describes the views, menus, toolbars, and shortcuts that you can use in Report Designer. To get started designing reports, see Design reports with Report Designer (SSRS). Solutions and projects
Microsoft SQL Server 2017 Reporting Services. SQL Server Reporting Services is a server-based reporting platform that provides comprehensive reporting functionality. Important! Selecting a language below will dynamically change the complete page content to that language. Select language. Download. Expand all.
Visual Studio 2017 Community Edition with the Microsoft Reporting Services Project Extension; or SQL Server Data Tools (SSDT) for Visual Studio. Wide World Importers Sample Database .
Upgrade to the latest Visual Studio. Stay current and benefit from cutting-edge features, enhanced Al capabilities in coding debugging and testing, improved AI assisted performance analysis, and robust security updates. Check out the Al capabilities in Visual Studio 2022. Download latest Visual Studio.
Create a basic table report (SSRS Tutorial) Follow the steps in this tutorial to learn how to create your first report. This tutorial shows you how to work with SQL Server Data Tools (SSDT) to create a data connection (data source). It also shows you how to define a query (dataset) and configure a data region to contain your data.
Microsoft SQL Server 2019 Reporting Services. SQL Server Reporting Services is a server-based reporting platform that provides comprehensive reporting functionality. Important! Selecting a language below will dynamically change the complete page content to that language. Download.
SSIS isn't included with the Express edition of SQL Server. In the SQL Server Setup Wizard, select New SQL stand-alone installation or add features to an existing installation. To install Integration Services, make selections on the Feature Selection page as follows: Under Shared Features, select Integration Services.