How to Put YouTube Videos in PowerPoint: A Step-by-Step Guide
Want to make your PowerPoint presentation a bit more engaging with a cool YouTube video? It’s actually pretty simple to do. By following a few easy steps, you can embed a YouTube video directly into your PowerPoint slide. This way, you won’t have to switch between applications during your presentation – it’ll all be right there in your slide show!

Step by Step Tutorial on How to Put YouTube Videos in PowerPoint
Before we dive into the steps, know that adding a YouTube video to your PowerPoint will enhance your presentation and keep your audience interested. No more boring bullet points, just a captivating video to emphasize your point!
Step 1: Find the YouTube video you want to embed
Locate the YouTube video that you want to add to your PowerPoint presentation.
Finding the right YouTube video is the first step. Make sure it’s relevant to your presentation’s content and will add value for your audience. Once you’ve found it, copy the URL from the address bar.
Step 2: Open your PowerPoint presentation
Open the PowerPoint presentation where you want to insert the YouTube video.
Make sure you’re on the slide where you want the video to appear before you move on to the next step. This will save you the hassle of moving it later on.
Step 3: Click on the ‘Insert’ tab
In PowerPoint, go to the ‘Insert’ tab on the menu bar.
The ‘Insert’ tab is where all the magic happens – from adding pictures and shapes to videos, it’s your go-to for jazzing up your slides.
Step 4: Select ‘Video’ and then ‘Online Video’
Within the ‘Insert’ tab, click on ‘Video’ and then select ‘Online Video’.
By selecting ‘Online Video’, you’re telling PowerPoint that you’re looking to add a video from the web, not one that’s saved on your computer.
Step 5: Paste the YouTube video URL
In the dialog box that appears, paste the YouTube video URL that you copied earlier.
After you paste the URL, PowerPoint will do a quick check to make sure it’s a valid link. If all is well, you’ll be able to move on to the next step.
Step 6: Resize and position the video on your slide
Once the video is embedded, you can resize and position it on your slide to fit your design.
Click and drag the corners of the video to resize it, and click and drag the video itself to move it around the slide. You can also use the format options to add effects like borders or shadows.
After you complete these steps, you’ll have a YouTube video embedded directly into your PowerPoint slide. No more awkward pauses while you exit the presentation to open up a browser. Your video will play seamlessly within your slide when you’re presenting, making for a smooth and professional presentation.
Tips for Putting YouTube Videos in PowerPoint
- Make sure you have a stable internet connection during your presentation, as the video will need to buffer.
- Test the video before your presentation to ensure it plays correctly.
- Keep the video short and to the point – you don’t want to lose your audience’s attention.
- Consider the volume of the video – ensure it’s audible for your audience but not overwhelming.
- If the video is long, use the ‘Trim Video’ feature in PowerPoint to show only the relevant part.
Frequently Asked Questions
Can i put a youtube video in powerpoint if i don’t have an internet connection.
No, you need an internet connection to play a YouTube video in PowerPoint as it streams directly from the website.
Will the video play automatically when I get to that slide?
You can set the video to play automatically or when clicked – it’s up to you. You’ll find these options in the ‘Playback’ tab once the video is inserted.
Can I put a YouTube video in any version of PowerPoint?
You can embed YouTube videos in PowerPoint 2010 and later versions. Earlier versions do not support this feature.
What if the YouTube video is removed or the link changes?
If the YouTube video is removed or the link changes after you have embedded it, the video will not play in your PowerPoint. Always check the video link before presenting.
Can I embed a video that is not from YouTube?
Yes, as long as it’s an online video, you can embed it by following the same steps and using the video’s direct link.
- Find the YouTube video you want to embed.
- Open your PowerPoint presentation.
- Click on the ‘Insert’ tab.
- Select ‘Video’ and then ‘Online Video’.
- Paste the YouTube video URL.
- Resize and position the video on your slide.
There you have it – putting YouTube videos in PowerPoint is a piece of cake! With this handy skill, you can now make your presentations more dynamic and engaging for your audience. Just remember to choose videos that complement your content and resonate with your listeners. And don’t forget to test everything beforehand to ensure a smooth-running presentation. Happy presenting, and may your slides be ever compelling!

Matthew Burleigh has been writing tech tutorials since 2008. His writing has appeared on dozens of different websites and been read over 50 million times.
After receiving his Bachelor’s and Master’s degrees in Computer Science he spent several years working in IT management for small businesses. However, he now works full time writing content online and creating websites.
His main writing topics include iPhones, Microsoft Office, Google Apps, Android, and Photoshop, but he has also written about many other tech topics as well.
Read his full bio here.
Share this:
Join our free newsletter.
Featured guides and deals
You may opt out at any time. Read our Privacy Policy
Related posts:
- How to Put Embedded Youtube Video in Powerpoint 2010
- How to Set Time for Slides in Powerpoint
- How to Add Page Numbers in Powerpoint 2010
- How to Save Powerpoint as PDF with Notes
- How to Loop a Slideshow on Powerpoint 2013
- How to Delete a Slide in Powerpoint 2010
- How to Unhide a Slide in Powerpoint 2013
- How to End Powerpoint on Last Slide in Powerpoint 2010
- How to Make a Powerpoint Slide Vertical in Powerpoint 2013
- How to Hide a Slide in Powerpoint 2010
- Can You Save a Powerpoint as a Video in Powerpoint 2013?
- How to Embed a YouTube Video in Powerpoint 2013
- How to Create a PowerPoint Presentation Step by Step: 2024 Guide
- How to Embed a Video in PowerPoint: The 2024 Guide
- How to Rotate a Slide in PowerPoint: A Step-by-Step Guide
- How to Insert Slide Number PowerPoint: The Ultimate 2024 Guide
- How to Add a YouTube Video in Powerpoint Online
- How to Change Hyperlink Color in Powerpoint 2010 (An Easy 5 Step Guide)
- How to Copy a PDF File Into PowerPoint: A Step-by-Step Guide
- How to Embed a Word Document Into PowerPoint 2000: A Step-by-Step Guide
Sign up for our daily newsletter
- Privacy Policy
- Advertise with Us
How to Create a YouTube Video with PowerPoint

Few people nowadays have the patience or willingness to sit through multiple slide presentations. Online videos, on the other hand, are a powerful means to build user engagement in an era of lower attention spans. As long as the videos look professional, your audience will pay attention to whatever you have to say.
Follow these simple steps to convert your hard work that went in to creating a PowerPoint into an accessible and compact YouTube video.
Also read: 4 Free Online Tools to Add a Censor Bleep to Your YouTube Videos
Step 1: Clean Up Your Slides
If you want to give a professional finish to the video, try breathing life into the slides first.
Open the file with PowerPoint 2010 and click “View,” followed by “Slide Master,” to apply uniformity in alignment, bullets, fonts and spacing. After saving the Master template, go to “Slide Sorter” view and apply a minimalist, standard design. You can use an academic or corporate template as long as it’s minimal and clean.

Too much text in a slide will disrupt the attention span of the typical YouTube viewer. Get rid of bullet lists, fancy animations, flowcharts and tables. If you previously used a slide to describe something complex, break it down into easily digestible ideas spread across multiple slides.
Use screenshots and full-slide, high-resolution images to fill up your new presentation. PowerPoint 2010 allows you to insert online pictures with a Creative Commons license and from the Bing search engine.

You can also use the “Pictures with Captions” layout along with “Design Ideas” to create a robust background for video frames. Use free stock images for new picture ideas.

Also read: 14 Useful PowerPoint Templates to Set Up a Digital Planner
Step 2: Insert Audio
Background narration is the most important component of a high-quality YouTube video. You can download royalty-free music , but the best YouTube videos always come with speaker narration. Go to “Insert,” followed by “Audio,” where PowerPoint allows you to record your own voice for each slide.

There’s a chance you aren’t getting a very high-quality audio with PowerPoint alone. It’s far better to work with a pre-recorded audio clip and a tight script. You can use a voice recording app like Audiophile or an actual digital voice recorder. Our aim is to achieve professional results by filtering out echo and background noise.

For a fifty-slide presentation, you should aim for no more than ten seconds of recorded narration per slide. Go to “Slide Show,” followed by “Rehearse Timings,” to get the timings right for each slide. Import the MP3 files into their corresponding slides and play them in automatic mode.

Finally, you are only required to set up the slide show. Check the options for “Play Narration” and “Use Timings” along with “Browsed by an individual (window).”

Also read: How to Create and Manage Your YouTube Clips
Step 3: Insert Video Clips (Optional)
If you did a good job with rehearsed narrations and images as described earlier, you can skip this part. However, a mini video clip within a video is a powerful way to retain your YouTube viewer’s attention. Unlike in the past, playing a video clip automatically from your PowerPoint is very easy.
Go to “Insert,” followed by “Video,” where you can embed any video from YouTube’s “Share” menu and play it on your own presentation.

Always make sure that it is your own video. You can always choose Creative Commons videos from YouTube, Vimeo and other sites. Use PowerPoint’s “Playback” option which is displayed after you embed a new video.
Step 4: Save PPT as Video
After clicking “File,” followed by “Save As,” save the PowerPoint as a WMV file. Your video is now ready for upload on YouTube and any other video-sharing sites.

Step 5: Upload Video on YouTube
Upload the desired video output to your YouTube channel. If it is aimed at prospects alone, you might want to keep it private or unlisted with no embedding or comments allowed.

Do you agree that converting your PowerPoint files to a five- or seven-minute video is a good investment of time? Please let us know your thoughts. Want to make the most of your time? Learn these PowerPoint keyboard shortcuts .
Our latest tutorials delivered straight to your inbox

Sayak Boral is a technology writer with over eleven years of experience working in different industries including semiconductors, IoT, enterprise IT, telecommunications OSS/BSS, and network security. He has been writing for MakeTechEasier on a wide range of technical topics including Windows, Android, Internet, Hardware Guides, Browsers, Software Tools, and Product Reviews.

Critical PowerPoint Shortcuts – Claim Your FREE Training Module and Get Your Time Back!
How to Embed a YouTube Video in PowerPoint (Step-by-Step)
- PowerPoint Tutorials
- Pictures, Icons, Videos, Etc.
- February 25, 2015
This is your SUPER GUIDE for how to embed a YouTube video in PowerPoint, covering all versions of PowerPoint (find your version below).
Adding videos to your presentations is a great way to create more engaging content and backup your main points with PROOF.
Before you get started embedding your video though, there are 3 considerations to take into account
Note: You are limited to what you can do with online videos in PowerPoint, compared to videos you embed from your computer. To learn all about these differences, read our guide
YouTube Video Considerations
1. which version of powerpoint you are using.
There are various techniques for the different versions of PowerPoint and add-ins you can install to make this process (and your life) easier.
The guide below covers PowerPoint versions 2007, 2010, 2013 and the latest Office 365 version of PowerPoint.
2. Do you want the YouTube video’s entire playlist on your slide?
If so, you need to navigate to your video through the YouTube channel’s playlist, which drove me crazy when I was trying to figure this out.
Also, inserting a playlist isn’t available in PowerPoint 2007.
3. Do you need to trim your YouTube video?
If you want to take advantage of all the PowerPoint video editing features, you will need to find a way to download your YouTube video and embed it in PowerPoint.
That’s because the FULL range of PowerPoint video editing tools is only available for videos you directly embed into PowerPoint from your computer.
To see everything you can do with videos embedded directly from your computer (instead of from an online source like YouTube), read our guide here .
PowerPoint 2019 (Office 365) Embed a YouTube Video
1. find your youtube video’s proper url.

To find the right URL for your YouTube video to embed into PowerPoint, follow these steps:
- Navigate to YouTube.com
- Use the Search Bar to find your video
- Select your video to open the YouTube Player
- Click Share at the bottom of the video player
- Click Copy
The same is true if you are using an online video from another source.
You want to make sure you use the Share button (or similar feature) to get the proper URL for your video before you embed it into PowerPoint.
Otherwise it might not play properly, as discussed below.
WARNING: Get the right YouTube URL
You want to make sure you copy your video’s URL using the share button. DO NOT use the URL from your web browser.
That’s because the URL in your web browser tends to start where you last left off in the video and not at the beginning of the video.

In the picture above this is reflected in the URL with T=60s. This means the video will start 60 seconds into the video, and not from the beginning.
This can lead to an embarrassing presentation, where you play the video at the punchline that you want to make instead of the full video that leads up to the punch line.
2. Embed your YouTube video into PowerPoint

To embed a YouTube video in PowerPoint, simply:
- Navigate to the Insert tab
- Select the Video drop down (within the Media group)
- Choose Online Video
- Where it says Enter the URL for the Online Video , Paste in (Ctrl + V) your URL
- Click Insert
Clicking Insert , a message at the bottom of your screen will tell you the video is processing. Once it’s done, the video appears on your slide as you can see below

How to trim a YouTube video
Keeping in mind that you are limited in what you can do with online videos in PowerPoint (like YouTube videos), you can adjust the start time of your YouTube video.
This allows you to start your YouTube video at a certain time within the video, so you can just show the most relevant part of the video that backs up your presentation.
The trick to doing this is to adjust it BEFORE you copy the YouTube video’s URL.
If you want to trim both the start and end times of your video, you’ll need to download the YouTube video, embed the video from your PC and then use the Trim command.
To learn how to embed a video in PowerPoint (including trimming the video’s length), read our guide here .
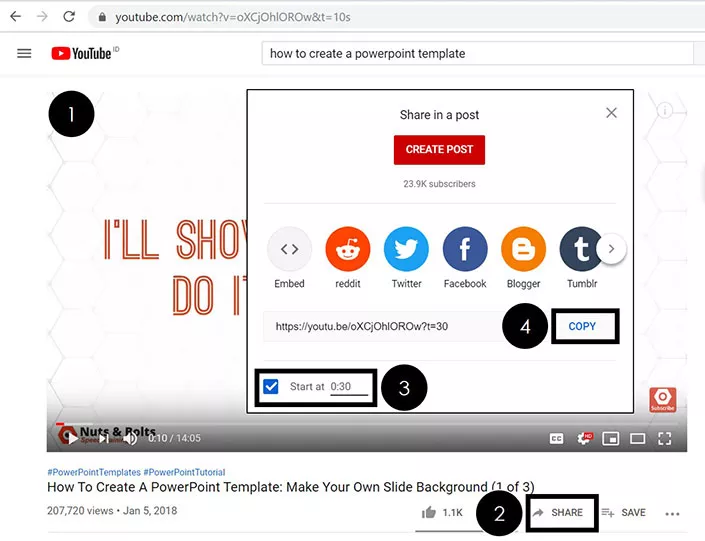
To trim a YouTube video to a certain start time, simply:
- Open your YouTube video’s watch page
- Click the Share button
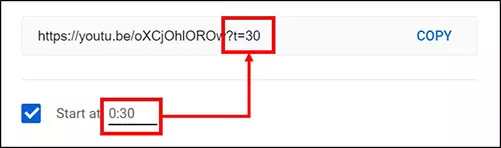
- Adjust the video’s Start at time
Adjusting the YouTube video’s start time, you’ll see the new start time reflected in the URL, as pictured below.
PowerPoint 2013: Embed a YouTube video in PowerPoint
There are two ways to embed YouTube videos in PowerPoint 2013: the new dedicated YouTube option in PowerPoint, and the old embed code method.
Warning: New YouTube Option
Although the new YouTube option in PowerPoint simplifies the embedding process…you DO lose the capability to format your YouTube videos and/or embed an entire YouTube playlist.
To format the appearance of the YouTube video in PowerPoint 2013 or to grab a playlist, you still need to use the old embed code method (the second method).
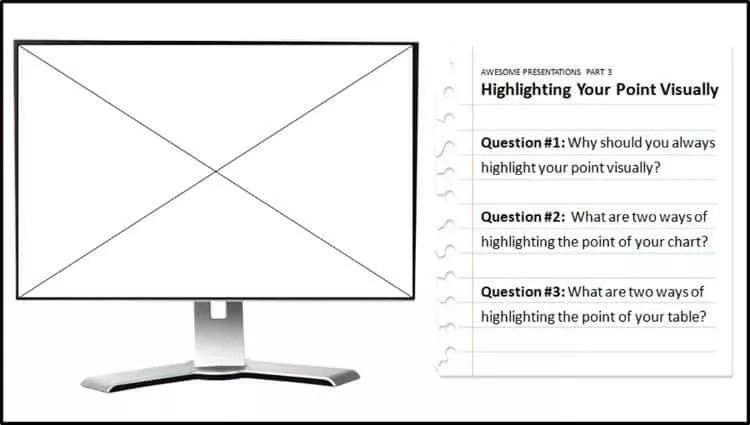
I’ve covered both methods in the tutorials below. You’ll notice I used an image of a computer screen to frame the video and create a cool effect…just another tip for making your videos come to life!
There are two methods for adding YouTube videos in PowerPoint:
Method #1 – The dedicated YouTube option (simplest but least flexible)
Method #2 – Using the embed code (most flexible)
Although the words ‘embed code’ wig most people out, rest assured that you don’t need to know ANYTHING about coding to pull the second method off…YouTube does all of the hard work for you
Method #1: Dedicated YouTube option
1. search the youtube dialog box.

Within the online video dialog box, go to the YouTube search box and type the name of the video you are searching for (in this case I’ve typed ‘breaking up your bullet points’), and then hit Enter.
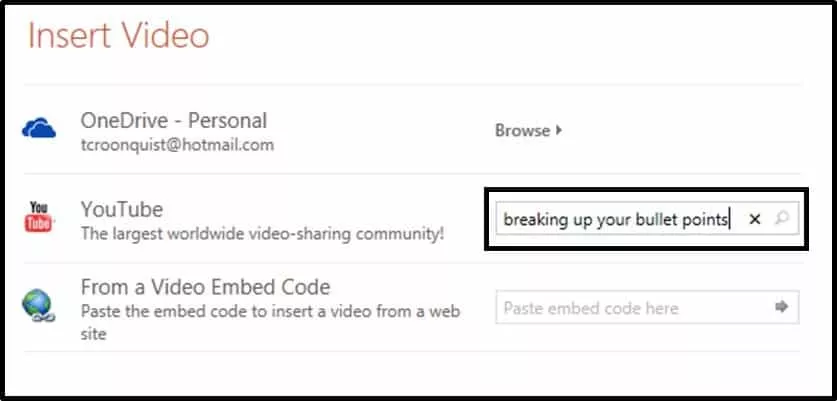
The dialog box searches YouTube and displays the video results. In this case the video we want is on the far left so I will select it and hit Insert.

2. Resize the YouTube video to fit your screen
Note: If you are using an image like I am, you want to extend the YouTube video until its controls cover up the bottom of the picture…which will make it look more realistic.
With the video setup, double-click the embedded YouTube video to load the video and see what it looks like.

What about the playlist and other formatting options?
Although this new YouTube embedding method is EXTREMELY fast and easy, notice that you are not given any options to remove the YouTube controls (on the bottom or the top of the video) and there was no option to include the entire YouTube playlist (assuming there is one associated with that video).
You can see the difference in this picture:
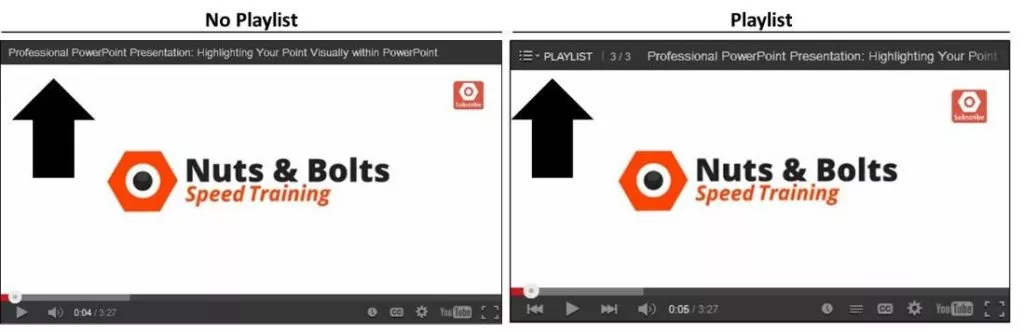
For more control over these additional features, you need to know how to embed a YouTube video using the embed code method, which is SUPER straightforward and easy…continue reading on to see how.
Method #2: Using the embed code
This technique not only works for embedding a YouTube playlist into your presentation, but will also work for embedding other online videos into your presentation.
1. Navigate to your YouTube video through the channel playlist
Assuming that you want a video’s entire playlist, you need to navigate to the channel where the playlist exists, and open the video through the playlist. If you don’t care about the playlist, simply search YouTube as you normally would.
This might seem SUPER weird, but as you will see in a minute, it works.
To get the playlist for this video, you can see that I’ve navigated to the Nuts & Bolts channel page (fancy that!), selected the playlists option, found my playlist and then found the video that I want within the playlist.
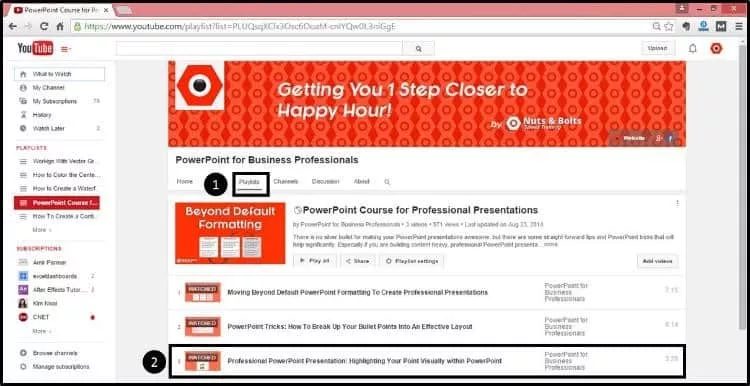
Select the video (through the playlist) to open the video in YouTube as you normally would. Notice in the picture below, to the right of the video, you can see the entire playlist.

2. Navigate to the embed code
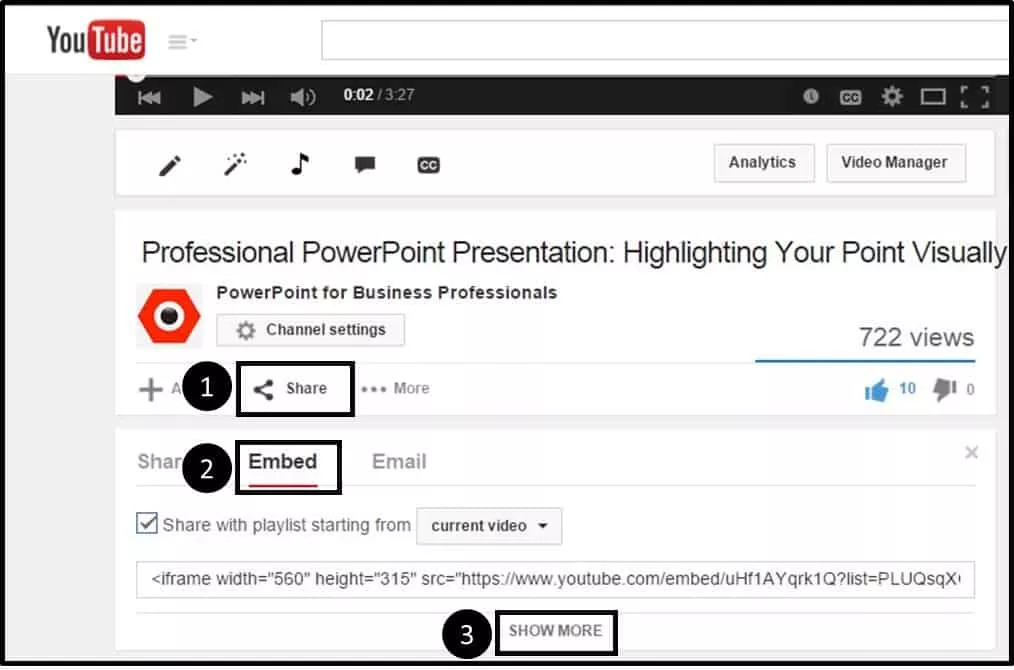
3. Choose how you want your video to play
When embedding a YouTube video in PowerPoint 2013, there are few options you want to pay attention to, primarily:

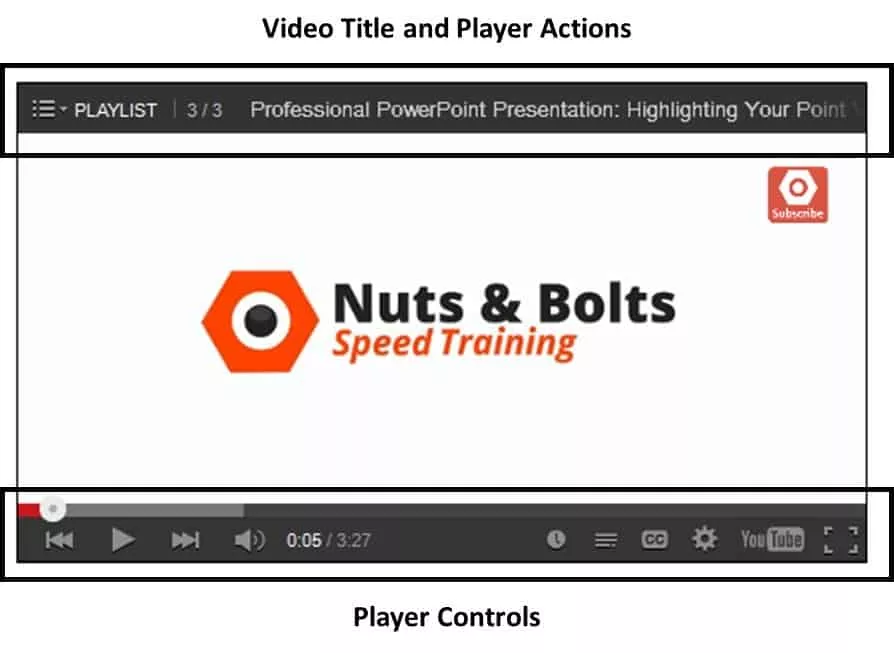
Option #1: Show Player Controls – This includes the pause, play and other navigational features at the bottom of the YouTube video.
Option #2: Show Video Title and Player Actions – This includes the tile of the video, share buttons on the far right and a playlist dropdown…assuming the video is part of a playlist and you navigated to it through the playlist itself.
Leaving these selected, the YouTube video will play in PowerPoint as demonstrated below.
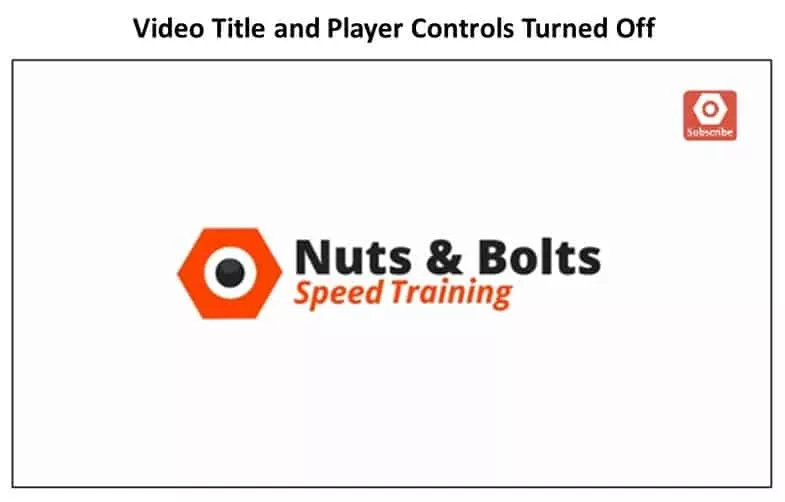
If you uncheck both of these options, your YouTube video will play in your PowerPoint presentation as pictured below (you can obviously do a hybrid of these controls as well).
Other video options include:
Video size – Not terribly important as you can manually resize your video within PowerPoint anyway.
Show suggested videos when the video finishes – This is optional and depends on whether you want people to continue watching other videos once the video finishes. This option is not available if you navigate to the video through the playlist as I described above.
Enable privacy – Enhanced mode – This last option is only relevant if you are embedding the YouTube video on a website…choosing this option will not work in PowerPoint.
4. Copy and Paste the Embed Code

Alternatively, you can simply right-click the video, select ‘Get embed code’ and then hit CTRL + C to copy.

With the embed code copied, back in PowerPoint 2013, navigate to the Insert tab, open the Insert Video dropdown and select Online Video.

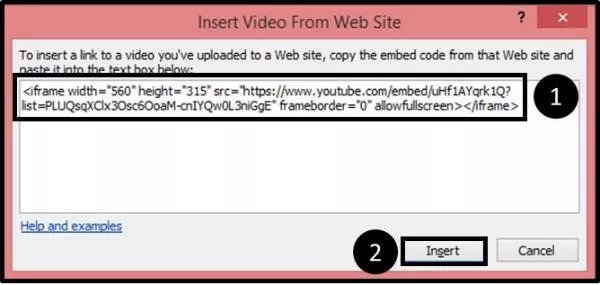
In the dialog box that pops open, in the ‘From a Video Embed Code’ option, hit CTRL + V on your keyboard to paste the embed code into the dialog box and then hit Enter.
A black box is inserted into your layout that you now want to resize and position.
If you are using a blank TV or computer monitor image (as I am in this example) you want to stretch the video down to cover the bottom of the monitor so that the YouTube controls cover the controls on the static image…it will look more realistic this way.

Note: Going this route has given us more control over the look and feel of our YouTube video and we were able to get the playlist feature in the upper left-hand corner.
PowerPoint 2010: Embed a YouTube video in PowerPoint
Believe it or not, there are three ways to embed YouTube videos in PowerPoint 2010:
- The free add-in (see Method #1 on the PowerPoint 2007 tab)
- Using the Shock Wave ActiveX Control (see Method #2 on the PowerPoint 2007 tab)
- Using the dedicated YouTube embed option
In this tutorial, I will focus on the third and newest method, which is a HUGE improvement over the previous methods: using the dedicated YouTube embed code option.
This method gives you the most flexibility in formatting your YouTube video in PowerPoint AND it allows you to embed an entire playlist…something that was not possible in PowerPoint 2007.
For the tutorial, I used an image of a computer screen to frame the video and create a cool effect…just another tip for making your videos come to life!
1. Find your YouTube video

When embedding a YouTube video in PowerPoint 2010, there are few options you want to pay attention to, primarily:
Option #2: Show Video Title and Player Actions – This includes the tile of the video, share buttons on the far right and a playlist dropdown (see ‘getting the playlist’ below) on the left…assuming the video is part of a playlist.
Leaving these selected, your YouTube video will play in PowerPoint as demonstrated below.
If you uncheck both of these options, your YouTube video will play in your PowerPoint presentation as displayed here:
Video size – This is not terribly important as you can manually resize your video within PowerPoint anyway.
Show suggested videos when the video finishes – This is optional and depends on if you want people to continue watching other videos once the video finishes.
Enable privacy – Enhanced Mode – This is only relevant if you are embedding the video on your website…choosing this option will not work in PowerPoint.
As YouTube states “Enabling this option means that YouTube won’t store information about visitors on your web page unless they play the video.”
4. Copy and paste the embed code
With the YouTube embed code copied, back in PowerPoint, navigate to the Insert tab, select Video and then select the ‘Video from Web Site’ option.

In the dialog box that pops open, hit CTRL + V on your keyboard to paste the YouTube embed code into the dialog box, and then click on Insert.
A black box is inserted onto your slide that you then want to resize and position.
Note: If you have the option to show the player controls at the bottom of your video, you will want to stretch the video out to cover the image you are using (in this case a blank computer screen) so that the YouTube video controls show on top of the controls on your image.
That way, when you play the video, it will look more realistic.
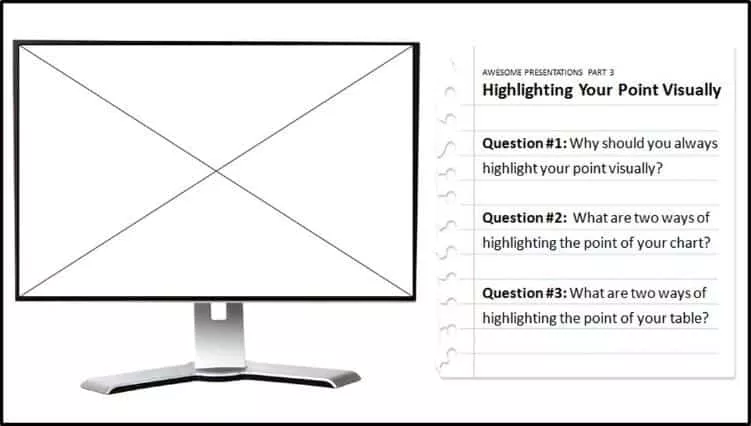
To see how the video lines up within your frame (which can be tough when you have a black box on top of a black frame), simply double click the video in the Normal View, and the YouTube video will load.
Notice in the picture below how the YouTube controls replace the controls on the bottom of the static picture I’m using, creating a more realistic effect in PowerPoint.
PowerPoint 2007: Embed a YouTube in PowerPoint
There are two methods for inserting YouTube videos in PowerPoint 2007, and a number of trouble shooting issues you need to be aware of.
Method #1: The Easy Way – Using add-ins like the free one built by Microsoft MVP Shyam, which does all of the hard work for you.
Method #2: The Harder Way – Adding the Developer tab to your Ribbon, adding a Shockwave ActiveX Object, and then manually manipulating the URL of your YouTube video.
Which one is best depends on how many YouTube videos you need to add to your PowerPoint presentations and how often you plan to do so.
If you frequently need to install YouTube videos in PowerPoint, you should definitely get the free add-in for PowerPoint 2007 and/or consider upgrading to a more recent version of PowerPoint which gives you additional YouTube options like adding playlists.
Warning: Compatibility Issues
If you are sharing your files with people using other versions of PowerPoint, you also need to be aware of the compatibility issues.
YouTube videos inserted in more recent versions of PowerPoint (2010 and 2013) will not necessarily play when opened in PowerPoint 2007…they might, it just depends on how they were added.
That said, any YouTube video successfully inserted in an earlier version of PowerPoint, will always play in a later version.
Method #1: The Easy Way
Embedding YouTube videos in PowerPoint 2007 normally requires getting and manipulating the video’s URL. This easy method of using an add-in is awesome because it does all of the hard work for you!
It takes a minute in the beginning to download and install the add-in, but once it’s all set up, with just a few clicks (as you’ll see below), you can quickly grab your YouTube videos and play them directly in PowerPoint.
A big thanks to Microsoft MVP Shyam Pillai for developing this great free add-in!
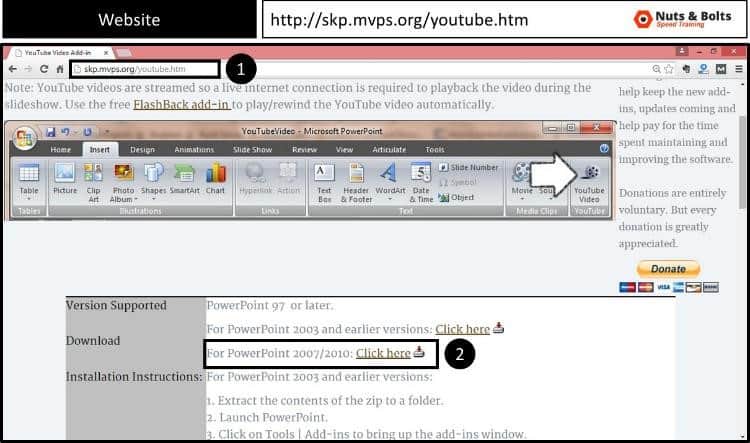
1. Download the free add-in
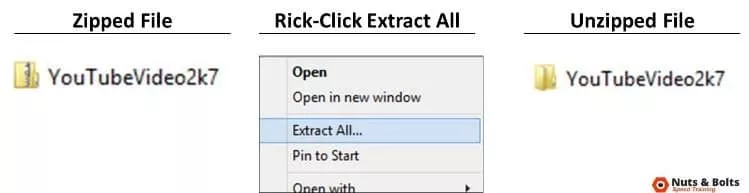
2. Extract the zipped file
3. Copy the PowerPoint add-in
4. Add the PowerPoint add-in
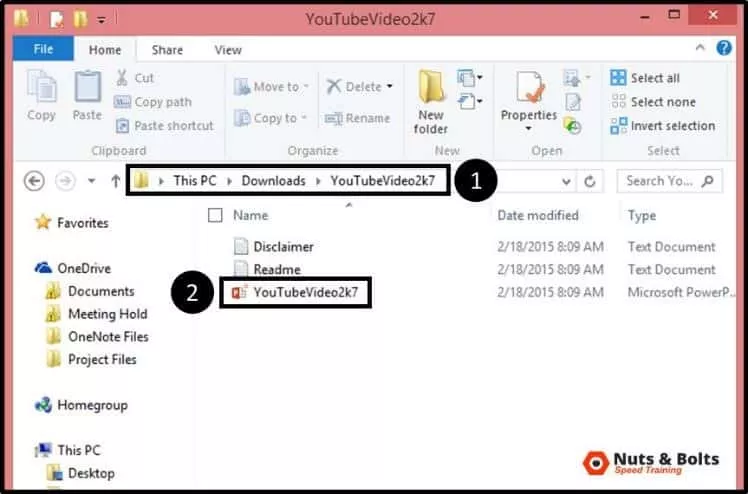
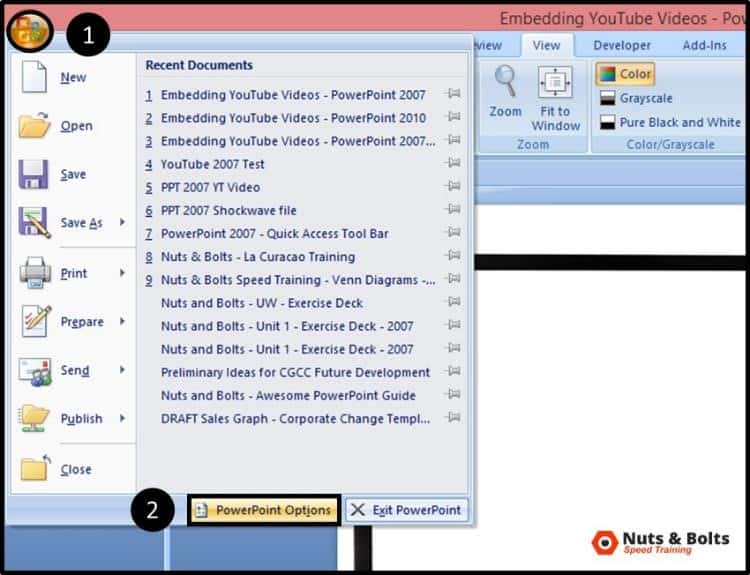
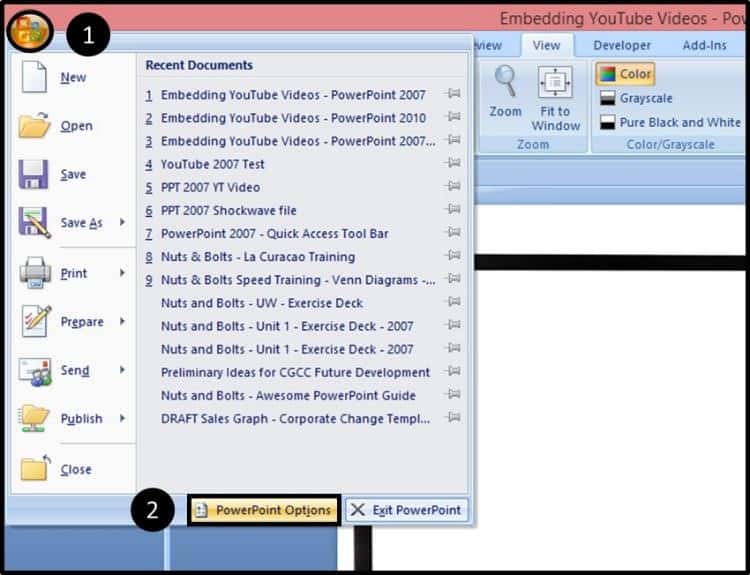
Back in PowerPoint 2007, open the Windows button in the upper left-hand corner and select PowerPoint Options.
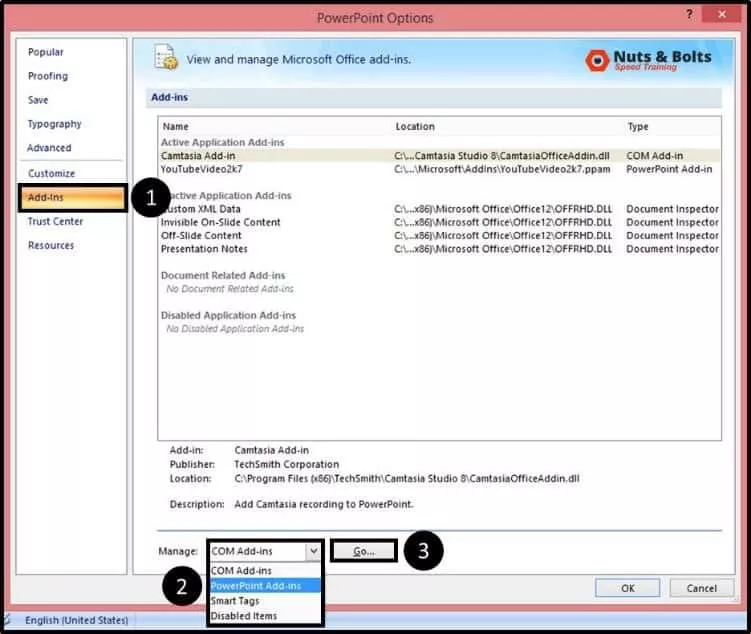
Select Add-ins on the left, use the drop-down at the bottom of the screen to filter to PowerPoint Add-ins and the select Go.
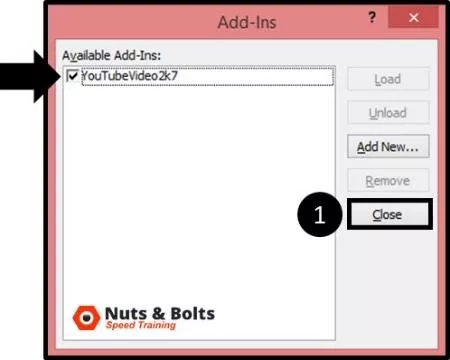
In the Add-Ins dialog box that opens, select Add New.

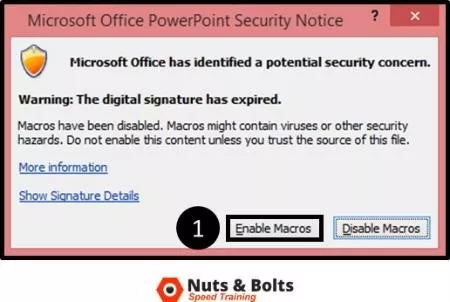
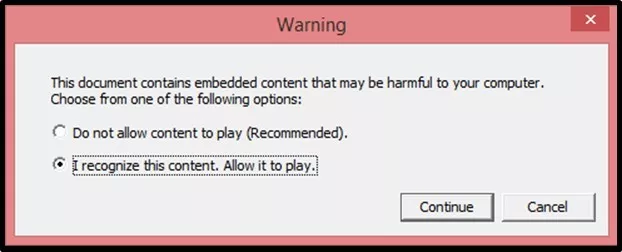
Clicking OK, a macro dialog box might open. If it does, select Enable Macros.
You should now see the YouTubeVideo2k7 add-in in the window with a check mark next to it. Click Close.
With the add-in installed, if you now open up the Insert tab in PowerPoint 2007 or 2010, you will have an added command at the end of the Insert Tab for quickly embedding YouTube videos.
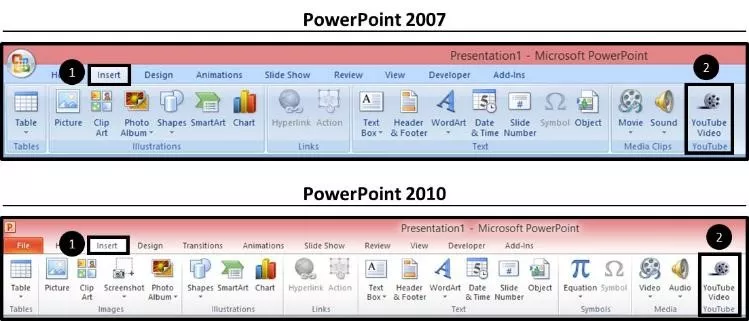
Now that you have the PowerPoint 2007 Add-In installed, let’s take a look at how to use it.
5. Navigate to YouTube and copy your video’s URL
Warning: Get the right URL
Be VERY careful here!
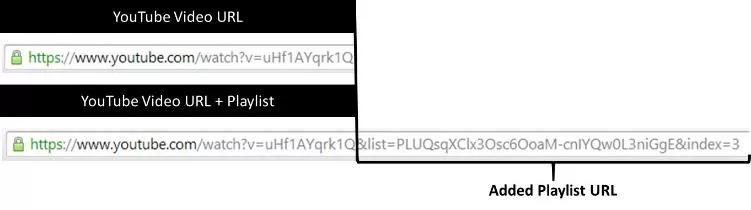
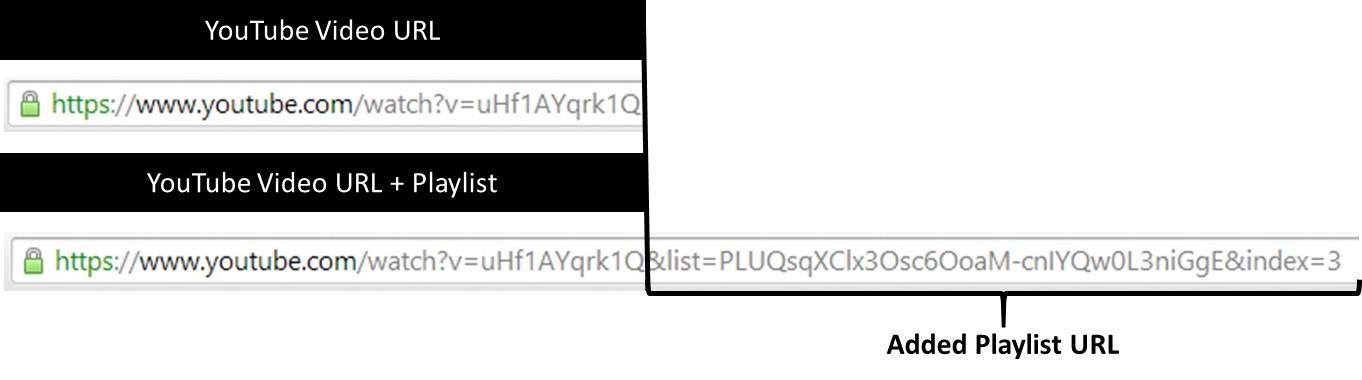
PowerPoint 2007 cannot play YouTube playlists, which you can tell by the length of the URL. Notice in the picture below the difference in length between the video and the video plus its playlist.
If you accidentally embed the longer URL into PowerPoint 2007, the YouTube video will not play, regardless of how you try to troubleshoot. If you want to embed a playlist in PowerPoint, you need to upgrade to PowerPoint 2010 or PowerPoint 2013.
You need to grab the shorter URL which is everything up until the ‘&list’ or ‘&index” separator. With the shorter URL selected, hit CTRL + C on your keyboard to copy it.
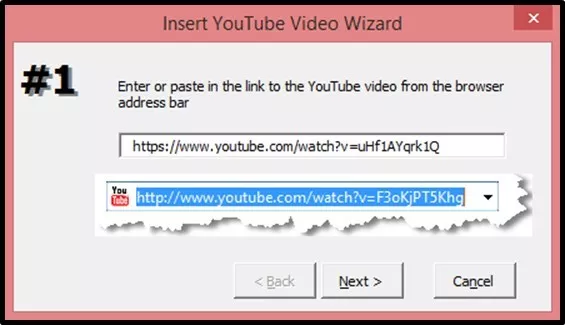
6. Insert the YouTube video using the add-in

Hit CTRL + V to paste in your YouTube URL, then hit Next.
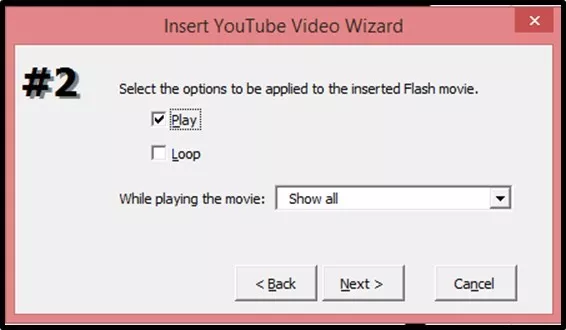
You can select options for your video like Play and Loop. I will simply hit Next.
You can then choose to resize the video here if you like. But as we can do this on our own in a second, I will again simply hit Next.

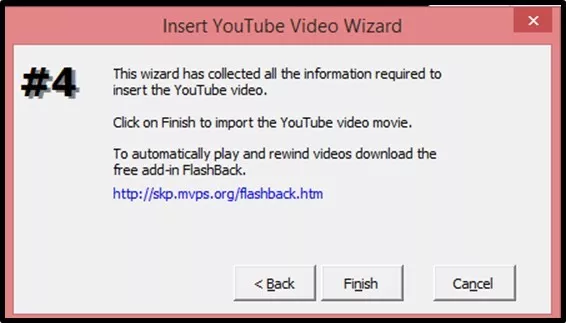
On the last screen, hit Finish
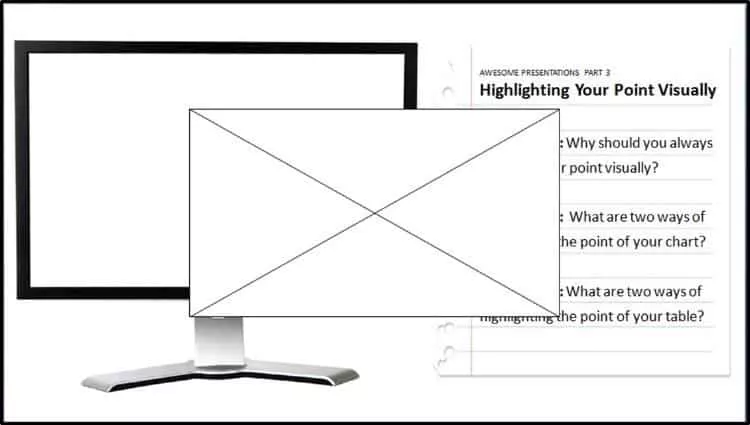
The YouTube video is now inserted into your slide as a white box with an X through it.
7. Resize the YouTube video
As you resize the video, the entire box might turn white, but no worries, you are still fine.
8. Launch the YouTube video
Assuming you are connected to the internet, the video will load and you will be able to play the video directly from within your PowerPoint 2007 presentation.

Method #2: The Hard Way
If that sounds scary to you, I highly recommend the easier method described above, using the free add-in.
1. Add the Developer Tab to your ribbon
2. Insert a Shockwave file
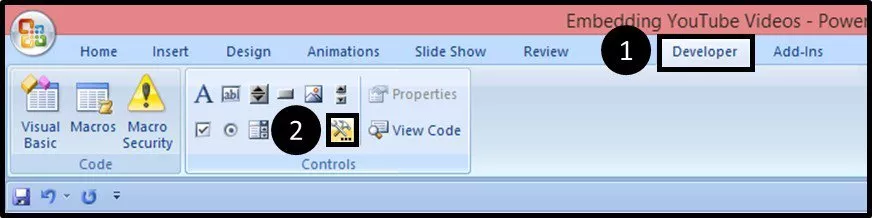
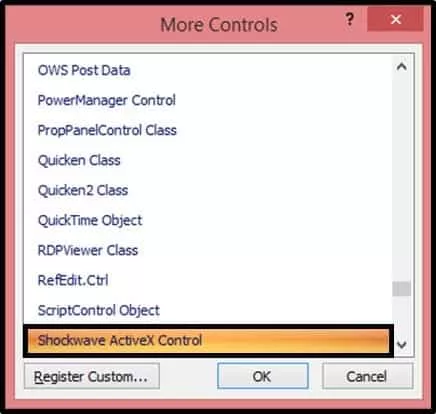
Within the dialog box, navigate down to Shockwave ActiveX Control, click OK.
And then draw a rectangle on your slide (where your YouTube video will go).
Note that you cannot draw the Shockwave ActiveX Control on top of another object, so you will have to draw it on a blank part of your slide (assuming you have something on your slide).

The Shockwave ActiveX object will look like a white box with an X through it. Resize and position the object on your slide, in this case I’m stretching it out to fit on top of my blank computer screen image.
Now we are ready to get our YouTube video
3. find your youtube video’s url.
Navigate to YouTube and find your Video’s URL…but be VERY careful here! PowerPoint 2007 cannot play YouTube playlists, it can only play individual videos, so you need to be careful you don’t accidentally grab a video + its playlist.
If you want to embed a playlist in PowerPoint, you need to upgrade to PowerPoint 2010 or PowerPoint 2013 and use the embed code method. See the PowerPoint 2013 tutorial below.
With the shorter URL selected, hit CTRL + C on your keyboard to copy.
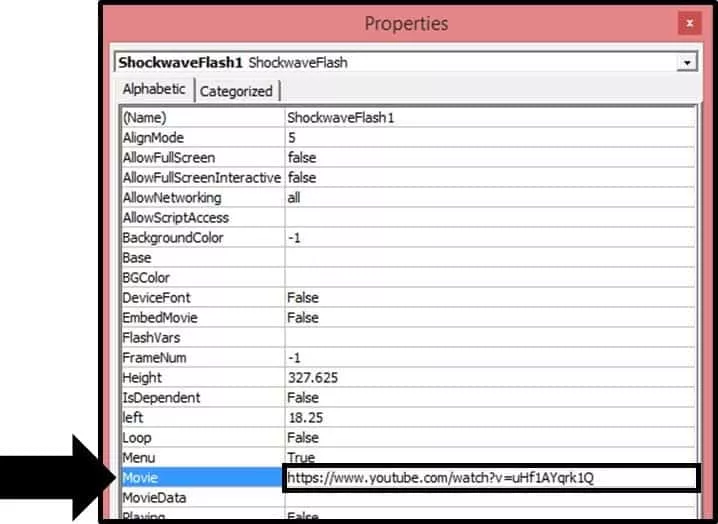
4. Open up the properties of your Shockwave ActiveX object

In the Properties dialog box, scroll down to the Movie section and paste in your URL.
5. Adjust the YouTube URL within the dialog box
To get the YouTube video to play correctly in PowerPoint 2007, you need to make two adjustments:
#1: Delete the ‘watch?’ from the URL #2: Replace the ‘=’ with ‘/’
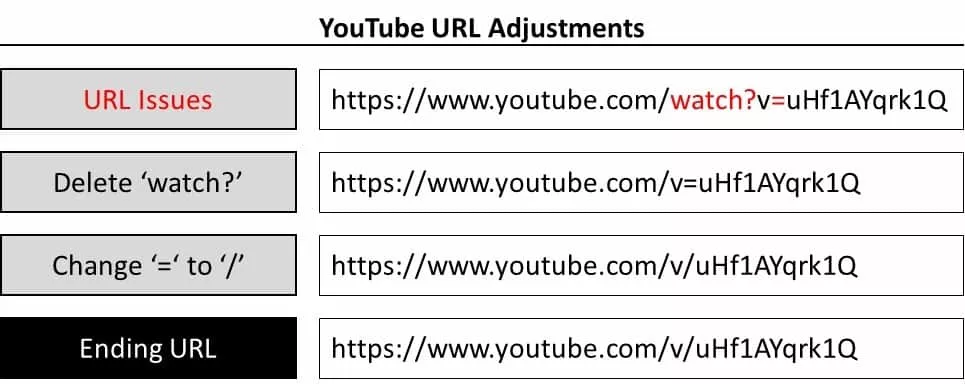
With the URL adjusted, hit OK to close the dialog box.
6. Run your presentation

So that’s how to embed a YouTube in PowerPoint, regardless of which version of PowerPoint you have.
This allows you to quickly and easily add interactive media features to your presentation.
The other advantage of embedding a YouTube video, is it does not increase the size of your presentation. That means that you don’t need to worry about compressing your presentation.
If you enjoyed the depth of this post and want to boost your PowerPoint skills for the professional world, visit us here .
What’s next?
Related articles.
- What is a broken link chart in PowerPoint (and how to fix it)?
- Bar chart trick: Right aligning categories (PPT, Word, and Excel)
- PowerPoint settings: program level vs. presentation level
- What is a linked Excel chart in PowerPoint?
- Set Up Slide Show: Customize how your PPT presentations run
About The Author

This Post Has 5 Comments

You may use Allavsoft to download YouTube video to AVI, WMV to put a youtube video in PowerPoint

Thanks for the tip!

This article certainly is thorough. Just an FYI, we’ve built a PowerPoint add-in at https://www.liveslides.com/websites/youtube/ that makes it significantly easier to embed and play YouTube videos (any web content really) directly in PowerPoint. Seriously, just a couple steps and you’re ready to roll.
Thanks for sharing, Jason. I’ve never used your software but we usually like anything that helps us save time. Cheers
Hey John, and thanks for sharing the software! Sounds like a handy program that can save you time – we like that! Just make sure you don’t abuse any copyright issues when downloading videos from the web 😉
Comments are closed.
Popular Tutorials
- How to Strikethrough Text (l̶i̶k̶e̶ ̶t̶h̶i̶s̶) in Word, Excel & PowerPoint
- How to Make Animated Fireworks in PowerPoint (Step-by-Step)
- Strikethrough Shortcut (l̶i̶k̶e̶ ̶t̶h̶i̶s̶) for Word, Excel & PowerPoint
- How to Create a Flash Card Memory Game in PowerPoint (Like Jeopardy)
- Keyboard Shortcuts Not Working: Solved
PowerPoint Tutorial Categories
- Strategies & Opinions
- Shortcuts & Hacks
- Presentation Design
- New Features
- Miscellaneous
- Charts & Data Viz
We help busy professionals save hours and gain peace of mind, with corporate workshops, self-paced courses and tutorials for PowerPoint and Word.
Work With Us
- Corporate Training
- Presentation & Template Design
- Courses & Downloads
- PowerPoint Articles
- Word Articles
- Productivity Resources
Find a Tutorial
- Free Training
- For Businesses
We help busy office workers save hours and gain peace of mind, with tips, training and tutorials for Microsoft PowerPoint and Word.
Master Critical PowerPoint Shortcuts – Secure Your FREE Training Module and Save Valuable Time!
⌛ Master time-saving expert techniques.
🔥 Create powerful presentations.
🚀 Propel your career to new heights.
We value your privacy – we keep your info safe.
Discover PowerPoint Hacks Loved by Industry Giants - KKR, AmEx, HSBC!
Over 114,880 professionals in finance, marketing and sales have revolutionized their PPT skills with our proven methods.
Gain FREE access to a full module of our premium PowerPoint training program – Get started today!
We hate spam too and promise to keep your information safe.
You are currently viewing a placeholder content from Facebook . To access the actual content, click the button below. Please note that doing so will share data with third-party providers.
How to Embed a YouTube Video in PowerPoint
Make your presentations engaging, not boring
Sitting through a monotonous PowerPoint presentation can be pretty miserable. As a presenter, you want your audience to stay focused and enjoy your slides instead of making them yawn. One way to make your PowerPoint slideshow more engaging is to add a YouTube video to your presentation.
Depending on what version of PowerPoint you’re using, there are different ways to insert a YouTube video into your presentation. Learn how to embed YouTube videos in PowerPoint and why you might want to do it in the first place.

Why Add YouTube Videos to Your PowerPoint Presentations
You want your audience to enjoy a presentation and also learn new information from it. The best formula for a well-balanced PowerPoint presentation is to mix your media, including text, images, charts, and videos. This will make your slideshow not only informative, but also captivating.
Some people learn more from visuals, while others remember things that they hear better than what they see. A YouTube video in your presentation will ensure that everyone gets the key takeaways from the meeting.
If you want to add a YouTube video to your PowerPoint presentation but don’t know where to start, follow the steps below.
- Open YouTube and find the video you want to embed in PowerPoint.
- Under the video, select Share .

- From the Share menu, select Embed .

- Select Copy to copy the embed code.

Now that you have the embed code of your video, head over to your PowerPoint presentation.
- Open PowerPoint and open the slide where you want to insert the YouTube video.
- From the menu bar, select the Insert tab.

- Select Video . Then from the drop-down menu, select Online Video .

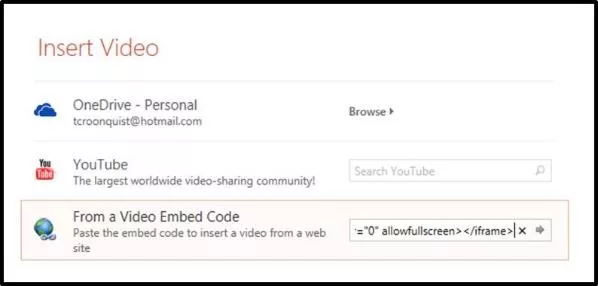
- In the Insert Video window, select From a Video Embed Code and paste the embed code that you copied from YouTube. Select the forward arrow to confirm.

You’ll see the YouTube video appear on the slide in your PowerPoint presentation.

If you want to change the layout of your slide , you can move and resize your video by dragging its corners.
Things You Should Know When Embedding Your Video in PowerPoint
There are a few tips and tricks that you should know of when adding YouTube videos to your PowerPoint presentation.
Should You Embed Your Video or Add a Link to Your Slide Instead?
Many users simply link to a YouTube video in the presentation, thinking this option is easier. Embedding is a better choice. It gives your presentation a more professional look, and also makes it easier for you as a presenter. If the video’s embedded, it’ll play as soon as you click on it without leaving the slide to open the YouTube site.
You can easily find the embed code for any video under the option to Share it on YouTube.
How to Search YouTube Videos Inside PowerPoint
There’s a trick that you can use to embed a YouTube video in PowerPoint without leaving your slide.

When adding your video to the slide, in the Insert Video window select Search YouTube and type in the name of the video you’re looking for. After you select the search icon to confirm, you’ll see the list of options from YouTube. Pick the video you want to use in your presentation and select Insert to embed it on your slide.
What If the Video Appears Black Inside Your PowerPoint Presentation?

After you’ve added the video to your PowerPoint slide, it might appear as a black rectangle at first. If you want to change the look of it to see the video’s preview right in your presentation, right-click the video and select Preview . You can then check what the video will look like on your slide during the presentation.
How to Embed a Local Video in PowerPoint
If you’re worried that you might run into internet connection problems during your presentation and/or already have the video you’d like embedded in PowerPoint downloaded, there’s an easy way to insert it into your slides.
To embed a locally stored video in PowerPoint, follow the steps below.
- Open PowerPoint and open the slide where you want to insert the video from your computer.
- Find the Insert tab and select Video .
- From the drop-down menu, select This Device .

- Find the video you want to embed in PowerPoint and select Insert .
You’ll see the video appear on the slide in your PowerPoint presentation. You can move and resize it by dragging its corners.
Embedding a locally stored or downloaded video in PowerPoint is a good solution for when you can’t ensure stable internet connection for your presentation. However, it’ll make the PowerPoint file much larger which in turn can cause performance problems.
Jazz Up Your Next PowerPoint Presentation
Adding a YouTube video to your slideshow is an effective way to make your presentation engaging for your audience. If you often work with PowerPoint, you can also learn how to insert other formats of media to your presentation like music, PDF files , or even animated GIFs .
How do you make a PowerPoint presentation more interesting and entertaining for your audience? Share your best PowerPoint practices with us in the comments below.

Anya is a freelance technology writer. Originally from Russia, she is currently a full-time Remote Worker and Digital Nomad. With a background in Journalism, Language Studies, and Technical Translation, Anya couldn't imagine her life and work without using modern technology on a daily basis. Always looking out for new ways to make her life and location-independent lifestyle easier, she hopes to share her experiences as a tech- and internet-addict through her writing. Read Anya's Full Bio
Read More Posts:

How-To Geek
How to add a youtube video to google slides.

Your changes have been saved
Email Is sent
Please verify your email address.
You’ve reached your account maximum for followed topics.
My Favorite Part of Proton Docs Is What It Can't Do
Firefox 128 has a new way to translate pages, 7 accounts you must always protect with two-factor authentication, quick links, embed a youtube video in a google slides presentation.
Want to spice up your Google Slides presentation by including a YouTube video in it? If so, use Slides' built-in feature to embed your YouTube videos with customizable options. We'll show you how to do just that.
When you embed a YouTube video, you can make the video play from the beginning or at a specified time . You also get to choose the time when your video ends. Additionally, if you don't want the video's sound, you can mute your video, as we'll explain below.
Related: How to Add Screen Recordings to Google Slides
To embed a YouTube video in Google Slides, you'll have to first get your video's URL (web link). You can get this URL by accessing your video's page on YouTube, then copying the link that appears in your web browser's address bar. The link should look something like this:
https://www.youtube.com/watch?v=GEhZHMtCO5U
Once you have the video link ready, start the video embed process by first opening a web browser on your computer and launching Google Slides . On the site, select the presentation in which you want to add a video.
When your presentation opens, in the left sidebar, click the slide in which you want to embed the video. Then, from Google Slides' menu bar, select Insert > Video.

An "Insert Video" window will open. Here, at the top, click the "By URL" tab to embed a video using its web link. The other way to add a video is to use the "Search" tab where you can find and select your YouTube video.
We'll go with the "By URL" method in this guide.

In the "By URL" tab, click the "Paste YouTube URL Here" field and paste your YouTube video's link. You can use the Ctrl+V (Windows) or Command+V (Mac) shortcut to paste the link.
As soon as you paste the link, you'll see your video's preview. Confirm this is the video you want to embed, then at the bottom of the window, click "Select."

In your selected slide, you now have your YouTube video embedded. To change the video's size on the slide, drag the handlers available around the border of the video.

To customize how your video plays, use the "Format Options" sidebar on the right. In this sidebar, you'll mainly use the "Video Playback" section to control the playback of your embedded video.
The options you can customize in this section are:
- Play (On Click) : To make your video play only when you click, select this option.
- Play (Automatically) : To make your video play automatically when the slide comes, use this option.
- Play (Manual) : If you'd only like the video to play when you manually play it, select this option.
- Start At : If you want your video to play at a specified time , enter that time here. For example, enter "02:00" to make your video begin at 2 minutes.
- End At : With this option, you can choose the timestamp where your video stops playing.
- Mute Audio : If you don't want your video's sound in your presentation, enable this option.

Feel free to change the options available in other sections, like "Size & Rotation," "Position," and "Drop Shadow."

Google Slides saves your changes automatically, so you don't have to do anything to ensure your video sticks in the presentation.
And that's how you make your presentations more engaging by including multimedia content in them. Enjoy!
Did you know you can add some music as well to Google Slides?
Related: How to Add Music to Google Slides
- Google Slides
Blog > How to add a YouTube Video in PowerPoint
How to add a YouTube Video in PowerPoint
07.08.20 • #powerpointtips.
Sometimes, you want to show your audience a YouTube video during a presentation. Some people do so by opening the browser, going to YouTube and then typing the video title into the search bar, when in fact there is a much easier and more convenient way. In the this post, you'll learn how you can directly insert a YouTube Video into PowerPoint that plays automatically on your slide. Also, we have got some great suggestions about videos you could show your audience.
You can watch our video (which is by the way inserted from YouTube as well) down below and learn how to add a video to your slides in just one minute! If you don't feel like watching the video, you can also follow the step-by-step guide down below.
Step-by-Step Tutorial
- Go to Insert in the PowerPoint task line on the top.
- Click on Video on the top right corner. Then choose the option Online Video .

- A window will open which will ask you to insert the video’s URL.

- Open the YouTube video you would like to embed in your browser. You can simply right click on the address bar in the browser and copy the URL. Alternatively, perform a right mouse click on the video, and then click on Copy Video URL .

- Go back to PowerPoint and insert the URL by either pressing CTRL+V or right click and then Paste . Then click on Insert .

- Your video will then be inserted on your current slide. Just like any element, you can change its size or move it around now.
- To start the video (either while editing or in presentation mode), simply click on the play button.

YouTube video with offline playback
With the previously described option, it is necessary to have a stable internet connection while presenting. As that can not always be guaranteed, there is also a way of inserting YouTube videos that work offline. Follow these steps:
- Open the YouTube Video in your Browser. Copy the URL by clicking the address bar and then Right Click > Copy.
- Open the website y2mate.com . Paste your copied URL into the text field, then click Start .

- Choose one of the options for download (and click the Download button. We recommend 1080p or 720p.

- A window will open, and your video will convert. When it's ready, click Download .mp4" .
- After your file has downloaded, you should see it in your Downloads folder in the browser. By clicking "Show in folder", you'll see where it's saved on your device.

- Right click on the file in your folder and click Copy .
- Go to the PowerPoint slide where you want your video to be placed. Right click and Paste . Your video should now appear and play if you click on it.

What kinds of videos can I use in a presentation?
Videos are an amazing way to liven up your presentation. Especially when you're talking for a long time, the audience tends to get tired. That's where a variation of multimedia elements, such as videos, can be helpful. We recommend putting videos in the main part of a presentation, but of course you may also start or finish by presenting a video to your audience. There is no limit for the type of video, the only guideline you should follow is relevance. Before mindlessly pasting a video to your slide, ask yourself: "What purpose does this video fulfill within my presentation?" Is it supposed to inform and teach the audience, is it something you really want everybody to see, or is it just a funny little clip to lighten the mood? All of those purposes are fine. With this tip, you're one step closer to a wonderful presentation! If you want to learn more about successful presentations and Audience Engagement, check out our blogpost Top 10 Tools for increasing Audience Engagement .

Set the start of your video
After you've added a video from YouTube, it starts to play by default when you click anywhere on the slide during the presentation. That's usually fine, but can sometimes be annoying, e.g. when you have more than one video on one slide. In that case, it is helpful to set the Start to When clicked on . The video then won't start until you click directly on it. You can do that by first clicking on your video, going to the Playback tab on the right and then select When clicked on in the Start-selection. By choosing Automatically here, your video will start automatically, without having to click on it.
Add a video from your device
If you want to add a video that is saved on your computer, you can do so by following the tutorial in our article Insert a local Video .
Useful Keyboard Shortcuts
| Shortcut | Action |
|---|---|
| CTRL+C | Copy an element or text |
| CTRL+V | Paste a previously copied element or text |
| CTRL+Z | Undo an action |
| CTRL+Y | Redo an action |
| CTRL+S | Save |
How can I insert a YouTube video to PowerPoint?
Go to Insert > Video > Online Video. Copy the video URL from the address bar and paste it to the window that opens. Click Insert and your video should appear instantly.
Can I play a video directly on my PowerPoint slides?
Yes. You can insert a video from YouTube by using the URL, and it will be played directly on your slide. In our tutorial , you'll learn how to do so.
Can I play an offline video from YouTube in PowerPoint?
Yes, it is possible to play an offline YouTube video on your PowerPoint slides. We show you how it is done in our tutorial .
Related articles
About the author.

Pia Lehner-Mittermaier
Pia works in Marketing as a graphic designer and writer at SlideLizard. She uses her vivid imagination and creativity to produce good content.

Get 1 Month for free!
Do you want to make your presentations more interactive.
With SlideLizard you can engage your audience with live polls, questions and feedback . Directly within your PowerPoint Presentation. Learn more
Top blog articles More posts

Insert and edit Adobe Illustrator files in PowerPoint

Microsoft Copilot: A Comprehensive Review of the AI tool

Get started with Live Polls, Q&A and slides
for your PowerPoint Presentations
The big SlideLizard presentation glossary
Vocalized pause.
A vocalized pause means the pause when the silence between words is filled by the speaker with vocalizations like "um", "uh" and "er".
Break-out-Room
In live online training, it is sometimes useful to divide the students into small groups for certain exercises, as it would be impossible to have conversations at the same time. Break-out-rooms are used so that people can talk to each other without disturbing the others. When the exercise is over, they are sent back to the main room.
An e-lecture is a lecture that is held online. Many schools and universities offer e-lectures as technical opportunities improve.
Vertical Communication
Vertical communication means that information is passed from one person to the next according to a linear system based on their titles. This type of communication is used when a company follows a hierarchical structure or for important, sensitive information.
Be the first to know!
The latest SlideLizard news, articles, and resources, sent straight to your inbox.
- or follow us on -
We use cookies to personalize content and analyze traffic to our website. You can choose to accept only cookies that are necessary for the website to function or to also allow tracking cookies. For more information, please see our privacy policy .
Cookie Settings
Necessary cookies are required for the proper functioning of the website. These cookies ensure basic functionalities and security features of the website.
Analytical cookies are used to understand how visitors interact with the website. These cookies help provide information about the number of visitors, etc.

- Certifications
Inserting YouTube Videos into PowerPoint: A Step-by-Step Guide
- December 27, 2022
As you know, YouTube is one of the most popular video sites in the world. Millions of people watch videos on YouTube every day. And with so many people watching videos on YouTube, it’s no surprise that now you can also easily insert a YouTube video into PowerPoint presentations. By incorporating YouTube into your presentations , you can give your audience something new and exciting to look at while they listen to what you have to say.
Videos are also great for illustrating key points and providing visual examples. So how can you incorporate a YouTube video in your PowerPoint presentation? Let’s take a look…
Create a new presentation in PowerPoint
Before you start editing your PowerPoint presentation to include a YouTube video, make sure you have a new presentation created.
You can create a new presentation from within PowerPoint by going to File > New > Presentation, or you can create a new presentation by using the charting tool. If you are using the charting tool to create a new presentation, ensure you select Standard chart type. You should also ensure that the charting tool is set to Excel data. Now that you have a new presentation created, you are ready to add a YouTube video.
Add a YouTube video to your presentation
To add a YouTube video to your PowerPoint presentation , you will first have to find the video you want to include. You can easily find the right video by using the YouTube search bar and entering the name of the video you are looking for.
For example, to find the best videos for learning about taxes, you would enter tax videos in the YouTube search bar. Once you find the video you want to include in your PowerPoint presentation, simply drag and drop it into your presentation. You can also copy and paste the video link into your presentation.
Next, you will have to add the YouTube video to the presentation. To do this, select the presentation’s tab on the left and then click on the down arrow located next to the Start button. You will now see the Library button appear. Click on the Library button and then select the Media button. You will now see all your PowerPoint presentations in the Media library.
Select the presentation you want to add the video in and click on the arrow located next to the Library button. Now click on the arrow located next to the Media button and select the Media button. You will now see all the videos in your PowerPoint presentations , select your video and click on the arrow located next to the Insert button. You will now see a dropdown menu, select PowerPoint.
Choose which YouTube video to include
With a YouTube video inserted into your PowerPoint presentation, it is time to choose which video to include. There are many ways you can choose which YouTube video you will include in your PowerPoint presentation, such as: – Pick the best video from the list of available videos. – Pick a video that matches the topic of your presentation, such as a video that relates to your presentation’s main topic. – Pick a video that is relevant to your audience, such as a video that is related to your target audience.
For example, if you have a presentation on marketing, you can choose a video on marketing that will interest your audience. Or, if you are planning a presentation on health and wellness and choose a video on travel, you might be missing out on the big picture. You can also choose a video about a specific topic, such as taxes. This way, your PowerPoint presentation becomes more relevant to your audience.
Change the appearance of your video
With your YouTube video in your PowerPoint presentation, you can change the appearance of your video. Changing the appearance of your YouTube video will help you to personalize your YouTube video and make it more relevant to your audience. You can change the appearance of your YouTube video by going to the YouTube video you added to your PowerPoint presentation and then going to the Video Settings menu.
With the YouTube video in the YouTube video settings menu, you can change the appearance of your video, such as the size, colour, and transparency. You can also change your video’s title and description so that your audience knows more about the video.
Combine HTML and JavaScript
If you have a PowerPoint presentation that you created with a YouTube video and you want to make the experience even more engaging, you can add HTML and JavaScript to your PowerPoint presentation. With HTML and JavaScript, you can make your video more engaging and interactive.
You can add HTML and JavaScript to the YouTube video you added to your PowerPoint presentation by going to the YouTube video settings menu, and then doing the following: – Click on the Advanced Option. – Now select the Enable HTML5 Video and JavaScript options.
Add a YouTube Player Button
If you want your PowerPoint presentation to feel more engaging and interactive, you can add a YouTube player button to your PowerPoint presentation. With a YouTube player button, your PowerPoint presentation will feel more engaging and interactive. You can add a YouTube player button to your PowerPoint presentation by going to the YouTube settings menu, and then selecting the Add a YouTube player button option.
With a YouTube player button, your PowerPoint presentation will feel more engaging and interactive. With a YouTube player button, the video play button will turn into a full-screen button, so your audience will have to click on it to exit full-screen mode. Now that your PowerPoint presentation is more engaging and interactive, you can now engage your audience with your video.
How to Customize the YouTube Video in PowerPoint?
With your YouTube video in your PowerPoint presentation, you can customize the video in a number of different ways. By customizing your video you can change the play button color, change the color of the play button, and change the way the video plays. To customize the video in your PowerPoint presentation , go to your YouTube video settings menu, and then do the following: – Click on the Customize button. – Select the color, size, and placement options for your play button. – Click Save and then click Close.
Bottom line
With a YouTube video added to your PowerPoint presentation, you can now easily communicate your message to your audience and help them learn new things. You can also add a YouTube video to your PowerPoint presentation to create a more engaging experience for your audience and make your presentation more engaging and interactive.
Now that you know how to incorporate a YouTube video into your PowerPoint presentation, you can easily use it to help educate your audience while they are listening to what you have to say.
Share This Post:
3 thoughts on “inserting youtube videos into powerpoint: a step-by-step guide”.
Wow, amazing blog layout! How long have you ever been blogging for? you made running a blog glance easy. The total glance of your site is magnificent, let alone the content! You can see similar here ecommerce
Wow, awesome weblog layout! How long have you been blogging for? you made running a blog glance easy. The overall glance of your web site is great, as neatly as the content! You can see similar here e-commerce
Very informative article.Really looking forward to read more. Really Cool.
Add a Comment Cancel reply
Save my name, email, and website in this browser for the next time I comment.
Get A 5X Raise In Salary

Reset Password
Insert/edit link.
Enter the destination URL
Or link to existing content
Unsupported browser
This site was designed for modern browsers and tested with Internet Explorer version 10 and later.
It may not look or work correctly on your browser.
- Presentations
How to Add YouTube Video to Google Slides Presentations
- Bahasa Indonesia
When you give a Google Slides presentation, you want to make sure that your audience is really engaged. Adding video to Google Slides is a great way to capture your audience's attention and make your presentation more interesting.

For even more tips on how to give an effective presentation, review this tutorial:

If you're not sure how to put a video in Google Slides, this tutorial is for you. We'll explain why video can be such an effective addition to your presentation. We'll also provide you with some guidelines and best practices for choosing the right video for your needs. Finally, we'll provide step-by-step instructions for how to embed a YouTube video in Google slides.
We also have a helpful complement to this tutorial. Download our FREE eBook: The Complete Guide to Making Great Presentations . Grab it now before you read on.

How to Add a Video to Your Google Slides Presentation (Quickstart Guide)

Jump to content in this section:
Why Use Video in Your Presentation?
How to choose the right video, how to embed a youtube video in google slides, how to add a non-youtube video to google slides, learn more about google slides.
- Make Great Presentations (Free PDF eBook Download)
There are many advantages to adding video to your Google Slides presentation. Here are just a few:
- Easily accessible. As long as you have access to an Internet connection, you can stream a short video through your presentation.
- Provides a break . Adding a video to your Google Slides presentation adds variety and gives audiences a change of pace.
- Can motivate viewers. Using a video can lead to a powerful emotional response since video incorporates both images and sound.
- Engages your audience. Audiences are comfortable with seeing video online and in both movies and television. They are likely to pay attention when you add one to your presentation.
- Makes delivery easier. As a speaker, adding a video gives you a short rest during which you don't need to talk. This can be especially helpful in longer presentations.
Sound can also be an effective attention grabber for your presentation. We have a helpful tutorial on Envato Tuts+ to learn how to add sound to your Google slides presentation:
.jpg)
Of course, not all videos are equal when it comes to effectiveness. Choosing the wrong video for your presentation could actually make your presentation less effective.
Here are some guidelines for choosing a video to add to Google Slides:
- Relevant. Don't add video to your presentation simply for the sake of having a video in your presentation. The video you add should have something to do with your topic.
- Professional. Don't add an amateur or poorly done video to your presentation. At best, you will annoy your audience. At worst, the unprofessionalism of the video will reflect on the whole presentation and on your business.
- Short. The ideal length for a video to be used with a presentation is between 30 to 60 seconds. Try to never add a video over three minutes. The longer the video, the more likely it is that your audience will lose attention.
Also, be sparing with the use of videos (and other multi-media effects) in your presentation. Adding a video to nearly every slide will only make your presentation seem disorganized. Plus, if you have too many videos, they will stop working as an attention grabber.
You've just learned about the importance of adding video to presentations. We've also covered some guidelines for choosing the right video.
Are you ready to learn how to embed video in your presentation? Let's go!
In this section, you'll learn how to add a YouTube Video to your Google Slides presentation.

This tutorial shows you how to add a video to Google Slides using the Riazo Google Slides Template . This template comes with over 150 slides to add your information. Also, it comes with five premade color schemes, so you can choose the color you want. The Riazo Google Slides Template comes with a picture placeholder, making it easy to drag and drop an image of your choice to add it to the slide quickly.
Discover hundreds of professional Google Slides themes , or browse through our curated collection to find just the right one:

Step 1. Open Your Presentation
Open your Google Drive. Select the presentation you want to add a video to in Google Slides:

Double-click on the presentation to open it. Here's an open presentation:

Step 2. Choose a Slide to Add Video
Once your Google Slides presentation is open, go to the slide where you want to add the video to Google Slides. You can open a slide in your presentation by clicking on it in the side panel on the left of your presentation:

In this case, I've chosen the 13th slide in the short presentation. It's important that there is enough space on the slide you choose for your video.
Step 3. Add a YouTube Video to Google Slides
Now that you've selected a slide, you're ready to add a video. Now let's learn how to put a video in Google Slides. Use the Google Slides Insert > Video menu option:

To learn how to add a YouTube video to Google Slides, you need to have a YouTube video URL. Add the URL into the box.

Notice that there are two options across the top of the dialog box:
- Search. Use this option to search YouTube for a video to insert.
- Google Drive. Use this option to insert a non-YouTube video from your Google Drive. We'll talk about this option more in the next section.
Since I know the URL of the YouTube video I'm going to insert, I will add the URL into the dialog box. After you press Return on your keyboard, your video appears.

For this tutorial, I'm going to use a URL from Envato's Tuts+ YouTube Channel . The video I'm going to insert is from Instructor Cindy Burgess. It discusses creating a Video Business Profile .
Copy the YouTube URL of the video into the dialog box and click the Insert button in the lower right corner. The video is now inserted into the slide:

As you can see, the video isn't in the location where we would like it to be. In the next step, you'll learn how to move and resize the video.
Step 4. Move and Resize the Video
Once the YouTube video is added to your Google Slides presentation, it's not difficult to move it or resize it. Here's what to do once you've added video to Google Slides :
Click on the video to select it. You'll see blue handles around the edges of the YouTube video. Without clicking on one of the handles, move your cursor over the video. Your cursor should look like a crosshair:

Use the crosshair cursor to drag the video to the spot on the slide where you'd like it to appear. Now the video should be in the right spot, but it's still not the right size for the space.
To resize the video, click on one of the handles and drag it. Dragging a corner handle diagonally keeps the shape of the video the same. Dragging a handle on the sides of the box could distort the shape.
The video is now the size and shape I would like it to be for my Google Slides presentation:

Step 5. Set Video Options
The video may be in place, but it's not quite ready. Use the Google Slides Video Format Options panel so that the video automatically plays when the slide starts.
The Video Format Options panel appears on the right of the screen:

To set the video to play automatically when this slide comes up during your presentation, click the down arrow the below of the video preview box. Select Play (automatically ).

You can also use the panel to define how much of the video plays. For example, if I just want to play the first 30 seconds of the video, I would leave the value in the Start at field at 00:00. In the End at field, I would enter 00:30. The video would stop playing after 30 seconds.
You can also select the check box to the left of the Mute audio option to turn the sound off on your video. This is helpful if you want to show the images of the video playing, but add your own commentary.
A video doesn't have to be on YouTube for you to add it to your Google Slides presentation. You can add any .mp4 file to Google Slides if it is in your Google Drive. Here's how to add video to Google Slides:
Open your Google Drive. Select the presentation you want to work with. Double-click on the presentation to open it.
The tutorial is based on the Riazo Google Slide Template from Envato Elements.
Once your Google Slides presentation is open, go to the slide where you want to add the video. You can open a slide in your presentation by clicking on it in the side panel on the left of your presentation:

In this case, I've chosen the sixth slide in the short presentation. I'm going to place my video over the graphic placeholder.
Now that I've selected a slide, I'm ready to add the video to Google Slides.
Step 2. Add a Video to Google Slides
The video must be on your Google Drive or shared with you through Google Drive for you to be able to insert it into your presentation. If it is not there, you must download it to Google Drive before adding it to your slide. Here's how to add videos to Google Slides:
Use the Insert > Video menu option to bring up the Insert Video dialog box:

Select the Google Drive option. Another dialog box displays:

As you can see, the choices on the left side are:
- My Drive. Shows the videos in your Google Drive.
- Shared with me. Shows the videos shared with you through Google Drive.
- Recent. Shows recent videos.
Since the video I want to add is on my drive, I click on the video and click the Select button. The video appears on the slide:

As you can see, the video is not exactly where I want it to be. We'll have to move and resize it.
To move or resize the video, click on it to select it. You'll see blue handles around the edges of the video. Without clicking on one of the handles, move your cursor over the video. Your cursor should look like a crosshair.
Use the crosshair cursor to drag the video to the spot on the slide where you would like it to appear. Now the video should be in the right spot, but it's still not the right size for the space.

Now that we've got the video inserted into the presentation, the final step is to set the video options.
The last step in how to add video on Google Slides is to set your video options. First, make sure that your video is still selected in Google Slides. On the right side of your window is a Video Format Options panel.

Click the arrow the left of the Play (on click) option so that the video plays when the presentation comes to this slide.
In this example, I only want to play the last minute of the video, so I enter 0:51 into the Start at field. To play the video to the end, I leave 01:17 in the End at field. Here's what the screen looks like now:

To turn the sound off on your video, click the check box to the left of the Mute audio option.
When you are done defining how your video will play, close the Video Options panel by clicking the X in the upper right corner of the panel.
If you liked this tutorial about Google Slides, you may also like our tutorial series on how to use Google Slides . Get started with these tutorials:
For start-to-finish help on how to create and deliver an effective presentation, take a look at our eBook on presentations:
Make Great Presentations ( Free PDF eBook Download )
This is the perfect complement to this tutorial, which will walk you through the complete presentation process. Learn how to write your presentation, design it like a pro, and prepare it to present powerfully.

Download our eBook: The Complete Guide to Making Great Presentations . It's available for free with a subscription to the Tuts+ Business Newsletter.
Add Video to Google Slides Today!
You've just learned how to put a video in Google Slides.
Whether you give presentations for your business, your hobby, or for educational purposes—you want to engage your audience in what you're saying so that your Google Slides presentation is memorable. Adding video can help you grab your audience's attention.
You've just learned why video can be important for your presentation and also how to select and use video. Plus, we've given you step-by-step instructions on how to add video to a Google Slides presentation. The next part is up to you. Why not download a Google Slides template and get started?
Editor Note: This tutorial was originally published in August of 2017. It's been revised for accuracy and relevance by Sarah Joy .

Before you leave
I thought you might be interested in reading this article
15 Ways to Develop Better YouTube Presentation Skills

DIY Video Studio is supported by its readers. Please assume links on this site are affiliate links or ads, and that I get commissions for purchases made through these links. As an Amazon Associate, I earn from qualifying purchases. Thank you if you use any of the links.
In this article I’ll show you how to can improve your YouTube presentation skills.
In fact, I’m sharing 15 tips that have helped over 580 of my real-world clients and thousands of my online students. Enabling them to speak with confidence and clarity when previously they thought, “ I can’t speak on camera “.
Almost all these tips will cost you nothing. But when you apply them, they will bring you actual results.
So, let’s get started.
The most common reason for people not making videos is that they are nervous about turning the camera on themselves. It’s a frequent problem. And it’s easy to convince yourself that you can’t speak on camera.
That’s why I have 15 strategies to calm your anxiety in front of the lens to improve your YouTube presentation skills. At the end of the article, I also have a video that features many of the video presentation tips I will be talking about.
In a Hurry? Click on any of the items in the following list to go directly to that tip.
- Be prepared and know your subject .
- Use a teleprompter .
- Keep things as normal and familiar as possible.
- Slow down. Don’t rush to try to get to the end quickly.
- Avoid strenuous exercise immediately before filming.
- Do one or two stretches and warm-up exercises to loosen up your shoulder and neck muscles.
- Don’t worry about being judged. Ignore haters and embrace your fans.
- Imagine that you are speaking to a friend who is behind the camera.
- Use the chocolate bar method of filming. Record one chunk at a time and you’ll soon finish it all .
- Practice and familiarize yourself with the script before recording.
- Don’t try to be a TV presenter, just be yourself.
- Make changes to the script to make it your own.
- Comfortable clothing will help make you feel less awkward.
- Get a friend to join you in front of the camera.
- Accept that you don’t need to be perfect.
Table of Contents
1. Be prepared and know your subject

The first and the most important tip of all is to know your stuff.
If it is your area of expertise, you may not need to do as much preparation. But if the topic is less familiar to you, make sure you brush up on the subject so that you can speak confidently and not worry that you can’t speak on camera.
Whether you are an expert in the field or a relative novice, always prepare a bullet list of what you want to say.
It does not always have to be a written list; it could just be a mental note to yourself. But I prefer to work with a physical list placed close to the camera lens.
The bullet list is a kind of security blanket, allowing you to calm your presentation nerves. You will know that you will cover all the necessary points and in the correct order.
The list assures you that the structure of the video is as you intended rather than in the order you remembered the points.
Knowing that you are on top of your subject matter and properly prepared will give you confidence in front of the camera.
If instead, you are unprepared and you know you are going to have to fill your video with fluff and repetition, subconsciously that will make you feel uncomfortable and nervous.
So, prepare, know your stuff, and give your viewer value with the quality of your content. Adopting that approach will help calm your nerves in front of the camera. This really will help you with your YouTube presentation skills
2. Use a teleprompter
A written script is a step up from a bullet list. It is a huge help if you find it difficult to speak unprompted or if you need to use precise technical words or phrases.
It can be stressful trying to remember your lines, but a teleprompter makes the process a lot easier.
You could go down the route of getting a professional teleprompter with a beam splitter, but it really isn’t necessary.
Provided you have at least 6.5ft (2m) between you and the camera, you can use a teleprompter app on an iPad.
Place the iPad next to or above the camera lens and at 6ft or more. At that distance, no one will notice you’re not looking directly into the lens.
Download a teleprompter app that is either voice-activated or has a remote control. This will ensure you will be less stressed.
With this kind of teleprompter, you won’t have to worry about keeping up or running out of words.
If you feel you can’t speak on camera, getting a teleprompter will go a long way to change your mind.
3. Keep things as normal as possible
Making videos may be a whole new world to you. But if you can keep things as normal as possible, you’ll find it a whole lot less stressful.
In other words, rather than stepping into an alien world of video production, try and bring video into your world.
Shoot your video in your office or lounge.
If possible, avoid lots of fancy lights that can be distracting and off-putting.
Choose clothing and makeup that you would normally wear. It will help normalize the situation.
Little things can make you feel a lot more comfortable. So, take time to incorporate them into your preparation for the shoot if you want to up your YouTube presentation skills.
4. Slow down

One huge giveaway that you’re nervous is speaking quickly, or at least quicker than normal.
Behind the break-neck pace is the thought that the quicker you go, the sooner you’ll be finished.
The faster you got, the more likely you will stumble over your own words.
So don’t do it.
Keeping the pace relaxed will make it easier for you to get the script right. Plus, your audience will also find it easier to follow what you’re saying.
So, before you start, close your eyes, and take a couple of deep breaths. Now open your eyes and look up into the lens of the camera. You’ll be more relaxed and can start speaking calmly and at a measured pace.
5. Don’t overexert yourself before filming

If you’re still worried that you can’t speak on camera, my fourth tip is not to overexert yourself just before filming.
Your pulse rate, respiration, and perspiration will be elevated after strenuous exercise. None of which will help you relax.
You’ll be conscious of heavy breathing, being flushed and perspiring and you won’t be able to appear calm in front of the camera.
If you are in that state take a few minutes to relax, cool down, and get yourself looking good.
Only then should you roll the camera.
6. Do a few warm-up exercises
Strenuous exercise is out of the question, but you can do some light warm-up exercises.
A few stretches will help you relax.
Rotate your shoulders and neck to loosen up.
Then try some breathing exercises. Close your eyes and breathe in and out slowly, concentrating on the rise and fall. Don’t try rapid breathing, you’re not trying to hyperventilate.
7. Don’t worry about being judged
You may be getting anxious because you think your viewers will judge you. I would like to say that they won’t, but they will.
The way you look, sound and dress will be noticed. It’s going to happen whatever you do, and there’s nothing you can do about it. So, if you can’t do anything to prevent it, don’t even worry about it. Just try and get over it.
Most of your viewers are not going to be judgemental. They’re watching because they want to hear what you have to say, whether it’s to learn from you or be entertained by you.
So, if someone makes a negative comment, don’t get anxious.
You’re never going to please everyone.
Develop a thick skin and accept that some people will hate you. Then embrace the viewers who love you because they WILL want to hear from you.
You will never please everyone, so don’t try. If you do, try to please everyone you’ll become bland and boring. You’ll no longer be the remarkable voice that you are.
So, chill. Relax. Be yourself. Your fans will love you for it.
8. Imagine you’re speaking to a friend
I’ll admit it. When I first had to speak at a seminar it was a little bit daunting.
So, I can understand that the thought of speaking to a large video audience can be scary.
Instead of thinking that you’re talking to a huge video audience, imagine you’re speaking to an individual behind the camera.
Better still. Imagine the individual is a friend, and you’re explaining something.
That’s a much less stressful situation than imagining you are talking to a huge crowd. After all, you have conversations every day without getting stressed. So, you CAN do it in front of a camera.
The truth is that it’s easier than real-world conversations. If you make a mistake in front of the camera you can stop and start again.
9. Use the chocolate bar method of filming
The more complicated you make the video shoot the more worried you will become.
So keep it super simple.
For instance, don’t give yourself too much to remember, whether that be what you have to say or do.
This especially applies to your first few videos where you are just learning how to do the basics.
Your video is likely to be at least a minute or two long. That can seem like forever and intimidate you into not starting.
But what if your video was just 10sec long?
I bet you could manage to record something as short as 10sec.
Now, if you can do a 10sec video, you can do a minute, five-minute, or ten-minute video. Moreover, it wouldn’t be any more stressful than doing a short 10sec video.
I know. You’re thinking, how’s that possible ?
It’s quite simple and relies on the fact that viewers, unlike traditional video professionals, don’t care about jump cuts. That’s where you seem to shift position between lines.
So, break up your script into short 5 or 10sec sections, that’s about 12 – 25 words respectively. Then record your video one section at a time or one chunk at a time.
You’ll feel a lot less anxious knowing there are just one or two lines to record at a time. That removes the pressure of thinking you must get to the end of a long script and be word perfect.
Record your script as short paragraphs or even phrases.
I call it the Chocolate Bar method of filmmaking.
You bite off one chunk at a time and you’ll get it all finished in no time.
When you come to edit your footage just cut the sections together.
Sure, there will be small jumps in your position, but your audience won’t care. It’s your amazing content they want, not Hollywood production values.
Record in short chunks and relax. It’s just like eating chocolate.
10. Practice and familiarize yourself with the script
We worry if the future is uncertain but feel happy and relaxed if we know what’s coming next. It’s the same when you’re presenting your videos.
Because you’re unsure of what’s coming up that gets you anxious. The greater your anxiety the more likely you’ll make a mistake and convince yourself that you can’t present your YouTube video.
The obvious answer is to read your script in advance.
Don’t read it in your head, read it aloud. You’ll understand where you need to slow down, where to add emphasis and what you need to stress.
You’re not trying to learn your lines; you just need to know what to anticipate. Consequently, you will feel more relaxed and present the script, so it sounds more natural.
Having had a practice, you will feel much more confident when the camera starts to roll.
11. Just be yourself
You’re not a TV presenter, so don’t try and be a fake one.
Some of your audience may even know you and think it’s weird if you put on a completely different persona.
Pretending to be someone you are not takes acting skill. Unless you’re an actor make it as easy for yourself as possible.
Just be yourself.
You know how to do that, so you’ll find presenting is much easier and you’ll be less awkward in front of the camera.
12. Mark up the script and make it your own
Make the script your own, especially if someone else has written it for you.
This is a YouTube presentation skill that’s about reading someone else’s words making them your own.
Adjust the words and phrasing so it sounds natural to you.
Speaking in ‘your own voice’ will seem easier and be more comfortable while presenting to camera.
Don’t include words that you wouldn’t normally use. It won’t sound like you and you’ll feel awkward and uncomfortable speaking that way.
So, make slight changes to the script to keep your performance natural and real.
13. Comfortable clothing with make you feel less awkward
This is one of those YouTube presentation skills that’s about making sure you feel comfortable.
Choose clothing that you feel comfortable in. Clothing that makes you feel good and confident.
If you feel awkward wearing a jacket collar and tie, that will show through, and you’ll appear awkward on-screen.
So, wear what you feel comfortable in to help dispel your anxiety.
14. Get a friend to help boost your YouTube presentation skills
You’ve probably heard the saying, ‘there’s strength in numbers’. Well, it can apply to your performance in front of the camera.
If feeling nervous about filming is a problem, remember that a problem shared is a problem halved.
What’s that?
Invite a friend to join you in the video. Do the video with a co-presenter or even as an interview.
If you decide to work with a co-presenter, it’s easy to get out of situations when you feel yourself drying up. If you feel stuck for what to say next, hand over to your partner. Do it in a natural way rather than just stopping though .
You could ask them for their opinion about what you just said or ask them if they have anything to add. There are many ways of handing over to your co-presenter. You could even ask them what’s coming up next.
Just like a script or cue cards are a safety net for you, having a co-presenter can work in the same way. If necessary, they ca n pick up the narrative while you get a chance to consider what to say next.
With a co-presenter, you don’t have to work to a fixed script.
The video could be recorded as a kind of conversation between the two of you. Each of you contributing your opinions on the topic you’re covering.
Or you could get your friend to interview you. Whether it’s a conversation or interview it will be easy to talk or answer questions because you know your subject.
Another advantage of working with someone else is that if either of you starts to ramble, the other is there to bring the conversation back to the topic of the piece and drive the video forward.
You will also potentially come up with more ideas for videos and how to do them if you work with another presenter. You can bounce ideas off each other and constructively criticize each other. It’s a fast track to boosting those YouTube presentation skills.
15. Accept that you’re not perfect
Finally, my fifteenth tip to improve your YouTube presentations skills is to allow yourself to be imperfect. Allow yourself to make mistakes.
By accepting that you don’t have to be perfect, you will make fewer mistakes. It may sound strange, but the acceptance of imperfection lifts a huge burden from your shoulders. You can then get on with presenting the video without it turning into a terrifying experience.
If you insist on getting everything right, you will keep stopping and become frustrated by every tiny mistake. In the past I even found myself stopping mid-sentence because in my head I thought I was about to make a mistake.
Incidentally, what you think is a mistake will often go unnoticed by your audience. As creators, we care about every detail. But the audience is not as critical as us. Furthermore, they aren’t looking for your mistakes. What they really want is your content, that’s what matters to them.
So just do your best, ignore any stumbles, and keep going. Knowing you can carry on will keep you calm, relaxed, and more productive. Being natural and real will be easier for you and your viewers will appreciate it.
Watch my video to help with YouTube presentation skills
As I mentioned at the start of the article, I’ve also recorded a video about improving your YouTube presentation skills and calming your presentation nerves.

Tosh Lubek runs an audio and video production business in the UK and has been using the Canon EOS R since it was released in the Autumn of 2018 and the Canon EOS R6 in 2020. He has used both cameras to shoot TV commercials broadcast on Sky TV, promotional business videos, videos of events and functions, and YouTube creator content. He has also won several international awards for his advertising and promotional work. You can meet him by visiting his “video booth” at HashTag Business Events across the country.
Recent Posts
Conquer Your Next Media Interview Like a Pro! (With 15 Actionable Hacks)
Feeling anxious about your upcoming interview? Don't worry, we've got you covered! Whether you're a seasoned professional or a first-timer, mastering the art of the media interview can be daunting....
How to Set Up Your Blue Yeti USB Microphone for Amazing Audio
Welcome to the DIY Video Studio blog from Tosh Lubek Productions! In this post, I'll be going over the steps to set up your Blue Yeti USB microphone for crisp, clear audio on Zoom calls, live...

How to Make an Eye-catching Video Presentation in Minutes | InVideo
- video presentation

Video is now the undisputed king of mediums in business communication. HubSpot reports that 85% of companies use videos in their marketing efforts. From webinars to demos, from sales presentations to investor pitches, and from welcome videos to online tutorials, videos are the go-to channel. Clearly, video marketing is on the surge.
And video presentations are among the most widely used formats for video marketing. But how exactly can you create winning video presentations, to begin with?
Simply by signing up to InVideo for business where you get tailor-made template and video editing services on demand so you can spend your time running your business. Sign up for a free demo here.
Video Presentations Q&A
Before we get into the meat of our guide, let’s quickly answer a few commonly asked questions.
1. What is a Video Presentation?
A video presentation is a form of communicating with an audience with the aid of a video or completely using a video. The video could be made of PowerPoint slides , still images, animation, or actual video footage.
2. Why Should I use Video Presentations?
Common reasons for using videos as presentation aids include:
- Overcoming space/time limitations - Using video as a visual aide to drive your point home - Video enables you to compress a lot of information into a digestible size
3. How do I make a Video Presentation?
Thanks to the advancements in technology, making video presentations has become very easy. It has also become more affordable than it was a couple of years ago. While different video makers have different steps to take when making a video , here are the basic steps to follow:
- Come up with a concept for your presentation. - Craft an engaging script . - Decide on the visual assets (and format) you’ll use. - Use a professional video editing app to bring it all together. - Promote the video.
Pro tip: To make things even easier, you could sign up to InVideo for business and get presentations made for your brand using the editing-on-demand services. Sign up for a free demo here .
4. How do you begin a Presentation?
You can open your presentation in 7 ways:
1. Share an anecdote or short personal story. 2. Kick-off with a provocative statement. 3. Present a startling statistic or data. 4. Tell a good clean joke that suits the audience. 5. Ask a loaded rhetorical question. 6. Show the audience a compelling visual. 7. Hook people with a fascinating quotation.
5. How do you Make a Video Presentation with PowerPoint?
Turning a PowerPoint presentation into a video is easy. Just follow these steps:
Step 1: On the File menu, select Save to make sure you have saved all your recent work in PowerPoint presentation format (.pptx).
Step 2: On the File menu, select Save As .
Step 3: Select the folder location where you want to store your PowerPoint Show file.
Step 4: In the Save as type box, choose PowerPoint Show (*.ppsx) .

Step 5: Select Save . That’s it.
Now that we’ve answered a few basic questions, let’s dig deeper into why videos are so powerful.
What Makes Video Presentations so Effective?
Why do they increase the impact of your message?
Well, it’s simple, really – people are visual creatures. This means we take in more information by watching than by reading. Remember the saying, “a picture is worth a thousand words”? Besides that, here are 4 other reasons video is so effective:
1. Conveys emotions better
No other communication channel conveys emotions better than video. That’s because video caters to the brain’s visual and auditory systems, helping the viewer pick up on cues like body language, facial expressions, imagery, and music.
2. Cements information better
According to research , people remember 10% of what they hear and 20% of what they read. However, they remember a staggering 80% of what they experienced. In short, visuals are easier to remember than text or audio because they help your audience “experience” your message. It makes video an essential part of creating presentations your audience will remember for a long time.
3. Makes it easier to digest information
Especially when explaining complicated concepts, video is a great way to present information in an easy-to-understand way. Not only is the format easy to take in, but it also makes breaking down concepts easier.
4. Builds relationships fast
I’m sure you know the marketing mantra: people buy from people they know, like, and trust. Nothing beats video in making prospects or your audience know, like, and trust you… fast. Video is an instant relationship builder. It’s the next best thing to live face-to-face communication.
A video is a great tool that has made it easier to communicate thoughts and ideas with people – not just in a room, but even across the globe.
6 Types of Video Presentations You Need to Know
Video presentations come in different flavors, depending on their purpose.

1. Educational Presentations
These are mainly used in teaching and learning sets online or in a classroom setting. These make it easier for the teacher to convey information and the students to grasp the concepts.
Use this template
2. Sales Presentations
The field of sales has evolved tremendously in the past decade. With customers being savvier, sales reps must play the game well if they’re to bag sales. One way they can do that is by creating story-based sales video presentations.
Sell more with pro video presentations
Use 5000+ InVideo templates to get started

3. Investor Pitches
Need to woo an investor? One of the best ways to do that is by using a video pitch. This will help you present your business plan in a visually appealing way so they can easily grasp your business concept.
4. Promotional Videos
Whether you’re promoting an existing product or a new one, video is your best bet for getting eyeballs on your product (or cause). People relate better to what they can see, making video the best medium for presenting your promotions (like product reviews, for example).
5. Employee Training and Onboarding
Video presentations are great for conducting employee training and onboarding. One of the main reasons for this is that video helps reduce the resources spent on these 2 important aspects of employee relationship management.
6. Informational Videos
As the name suggests, the informational/how-to type of presentation serves to pass on important information. Why video in this case? Because it’s more engaging and can pack a lot of information in a short clip.
Pro tip: You can get tailor-made templates to create any kind of presentation for your brand or business using InVideo for business . Sign up for a free demo here .
How to create killer Video Presentations – 4 Tips
Now you know why video presentations are important and which scenarios to use them in. Now to the fun part – tips on creating killer video presentations. Let’s get to it, shall we?
Tip #1 - Know your Audience

The most important aspect of creating a stellar presentation is to know and understand your audience. Even if you use the best video presentation maker , if you don’t target a specific, clearly defined audience, your presentation will flop. Understanding your audience will help you:
A. Communicate effectively
Effective communication involves knowing the language and examples that resonate with your audience.
B. Choose the right visuals
Certain visuals are more impactful when used on a particular audience. Study those that your audience will easily understand and relate to.
C. Connect on an emotional level
No matter the type of presentation, it’s crucial to connect with your audience on an emotional level. And to do that, you need to understand the emotional triggers to push in your video presentation.
Invest in adequate audience research. While it may be time-consuming (and a bit costly), it will pay off in the end.
Idea #2 - Brainstorm video content ideas

Now that you have gathered enough audience data, it’s time to brainstorm some content ideas. Whether you’re creating your talk solo or as a team, 3 crucial questions will lay the foundation of your brainstorming session:
1. What do you want the video to achieve? 2. Which emotions do you want the video to evoke? 3. What will visual elements help your video achieve its goal?
The answers to these questions will help guide your ideas. They are key to creating a killer video that your audience will love.
Tip #3 - Craft engaging scripts

Audience research? Check.
Great idea? Check.
Now we get to another interesting stage of creating great video presentations – crafting an engaging script. Whether it’s a live presentation, a webinar, or even a product review, you’ll need a great script to ensure you keep your audience engaged.
Even if you love creating impromptu videos, having a script for your video presentations is important. And no, you need not be Quentin Tarantino to produce a great video script (although it won’t hurt to learn how to become a good copywriter). Here are 3 reasons a good video script is a must:
1) Helps structure your video
To ensure your video has a smooth and progressive flow, you’ll need a good script.
2) Eliminates “dead spots”
Dead spots, or moments of inactivity, are a great turn-off in a video. They reek of unprofessionalism and can lead to your audience disengaging. The best way to eliminate dead spots is to craft a solid video script .
3) Keeps you on track
It’s very easy to get sidetracked when creating a video . However, with a script, you minimize the instances of going off-topic.
Creating scripts for your videos is a best practice that shouldn’t be overlooked. If anything, invest more in your script than the visuals as a good script can save a video with poor visuals.
Pro-tip: Once you’re confident about your script, it is time to make things even more clear. A storyboard will allow you to break down your video visually, scene by scene, describing what is happening in it.
Tip #4 - Invest in the Right Tools

With video, one thing you should never skimp on is the tools you use, particularly your video editing software. While there is a gazillion free video editing software on the market, it’s highly recommended that you use a professional video editor . And that means going the paid route.
Why should you spend on a video editor when there are countless free options available? Here’s why:
A. Get more (professional) features
Creating professional-looking videos requires a lot of resources and features. Most free video editors lack the features that will enable you to create professional videos.
B. Avoid branding and ads
With video editing software, free is never free. That’s because you pay through being forced to include the video editors brand in your work. In other words, you pay by advertising for them. Besides branding, some free video editors may subject you to irritating in-app ads.
If there’s one thing that’s inevitable when it comes to software, it’s that one time or another you’ll encounter glitches. This is where paid video editors have a great advantage over their free counterparts – you’ll have access to customer support.
From hardware (like cameras) to software (like video editing software), the tools you use will determine the quality of your videos. Invest in professional tools, and your presentations will sweep your audience off their feet because they’ll be more polished.
Pro tip: If you don't have the time or bandwidth to find your way around an editing tool, simply sign up to InVideo for business and get presentations created using tailor-made templates and on-demand editing services. Sign up for a free demo here .
Tip #5 - Adopt Video Presentation Best Practices
There’s no need to reinvent the wheel when creating presentations . Most winning video presentations are based on common fundamental principles that work. Here are some you need to know:
1) Create impactful intros (and outros)
Your intro is the most important part of your presentation as it sets the tone for the rest of the talk. If you can’t engage your audience with your intro, you probably won’t get another chance to engage them.
2) Keep it short, sharp, and sweet
No matter how engaging your video is, always remember it’s not a movie. The point is to keep your audience engaged enough to pass on your information, no more no less.
3) Be professional
Don’t throw out your professional etiquette just because you’re on (or using) video. Maintain professionalism in your video presentations by, for example, using clean language and maintaining a good posture.
4) Use quality sound
Sound plays an integral part in presentations. Whether it’s music or speech, make sure it’s crisp, clear, and audible.
By following these (and other) video presentation best practices, success is inevitable. Remember, the presentation is not about you; it’s about your audience. So, ensure that your presentations provide a good user experience for your audience.
Make video presentations in minutes
With customizable InVideo templates

Looking for a great Video Presentation Template? Here’s what you should consider

Templates are lifesavers. They help you create a decent presentation in a snap, even if you are a newbie.
Here are 3 simple questions to help you determine if a template is good:
1) Is it editable? – Are you able to change things like playback speed, effects, or text, so you produce something you like? Stay away from rigid templates that don’t give you the freedom to create with ease.
2) Is it customizable? – Can you design brand-specific clips using your company’s colors, fonts, and styling? Good templates give you wiggle room to include your brand’s specific needs.
3) Is it campaign-specific? – Different videos fit different scenarios. Ideally, you want templates tailored to your current campaign. That way, you have less tweaking to do because the templates are close to what you want.
Pro Tip: Get more tailor-made templates for your video presentations by signing up to InVideo for business . Sign up for a free demo here .
5 Awesome Video Presentation ideas to bring The House Down
Presentation is both an art and science. Get the balance right, and you have the audience eating out of the palm of your hand. Here are some ideas to help you do just that.
Idea #1 - Tickle them with humor
Humor is a powerful learning tool.
According to studies by Physiology Org humor leads to learning because of it:
- Attracts and sustains attention. - Relieves tension and produces a relaxed atmosphere. - Enhances participation. - Increases retention and motivation. - Bonds the student and the teacher.
However, to reap all these benefits, the humor must be appropriate and on-topic. So spice up your presentation with a joke or two. The result? Your audience will laugh and learn.
Idea #2 - Use Relevant Examples
Effective presenters use timely, powerful illustrations.
The word illustration comes from the Latin term ‘illustration,’ which means illumination. So practical examples are like windows of your presentation. They let light in. They help people see or understand the material better.
Here are 5 questions to ask about your illustrations:
1. Are they relevant to the topic? 2. Are they suited to the audience? 3. Are they suited to the time limit? 4. Are they enlightening? 5. Are they well told?
Grab compelling examples from books, movies, TV shows, history, children, current events, and captivating real-life incidents. Use good illustrations ram your points home.
Idea #3 - Wield Questions like a Ninja
Questions are an integral part of learning.
Sharp questions aid learning. Plus, they keep listeners highly engaged.
Ask questions:
- At the beginning of your presentation to draw your audience in. - In the middle of the presentation to revive waning audience interest. - At the end of the talk, so the audience reflects on the material.
Also, allow the audience to ask questions. When your audience asks questions, they switch from passive spectators to active participants.
Idea #4 - Be Minimal
Have you ever sat through a presentation and felt:
- Dazed? - Confused? - Strained?
More than likely, the reason is the presenter drowned you in a blaze of inessential stuff. There was too much going on you couldn’t cope with.
Minimalism is removing all unnecessary material, leaving only the bare minimum needed to put your points across. It means using just enough text, visuals, scenes, or slides to make the point and no more. A minimal presentation is clean and uncluttered.
Simple yet intriguing. Plain but profound. Basic but punchy.
Most importantly, it makes learning easy and enjoyable.
Idea #5 - Connect emotionally with a story
Stories are speakers’ most powerful weapons. That’s because stories play a dual purpose –
- Engage intellectually - Connect Emotionally
And an emotional connection is key to bringing the house down with your presentation. Why?
An emotional connection:
- Endears you to your audience - Makes your presentation memorable - Inspires your audience to take action
By using a relevant story in your video presentation, you’ll ensure that your audience walks the entire journey with you from intro to outro.
6 PowerPoint Presentation tips to wow your audience

No business video guide is complete without PowerPoint, the staple software for business presentations.
Here are 6 golden rules to help you nail your next PowerPoint presentation and leave your audience crying for more:
1. Keep Things Simple
Legendary artist Leonardo da Vinci once said something profound:
"Simplicity is the ultimate sophistication".
With the plethora of apps and templates at your disposal, you will be tempted to complicate things. Don’t. Keep things simple.
Simple design. Simple colors. Simple story.
People get swamped and confused by complicated stuff but easily absorb and appreciate straightforward material.
2. Good visual contrast
What use is your blockbuster presentation if the audience can’t see it?
You want people to enjoy your presentation, not endure it. If you use dark fonts on dark backgrounds or light fonts on light backgrounds, you’ll strain your audience’s eyes. They’ll struggle to see your lovely slides.
Classic black-on-white color contrast does just fine. You can use colors like red, blue, or yellow for headings and images. If you don’t like black and white, you can use other colors you prefer as long as the contrast of your combination is bold and strong.
3. Use a few words and animations
It’s easy to go overboard with fancy animations and a gushing stream of words. Only use as many words as it takes to get your point across and no more.
Too many words cause the audience to read rather than listen. Remember, your slides are there to compliment your talk, not substitute it. Also, a lot of words will fill up many slides that wear your audience down.
Ruthlessly cut out senseless animations that don’t add value to your talk.
4. Use excellent images
Images are to a presentation, what water is to fish. Without them, your presentation becomes bland. It lacks the needed fizz to keep your audience hooked. But only include relevant images.
Not only that. Above all, make sure all pictures are of high quality. Amateur-looking clip art causes the audience not to take you seriously.
Pro-tip: Get access to millions of stock assets and tailor-made templates with InVideo for business . Sign up for a free demo here .
5. Smooth and fast transitions
While PowerPoint transitions can make your presentation engaging, don’t overdo them, especially the advanced ones. Not only do they quickly drain power on weaker machines, but they also distract the audience. Stick to simpler and faster transitions like wipe or slide.
6. Avoid overloading your slides
In presentations, less is more.
Having a lot going on your screen confuses and overwhelms listeners.
Cramming too much info into your slides is a big no-no. Clutter is your enemy. Strip your slides down to essential words and images. Your audience will love you for it and leave you with many takeaways.
Pro looking Video Presentations – No longer an option
With Industry 4.0 fast coming into its own, going digital is no longer an option for businesses and speakers.
And one of the most important communication mediums in the digital age is video. That’s why you can’t afford to ignore video any more. Whether you’re speaking before a live audience or seeking to disseminate information to a global audience, video presentations are the way to go.
Need a great tool to create stunning video presentations? Then make sure to schedule a demo and see just how much you can do with InVideo for business.
Let’s create superb videos

How to Embed a YouTube Video in Google Slides in 3 Easy Steps

Wondering how to present in a way that’s interesting, informative, and engaging? No problem! We’ll walk you through a simple process for how to embed a YouTube video in Google slides so you can be prepared to present a slideshow that’s anything but boring. Not only is it super simple, but your audience will thank you for it.
Why Use Google Slides?
We’ve all been there – stuck in a boardroom sitting through a slideshow presentation that feels so long that you completely zone out . By the end of the presentation, you’re not even sure what it was about. Now the shoe’s on the other foot. YOU have to stand up in front of the room and deliver an engaging presentation and the thought of boring your audience to tears has you more terrified than anything else.
If you’ve only ever used – or heard of – Microsoft PowerPoint, we’d like to introduce you to Google Slides .
Google Slides is a great alternative (for starters, it’s free!). But what gives it an edge in our book is that it allows you to include video in your presentation. Why is it such a selling point to be able to embed a YouTube video in Google Slides?
Videos Capture Attention
Well, as you know, videos are a great way to grab your audience’s attention – and keep it.
Generally, adults have a span of attention of about eight seconds, research shows. And as AdAge points out, if you are not fully engaging your audience after 30 seconds, you'll likely lose 33% of your viewers, and after one minute, 45% will stop watching altogether.
The more you mix up your presentation with text, photos, videos, and a Q&A session, the better chance you’ll have of keeping your audience engaged.
Videos Explain Complex Ideas
We’ve used this analogy before, but it’s so relevant. When faced with having to assemble new furniture from Ikea, do you spend hours trying to decipher their instructions? No. You hop on over to YouTube for a quick 15-minute step-by-step tutorial video.
With explainer videos , you can get right to the point quickly and simply. By including videos in your slide, you make it easier for your audience to understand what you’re saying versus giving them a thick manual to follow. This also helps to break up text walls and long, drawn-out speeches (sorry!).
So now that you know why including a video in your presentation is important, you’re probably wondering how to embed video in Google Slides – especially if you’re not familiar with its functionality.
Learn How to Embed a YouTube Video in Google Slides
This process is so simple, you’ll be left here wondering why you haven’t been doing this all along.
All you’ll need is an internet connection – no downloads are required!
Go to slides.google.com and you can either create a new slide show (or open one you’ve already created if you’ve used the program already).

To insert a video, click Insert in the top toolbar then select Insert Video from the dropdown menu.

Find and select the video you want to embed. In the search menu bar, you can enter keywords or the title of the YouTube video you want to embed (if you have a specific video in mind).
Click the magnifying glass icon or enter.

You can also add YouTube videos to Google Slides using a YouTube URL – s imply choose “ By URL ” instead. To embed the YouTube video, open the video in another browser tab and copy its URL. Enter the video URL in the text field and click select.

What if I Want to Use a Non-YouTube Video Instead?
If you want to include a video in your slide, but it’s not on YouTube, that won’t be a problem. You can use a video from your laptop, USB flash drive, or external hard drive, but you’ll have to upload it to your Google Drive account first.
In case you haven’t used Google Drive before, this, too, is pretty straightforward. All you need to do is log into your Google account and go to the Google Drive app .
To do this, go to www.google.com and click on the Google apps icon, which is the 9 dots next to your profile picture. Choose Google Drive from these apps).

Next, click on the multi-colored plus icon in the upper-left corner and then click File upload . Find the video file (or files) you want to upload to your Google Drive.

Now that your video is uploaded to Google Drive, from here, you’ll follow the same initial steps as you would if you were looking at how to embed a YouTube video in Google Slides. The difference is, when you click Insert video , you’ll use the Google Drive tab for adding Google Drive videos.

Here, you’ll be able to Browse My Drive , Shared Drives , Shared with Me , and Recent tabs and select your video(s) for upload.
Once the video has been selected and highlighted, click Select.

You can position the video using the red guidelines on the slide – just click and drag the video when it’s been added.

How to Embed a YouTube Video in Google Slides With Some Additional Features
If you want to take things a step further, you can also right-click the video and choose Format Options .

You’ll see all the options on the right hand of your screen, but here are a few likely to be useful to you. Rather than playing the entire video and awkwardly waiting for the part you need, can select specific time stamps for specific clips.
The options that pop up are:
- Play (on click) – This is the default setting and if you click to advance the slide, your video will play.
- Play (automatically) – You don’t need to click anything, your video will play automatically.
- Play (manual) – During your presentation, you can play your video by clicking directly on it.
Whichever you choose will be based on your needs and personal preferences.

You can also choose a specific section to play (if your video is an hour-long, and you only want to use a short clip, this is super helpful instead of skipping forward to a certain section 30-minutes in!).

You can also mute the audio and even change (and lock) the aspect ratio!

Final thoughts: Instead of fumbling around, clicking between slides and tabs, and losing the focus of your audience, you can deliver a well-planned and well-executed Google Slides presentation that will have people walking away having learned something.
To improve your video presentation game, send us a message !
Similar Articles:
- What are Motion Graphics and Why do you Need It?
- 2D Animation: Everything You Need to Know to Help You Get Started
- How Whiteboard Animation Can Help You to Communicate Complex Ideas
- What is Corporate Videography and How You Can Leverage it

Subscribe to our newsletter
- AI Video Generator
- Text to Video AI
- AI Animation Generator
- AI Logo Maker
- AI Website Builder
- AI Business Name Generator
- YouTube Name Generator
- Video Editing
- Website tips
- Onboarding Videos
- Contact Support
- Knowledge Center
- Video Tutorials
My Projects
- My favorites
- My colors & fonts
- Subscriptions
Make Video Presentations with Outstanding Visuals
Bring new quality to your presentations and turn them into attractive and top-notch videos to enhance your storytelling.

Join Millions of Users to Save Time and Succeed!
High-quality presentation video templates.
Whether it’s a whiteboard video presentation or explainer animation, we have millions of slides in different categories to cover all your design needs. Simply choose your desired style and continue the editing process online, directly in your browser.

Business Presentation Pack

Whiteboard Animation Toolkit

Informative Social Pack
Ultimate Icon Animation Pack

Modern Infographics Pack

Company Presentation Toolkit

Explainer World Toolkit

Dynamic Corporate Presentation

3D Explainer Video Toolkit
What kind of presentation videos can you create.
Whiteboard Explainers
Our whiteboard animation toolkit has thousands of animated whiteboard scenes which do help to bring life to your ideas and visuals.
Explainer Videos
Explainer video templates can be used to create an animated video presentation for maximum engaging results.
Footage-Based Presentations
We have an immersive library of 1M+ stock footage and images, which can be combined with your texts and turned into beautiful and informative presentation videos.
Informative Pitch Decks and Infographics
Use infographics and typography presentation templates and turn your ideas and numbers into beautiful animations, which stand out from the crowd and make you unique.
The Process of Presentation Video Creation

Pick a Video Template
Start creating your presentation by going through our rich template library and selecting your favorite one. Each template offers hundreds of scenes separated by categories. Pick and add the scenes manually, or go with the fully customizable video presets, to streamline the creation. The scenes will then be added to the editor for further personalization.

Personalize Your Video Presentation
Design a compelling presentation by customizing the scenes to match them with your project purpose. Use the flexible editing tools of video maker to modify the text, alter style and colors, upload your media, and pick a dynamic transition. Move to the 'Music' section and add a background tune or a voiceover.

Export and Share Your Presentation
Go to the “Preview” section to see the final version of your presentation video. Ensure that there are no more changes to be made in there. Once the video is final, export it in your preferred quality. Then, instantly share the video to digital platforms, or download it to your device.

See what our customers say about us

Darlan Evandro, Content Creator
“Renderforest is an amazing tool with many practical solutions for small businesses. Even without advanced knowledge in design creation, small entrepreneurs can create videos, logos, presentations and even websites to promote their products and companies. If you want to create beautiful and high quality materials without investing hours in study and production, this is definitely an excellent option for you!”
Olga B., Education Manager
“That's impressive! Amazing! Beautiful! Outstanding! The first service which helped me to create, visualize and implement my ideas, but finally I started to create my own videos, with my face and voice, but Renderforest taught me how to present my ideas into logical, laconic, beautiful, rational and clear way. It is the best tool for creating short cartoon videos I have ever used. The main thing which makes this company unique is that they help to make your videos inspiring, influential, motivational, encouraging, meaningful and valuable. Your videos matters. Renderforest is born to inspire. Just unleash your fantasy and keep moving forward.”
Kamal Balogun, Marketing Consultant
“Before I discovered Renderforest, I was using seven different platforms to run my daily business functions and assets. Fast forward to today and I use two. Renderforest is 90% and the other tool 10% of the time. Do you want to make websites, logos, brand assets, social media assets, videos of all styles, and endless possibilities with Renderforest in your possession? I don't have space to detail all that Renderforest can do for you in a fraction of the time and how much money your business will SAVE is mind-blowing.”
Discover more from Renderforest
- Video Presentation
- Video Templates
- Video Editor
- Video Ad Maker
- Video Opener
We use cookies to improve your experience. By clicking agree, you allow us such use.
- Presentations
- Most Recent
- Infographics
- Data Visualizations
- Forms and Surveys
- Video & Animation
- Case Studies
- Design for Business
- Digital Marketing
- Design Inspiration
- Visual Thinking
- Product Updates
- Visme Webinars
- Artificial Intelligence
How to Make a Video Presentation With Audio in 8 Steps

Written by: Orana Velarde
Wondering how to make a video presentation with audio?
You're in the right place.
In this guide, we’ll cover the 8 steps to creating video presentations with voiceovers, pictures and music. We've also included tips for powerful presentations to help you get maximum results.
Here’s a short selection of 8 interactive presentation templates you can edit, share and download with Visme. View more templates below:

Jump to your desired section in the table of contents below.
8 Steps to Creating a Video Presentation
What is a video presentation, what makes a good video presentation, step #1: plan and strategize, step #2: organize your content, step #3: log in to visme and choose a template, step #4: input your content into the slides, step #5: add animations and transitions, step #6: add audio to your presentation, step #7: review and edit, step #8: download and share.
A video presentation is a presentation that can be shared and viewed as a video. Technically, for a presentation to be a video presentation, it must be an MP4 or MOV file type.
A video presentation can be shared online on YouTube, Vimeo and other social media platforms . The best part of a video presentation with audio is that you can share it widely without the need of being there to present the information in person.
Even a live presentation can be improved with a video slideshow. Simply give a live introduction during your webinar or summit, and then play your video presentation to the audience.
A video presentation becomes even more valuable and high-quality when you add audio to it. For example, adding a music clip or a narrated voiceover can do wonders to help you get your message across and leave a lasting impact.
Check out this "2021 Year in Review" video presentation we created at Visme.
Made with Visme Presentation Maker
Make your own video presentation in Visme! Create Now
A good video presentation will capture your audience’s attention until the very end.
When it comes to creating a video presentation, there is no definite checklist as to what constitutes a good video presentation. But there are some things you can do to make sure that yours is good enough to keep the viewer engaged.
For example:
- Think of your presentation as a video from the very beginning.
- Take the time to create an outline or storyboard of your slides.
- Make sure the information flows from one slide, or scene, to another.
- Preview your presentation as you put it together, making sure it flows well.
- Add animations and motion graphics only if they bring visual value.
- Stay balanced with animations and transitions throughout the scenes.
- Tell a story to improve content retention.
Using the tips above, you’re well on your way to creating a video presentation that is sure to make an impact.
Ready? Let’s get started with a step-by-step tutorial!
If you prefer watching over reading, here's a short video tutorial on how to create engaging presentations in Visme.

For any successful project to be a success, including your new video presentation, you must plan and strategize. You and your team need to know the purpose of the video presentation before you even start putting together content or visuals.
Because you need to know the reason, the why, behind the project. That way, the creation process will reflect those goals and take you in the right direction faster.
For example, if you want to create an explainer video about your new product line, do you want the goal to be brand awareness or sales, or both?
If it’s sales, then the messaging and visuals must be created for that purpose. If it’s awareness, then you can take a different approach at how to portray the new product line.
If you want both, then you can do a bit of both and tell a story about the product that explains how it’s made and how it will improve your customers' lives.
Hey marketers! Need to create scroll-stopping visual content fast?
- Transform your visual content with Visme’s easy-to-use content creation platform
- Produce beautiful, effective marketing content quickly even without an extensive design skillset
- Inspire your sales team to create their own content with branded templates for easy customization
Sign up. It’s free.

Questions to ask before you create a video presentation.
Here are the most important questions to ask yourself and your team before you create a video presentation:
- Why do you need a video presentation?
- Who will watch this video presentation and where?
- What are you planning to convey?
- What story are you telling?
- Who do you want to convince, of what?
- How would you like the audience to feel when seeing your video presentation?
- Will it be in-house and private or public for the world to see?
- How can your company or brand sound like an expert in the topic?
- Do you want the audience to engage when they are done watching?
- Do you need a voiceover or maybe a music track will be enough?
- Is it necessary to hire voice talent or maybe a presenter you can film?
- Will you need to write a video script or not?
Write down a list of goals for your video presentation and make sure they are on-hand during every step of the process. Use these goal-setting worksheets and templates to get started.
Every person involved in the creation of the video needs to know about the purpose, goal and plan at all times — from stakeholders and designers to content creators, marketers and social media managers.
Here's a sample plan template you can use to keep up with your project goals, target audience, tactics and more. Share it with your team to help everyone stay on the same page.

Customize this template and make it your own! Edit and Download
Now that your team is on board and you know the purpose of your video presentation, it’s time to get organized.
This is a step with more value than you can imagine. In fact, it should be an un-skippable step to every visual project you create, along with the first step of planning and strategizing.
Start by organizing all the content for the presentation into a folder on your desktop. Include all the graphics, photos, video clips, audio bites and any brand assets. Create a document with all the written content and make notes on what the audio will be.
- For a voiceover, draft a script.
- For music, choose the perfect track.
With the written content, draft a simple outline or storyboard. For a video presentation, in particular, you should try a storyboard.
This step is especially important if you have stakeholders invested in seeing the final product and want to see the process.
How to create a storyboard in Visme.
It's easy! Use one of the Visme storyboard templates to put one together.
Remember, storyboards don’t need to be too detailed. The purpose of making one is to give an idea of what will be created. Don’t invest too much time in trying to perfect it.
Here are some templates to get you started.

Public Library Storyboard

Mobile App Pros and Cons Storyboard

Web Development Storyboard

Microwave Lunch TVC Storyboard

Cloud Computing Services Storyboard

Tree Plantation Program Storyboard
Create your storyboard View more templates
It’ll be easier to create a storyboard once you’ve already created the outline. The slide layout for a video presentation is much like the layout of a regular presentation.
For example, here is a broad outline for a regular presentation with sections:
- Slide1: Title and Subtitle
- Slide 2: Introduction - Table of Contents
- Slides 3: Section 1 Title
- Slides 4-7: Section 1 content
- Slide 8: Section 2 Title
- Slide 9-11: Section 2 content
- Slide 12: Summary or Review
- Slide 13: Conclusion and Closing
If your presentation doesn’t have defined sections to separate the content in, choose a good flow from one slide to another . For example:
- Chronological Order
- Problem and Solution
- Before and After
- Hero’s Journey progression

Browse presentation templates in Visme! Create Now
Now that you have a good idea of the purpose of your video, an outline or even a storyboard, it’s time to put it all together.
Log in to your Visme account and select a starting point for your video presentation. This could be:
- One of the four presentation themes with hundreds of slides and layouts to mix and match.
- A full-scale pre-designed presentation template with animation effects.
- One of our animated video templates.
- A previously created and imported PowerPoint presentation.
- An existing Visme slideshow without animation, video or audio.
Use your outline or storyboard to set up your slide order in the editor. Make sure you have all the slides you need to fit your content.

Now, it’s time to add the content to your slides. If you are starting with a blank canvas, you can use content blocks to help you layout the content in balanced compositions.
When adding the content to your slides, remember that people don’t want to read slides on videos. Keep the text to a minimum and use more visuals instead.
If you’ll be using a voice over for the online video presentation, then you’ll need hardly any text on the slides apart from titles and section titles.
For complementary visuals like images and backgrounds, look through the library on the left side menu of your editor. It’s also likely that you have a selection of images from your company that you want to use in your slides. Upload them to your library.
Add some uniqueness to your images by placing them inside frames or cropping them to fit next to colored shapes and sections.
For backgrounds, you have lots of choices — from full colors to gradients to animated and video backgrounds. Try photographs with filters for a subtle background that doesn’t compete with the foreground elements.
You can also add videos inside your video presentation, either uploaded or with a link to YouTube, Vimeo or Wistia. We suggest you use short videos in this case so that your final project isn’t excessively long.
Do you know how to make a video presentation that is impactful and fun to watch?
Just add animations and moving elements!
Visme comes with built-in with the following animated assets:
- Animated icons
- Shapes and lines
- Animated illustrations
- Animated characters
- Special effects
- Animated gestures
- Animated charts and data widgets
It’s time to bring it all to life and go from regular static presentation to video presentation.
At this point, you might already have some animated elements in your slides, maybe some animated icons or animated characters. Before you go ahead and animate anything else, review all the transitions between slides.
It’s important to understand that the animated elements, embedded or background videos, and audio you use must all match the transition between slides.
This is the magic sauce for transforming a normal presentation into a video presentation.
Let’s look at all the animation and transition options in your Visme dashboard and how you can use them to your advantage.
Animated characters, icons, illustrations and special effects.
All these elements have options to select the number of repetitions of their action and the speed. The higher number of repetitions you choose, the longer it will take to finish its action. The speed will make the action faster or slower. You can toggle both to find the perfect combination.
The completed action of any of these animated elements will override a timed transition. The transition will wait until the animation is finished to go ahead and start. You can adjust the final length of your animated elements by previewing your slide and taking note of its length.
Additionally, you can customize the poses that the characters portray and also the color of their clothes and skin. These deep customization options will help you stay on brand when creating your video presentations.
Stock videos and video backgrounds.

Videos you add from the editor or import from your computer have the option to trim to a desired length, loop or autoplay.
Alternatively, use video as a background. Stretch it to fit the entire slide and position it behind all the other content. The edit settings are the same as a regular video.
Visme offers a large selection of quality video clips to use as backgrounds or as complementary visuals. it's also easy to upload your own video to the library.
Animated backgrounds.
These loop on their own and are ruled by the transition settings. Animated backgrounds stand out so make sure you are keeping a balance with the elements in the foreground.
Manual animations.
Animations can be added to everything on your slide, including the videos and animated icons. You can tweak the settings to control when elements enter and exit the slide.
There are lots of options for these animations and you can time them using the animation settings. Try to keep animations on the same slide to a minimum so they're not distracting.
Smooth transitions.
Transitions can be added slide by slide or to the entire presentation at once. If you don’t go into the transitions menu at all, Visme will apply a staggered enter from the side that already looks great for presentations that you have to click on to continue to the next slide.
For video presentations, you’ll need to edit your transitions to happen automatically according to what is going on in your slide.
In general, you can make the transition happen after a specific number of seconds but if you have an animated element or audio clip that lasts longer, the transition won’t happen until the longest one has finished its action.
For slides with added video, make the transition happen either when the video ends or at a calculated time after the video has ended. Both are available options in the transition settings.
Transitions can be set in different styles, slide from the side top or bottom, or a simple fade or zoom. For a balanced composition, use the same style of transition throughout.
But if you want to get creative, use different transitions to design a more creative flow. Just make sure you don’t go overboard.

In the section above, we already talked a little about how audio works together with the transitions for a seamless video experience.
Now, let’s take a look at how to add audio inside Visme.
As you work on your video presentation, you might feel the need to work on animations, transitions and audio at the same time so that it all fits together in the best way possible.
To add audio to your presentation in Visme, you have several options:
Adding audio in the background.
Adding audio to each slide., tweaking the audio inside video clips., adding a voice over or narration..

To add a background sound clip, click on the top-left hamburger menu and select “Publish Settings”. This is where you can tweak your project's main settings. Click on the third tab "Sound."
Toggle background music on to release a dropdown that shows the options inside the editor or any .mp3 file you’ve added to your library.
Adjust the volume of this clip and choose if it will loop, fade in or fade out. You can also choose if the background audio will play at a specific point in time.
Any background audio will play under all other audio or video you add to the presentation. So make sure these are balanced and make sense together.
Inside the editor, you have the option of adding individual audio clips to each slide.
Choose from any inside the editor or upload your own. You’ll have the option to trim the length of the audio, its volume and if it loops or fades in and out.
Similar to the background audio, you can choose to start at a specific time during that slide’s progression.
When you add a video file that has audio in it, you can choose to keep the audio or turn it off. The option is inside the video settings in the “muted” tab.
You can add voiceovers to your video presentation in three different ways;
- A track in the background
- An imported clip to each slide
- Recorded over every slide using the Visme voiceover recording feature
Whichever you choose, remember to calculate all the play lengths along with the transitions so that everything flows well.

Now it’s time to review everything and make sure it’s perfect.
First up, do some proofreading of your text to fix any typos or grammatical issues. Make sure all the text is in the correct font and size to stay on brand and maintain a visual hierarchy.
Use the Present button and watch the entire video presentation from start to finish. Take notes along the way of things you notice that need a fix or edit.
If you want to see what the final project will look like to your audience, download a video version and watch it on your video player. Once again, take note of any necessary edits.

You’re done! That was easy, wasn’t it?
It’s time to share your video presentation with its intended audience. Click on the download button and select the MP4 file option.
If your video is especially long or full of features, it will take a bit longer to download. We’ll send you an email when it’s ready so you don’t have to watch the progress bar.
Go get a coffee or take a break for a job well done!
Once downloaded, upload your video to YouTube, Facebook or any of your favorite social media platforms.
If you created the video as part of a larger Visme project, upload it back into your editor. Use your video as part of an interactive report, or for your website, landing pages or email campaigns.
Ready to Create Your Video Presentation with Audio?
Are you ready to create your video presentation with audio? Visme offers all you need to create professional-looking video presentations with audio for any purpose and industry.
With plenty of ready-made presentation templates , you don't need video editing experience. And, since Visme is a web-based app, it doesn't matter if you use a Mac or PC computer.
Video presentations with audio are great for projects like:
- Annual reports
- Explainer videos
- Sales pitches
- E-learning courses
- Pitch decks
- Informational reports
- Advertising
- Explanations
- School reports
- Medical reports
If you’re still doubting if you know how to make a video presentation, just remember to follow the steps in this guide and use the tips in the first section to guide you through the process.
Don’t forget that the ultimate goal for your video presentation with audio is to leave a powerful, lasting impact on your audience.
Sign up for our presentation software and get started right away. Make simple video presentations or rich, interactive and memorable video presentations with audio, animations, characters, links, embedded content and other exclusive features.
Create beautiful presentations faster with Visme.

Trusted by leading brands
Recommended content for you:
![15 Best AI Presentation Makers in 2024 [Free & Paid]](https://visme.co/blog/wp-content/uploads/2023/11/Best-AI-Presentation-Makers-in-2024-Thumbnail-500x280.jpg "how to make a youtube presentation video")
Create Stunning Content!
Design visual brand experiences for your business whether you are a seasoned designer or a total novice.
About the Author
Orana is a multi-faceted creative. She is a content writer, artist, and designer. She travels the world with her family and is currently in Istanbul. Find out more about her work at oranavelarde.com
Video Presentation Maker
Create memorable video presentations that drive your message home. Start making a video presentation with your own content or generate one with AI.

Everything you need to make a presentation you’re proud of
Start creating a video presentation without having to set up any equipment. With a screen recorder and a microphone, you can record video presentations online yourself. Or, browse the stock footage library to craft the perfect presentation video.
Visualize your presentation with Video Generator
Easily experiment with different visual elements using the AI video generator . Spark inspiration from each generated video or choose one to edit directly.
Perfect for slideshows, reviews, video presentations
Make a video presentation your audience will remember. This video presentation maker is perfect for creating any kind of presentation from slideshows to talking head videos.

How to Make a Video Presentation
.webp "how to make a youtube presentation video")
Open a new project with a blank canvas. Choose the size you want your video presentation to be; apply preset aspect ratios 9:16, 4:5, 1:1, and vice versa.
Open the “Record” tab in the left-hand side and choose your recording settings to start recording. Or, browse the stock footage library to create a presentation without recording.
(Optional): Use the AI video generator to create a video presentation for you with subtitles, background music, and an AI voiceover.
Trim, crop, or add subtitles to your video presentation. Apply subtle background music to fill in silences, or remove silences automatically with Smart Cut.
Export your video presentation, download a video file, and share its unique video link. Have others leave comments at specific points in your video—all in real time.
The best way to create video presentations without feeling overwhelmed
Unless your racing against the clock and coming up on a deadline (we've all been there), create video presentations online without feeling overwhelmed by a complex-looking video editor.
Kapwing's video presentation maker offers you a full creative suite of video editing tools with a user-friendly interface. Start creating video presentations without a learning curve.
Professionalize your video with AI-powered features
Use the AI voiceover generator to add an AI voice so you don't have to record narration yourself. (TIP): Apply text-to-speech for both subtitles and a voice over.
Store brand colors and logos in a shared Brand Kit
Easily access brand assets to have consistent branding across different social media platforms. Create video presentation templates and save them for your team to create the next video presentation in a breeze.
Make a video presentation in under 10 minutes
Jump directly into the editor and generate a video presentation using the slideshow generator. Edit the generated subtitles accordingly and make any additional changes to your video. Create and edit a video presentation all on one platform—no download or software installation required.
Collaborate with your team in real-time
Leave feedback at key points directly on the playback timeline. Share your video presentation with just a link. Never see a "file upload limit" notification on your screen again.
What's different about Kapwing?

Kapwing is free to use for teams of any size. We also offer paid plans with additional features, storage, and support.
- PRO Courses Guides New Tech Help Pro Expert Videos About wikiHow Pro Upgrade Sign In
- EDIT Edit this Article
- EXPLORE Tech Help Pro About Us Random Article Quizzes Request a New Article Community Dashboard This Or That Game Popular Categories Arts and Entertainment Artwork Books Movies Computers and Electronics Computers Phone Skills Technology Hacks Health Men's Health Mental Health Women's Health Relationships Dating Love Relationship Issues Hobbies and Crafts Crafts Drawing Games Education & Communication Communication Skills Personal Development Studying Personal Care and Style Fashion Hair Care Personal Hygiene Youth Personal Care School Stuff Dating All Categories Arts and Entertainment Finance and Business Home and Garden Relationship Quizzes Cars & Other Vehicles Food and Entertaining Personal Care and Style Sports and Fitness Computers and Electronics Health Pets and Animals Travel Education & Communication Hobbies and Crafts Philosophy and Religion Work World Family Life Holidays and Traditions Relationships Youth
- Browse Articles
- Learn Something New
- Quizzes Hot
- This Or That Game
- Train Your Brain
- Explore More
- Support wikiHow
- About wikiHow
- Log in / Sign up
- Arts and Entertainment
- Making Videos
- Making YouTube Videos
The Beginner's Guide to Making an Awesome YouTube Video
Last Updated: June 24, 2024 Fact Checked
Equipment & Setup
Ideas & planning, setup & recording, uploading on a computer, uploading in the mobile app, expert interview.
This article was written by Naseem Speach and by wikiHow staff writer, Darlene Antonelli, MA . Naseem Speach is a Tech Video Producer based in Los Angeles, California. Naseem started his tech reviews YouTube channel in 2020 and has since gained a following of over 34,000 subscribers. He specializes in sharing information about the latest smart home tech, Apple, Samsung, Google, PlayStation, Microsoft, and gaming devices. This article has been fact-checked, ensuring the accuracy of any cited facts and confirming the authority of its sources. This article has been viewed 2,109,319 times.
Have you found yourself watching YouTube videos and thinking, "I can do this too?" If you're confused about where to begin, don't worry—it's easy to make a YouTube video. YouTube videos can be as casual or as high-quality as you prefer. If you don't want or need to plan out your video, skip to the end of this guide for simple instructions on uploading your video to YouTube. This wikiHow article will teach you how to plan, film, and publish a video on YouTube.
Things You Should Know
- If you're just starting, it's best to use a webcam, your smartphone, or something that's relatively cheap and not as complicated as a DSLR camera.
- Record the video on your device, then transfer it to a computer if necessary.
- Go to youtube.com, sign in, and click "Upload" to begin uploading your video.

- Use a webcam for convenience. If you have a laptop with a built-in webcam , you can use it to make a YouTube video. Unlike your smartphone, you don't have to hold your webcam in your hand while recording your video, which is handy if you're making a vlog . However, built-in webcams tend to have poorer quality than many smartphone cameras. Still, a webcam will work if you don't want to purchase a digital camera .
- Use a smartphone for mobility. If you have an Android or iPhone, you can use its built-in camera and microphone to film anywhere. Premium smartphone models have amazing built-in cameras and can produce high-quality video. You could purchase a tripod if you want to record yourself doing something, or just hold the phone in your hand while you talk. You can then upload the video to YouTube straight from your phone or transfer the video to your computer first.
- Most modern digital video cameras have a removable SD card that can be used to transfer videos to your computer. Double-check to ensure that your selected camcorder has an SD card, or can be easily connected to your PC or Mac before purchasing.

- When recording, be sure that both the audio and video are properly being recorded by first making a test clip and viewing it.

- Video blogs , or vlogs are regularly-updated series featuring a creator talking about whatever is on their mind, usually for 10 minutes or less.
- Gaming videos attract a lot of viewers, especially if you cover recent game releases.
- Tutorials and how-to videos can encompass literally any topic in which you are skilled.
- Montages are videos filled with images or video clips, set to music.
- Pet videos are always popular. These are typically recorded with a hand-held item, such as a smartphone or camcorder. They often feature the creator's pet doing something funny or endearing.
- Reviews are video blogs that review a product or service. Being sardonic and funny when reviewing something will get more people to watch.
- Comedy videos encompass a wide range of styles and approaches. They're best done with friends, and can feature anything from practical jokes, to silly dancing, to scripted sketches and beyond.
- If you're stumped, check out our guide on YouTube video ideas .
Captivate your audience. Make the first 10 seconds of videos engaging to capture your audience's attention. Craft compelling titles & thumbnails. Don't shy away from serious topics, but remember – YouTube is an entertainment platform, so add a sprinkle of humor. Have fun and keep your audience interested – it's the secret weapon for a thriving YouTube channel!

- Plan ahead of time to film events like family picnics, weddings, and birthdays so that you'll have the raw video to edit and upload to YouTube later.
- You can choose to make the YouTube video private so that only people with the specific URL (web address) of the video can view it. Still, there's no guarantee it won't eventually be seen by third parties. Keep the content of your video clean and in accordance with YouTube's guidelines.

- If you're taking this route, you won't need video recording equipment, but you will need source files in the form of downloadable video clips (you can download YouTube videos for this purpose if need be).
- These "remix" videos often exist in legal limbo. You're unlikely to get in any trouble for making one, but if one of the copyright holders for the original clips in your video requests that YouTube remove it from their site, they will do so immediately.

- If you're recording yourself, you should sit facing the light, with the camera directly in front of you. Having your lighting source behind the camera illuminating your face will help you look better on video.

- You may have to record multiple takes. This is completely normal, especially for a beginner.
Tip: Record more than you plan to use. You can edit out the extra bits later on; there's no reason to worry too much about getting the timing perfect from the beginning.

- If you're using a microphone, speak directly into it. This is especially important when you're using a recording item with a built-in mic.

- Your computer may not have an SD card slot. If so, you'll need a USB card reader.
- There are many ways that you can use to transfer videos , like using a cloud service .

- If you're not signed in to YouTube, click SIGN IN at the top-right to do so now.

- The easiest way is to drag the video file from your computer to the "Drag and drop video files to upload" window.
- You can also click SELECT FILES to choose the video file from another location on your computer and then click Open .

- If you want to make it easy for people to find your YouTube video, make sure to use keywords that describe your video in the description field. For example, if you're making a gaming video, be sure to type the game's name into that field.

- If your video is under 60 seconds long, it will upload as a YouTube Short , which viewers can find by clicking the Shorts option. [1] X Research source You won't be able to select a thumbnail for a YouTube Short.
- You can also click Custom thumbnail here to select a custom thumbnail.
- If you want, you can change or edit the thumbnail later.

- If your video contains a paid promotion (for example, if a company or influencer gave you something of value in exchange for making this video), you'll need to check the box under "Paid promotion. [2] X Research source "
- You can choose to automatically label chapters and key moments and tag places you mention.
- Select a category for your video from the "Category" drop-down menu.
- Choose whether to allow people to leave comments. You can also choose to moderate the comments and show or hide how many likes you get.
- Click NEXT once you're finished.

- If YouTube detects a copyright problem, follow the on-screen instructions to correct the issue.

- Depending on the length of your video, it may take additional time to upload.

- You may have to allow YouTube access to your phone's camera, microphone, and/or camera roll before proceeding.

- If your video is less than 60 seconds long, it will upload as a YouTube Short . [3] X Research source

- If your uploading a video as a YouTube Short, you can add creative elements like text, voiceovers, sounds, and more.

- Tap the Create a title field to enter a title for your video.
- Tap Add description to type keywords and information that can better explain your video or help people find it easily when searching.

- Tap the Visibility menu to choose whether your want your YouTube video to be Private (only you can see it), Unlisted (not searchable, but visible to anyone with the URL), or Public (searchable and viewable to everyone).
- Tap the Audience menu to choose whether this video is specifically made for children.
- If you want to tag a location, tap Location to do so.

- Once the video is live, you'll be able to view it on your channel. [4] X Research source
Community Q&A
Reader Videos
- It may take a while for your potential to be discovered. Thanks Helpful 6 Not Helpful 0
- Avoid purchasing an extremely expensive camera (e.g., a DSLR) unless you know how to use it. Thanks Helpful 5 Not Helpful 0
- Being positive about your channel and during your videos—especially while shooting live streams —will encourage more people to view your videos. Thanks Helpful 3 Not Helpful 0

- Don't plagiarize other people's content.
- Like any popular website with user-created content, YouTube is full of bullies, trolls, and other kinds of people who will attempt to bring you down. If ignoring them isn't enough, you can disable comments on your videos.
You Might Also Like

Thanks for reading our article! If you’d like to learn more about making videos, check out our in-depth interview with Naseem Speach .
- ↑ https://support.google.com/youtube/answer/10059070?hl=en
- ↑ https://support.google.com/youtube/answer/154235?hl=en
- ↑ https://support.google.com/youtube/answer/57407?hl=en&co=GENIE.Platform%3DAndroid&oco=1
- ↑ https://support.google.com/youtube/answer/11913617?co=GENIE.Platform%3DAndroid&oco=1
About This Article

- Send fan mail to authors
Reader Success Stories
Alex Palmer
Jun 30, 2017
Is this article up to date?
Kelley Raines
Jul 3, 2017
Devin Cordek
Apr 18, 2016
Gangadhar Krishna
Mar 12, 2017
Joyce Proper
Mar 4, 2017

Featured Articles

Trending Articles

Watch Articles

- Terms of Use
- Privacy Policy
- Do Not Sell or Share My Info
- Not Selling Info
Keep up with tech in just 5 minutes a week!
Ready to get started?
- Inspiration
17 fun presentation ideas (with video!) to wow your audience
 to wow your audience")
- 30 Mar 2023
So you want to be the next Steve Jobs. Or Martin Luther King. Or any other dazzling orator you look up to. But you need a little something to add to your presentation ideas – you don’t want to bore people to death with Powerpoint.
Whether you’re creating a sales presentation, an event presentation, or just showing your travel video to Uncle Ron, we’ve compiled some of the best ways to get your audience seriously hyped up about your message.
Biteable offers online video presentation software, so we know a thing or two about making engaging presentation videos. In this guide, we share some of our favorite video presentation inspiration and show you some of the different types of presentations you might consider.
When you’re ready to make your own video presentation, head over to Biteable for hundreds of brandable templates, video scenes, and workplace-ready animations. With Biteable, making a video presentation is as easy as making a PowerPoint – only a whole lot more fun.
Create videos that drive action
Activate your audience with impactful, on-brand videos. Create them simply and collaboratively with Biteable.
Types of video presentations
If you’re looking to win over your audience with a presentation, videos are the best way to do it. According to Insivia, viewers retain 95% of a message when they see it in a video, but only 10% if they have to read on-screen text.
When you’re making your presentation, you could either make your video the whole presentation, or just a part of the whole. Did you know, for example, that you can embed a video in a Powerpoint document? Either is possible with our video templates and it can be interesting to mix things up once in a while.
There are four main types of presentations:
- Informative
- Demonstrative
- Inspirational
Picking the right one will ensure you’re onto a winner with your video presentation. For example, if you’re onboarding some new employees, you might choose a video template that’s an informative presentation like this one:
Or, if you want to show off how something works, a demonstration presentation might be what you want to create:
A persuasive presentation would involve creating a video more like this charity infographic example:
And if you want something a little more inspirational, try something like this positive quote video template.
But that’s not all, folks! If you’d like to check out more awesome Biteable video templates, visit our templates page here .
Creative (and fun!) video presentation ideas
You’ve now picked the type of presentation you need. But how do you get creative with your video?
First of all, it’s important your video is top-notch. Without high-quality graphics and production value, your message may fall by the wayside. Choose online video presentation software that’s easy to use and makes great-looking videos. That’s where Biteable comes in.
Whatever the topic of your presentation, your video format and design need to match the overall tone and message.
Delivering a corporate presentation on climate change? A fast-paced, wildly colorful template with upbeat music is going to feel a little off-message.
To identify how to design your presentation, think about the feelings you want to evoke in your audience. Want them to be crying with laughter? Moved to tears? Motivated into taking action? Pinpointing the emotions behind your presentation will help you choose the right template and make the best video possible.
17 great video presentation ideas
Now you’ve nailed down the type of video presentation you want to make, it’s time to master the finer details. Here’s just some of the ways you can make your message sing.
1. Start with a bold statement
A bold statement can capture your audience’s attention right from the get-go. Your statement should offer something slightly unusual and maybe even a little controversial. Something to make people sit up and take notice.
2. Tell a story
One of the best ways to get your audience’s attention is to tell a story – it’ll hit them right in the feels.
A personal, human story works because it the audience can relate to it on a personal level. Think about some stand-out examples of human stories that relate to your business or idea, and tell that story so people will connect with the central character. The bigger the emotion the better: love, longing, overcoming obstacles, things we’ve all had to deal with at some point in our lives.
Think about the ‘story arc’ – how will you frame your message so the audience immediately empathizes?
If you’re selling trainers, perhaps you’ll talk about someone who’s training for a marathon. If you’re lobbying for women’s rights, perhaps you’ll tell a story of when a passing comment affected you deeply. Maybe you should think back to the decision that started your business, and start your presentation with that.
Here’s a great example of storytelling from one of the world’s top brands:
3. Use music
Music has great power to support and enhance the emotion in a video presentation, and has been proven to sustain an audience’s attention and aid in information retention. Music is used in movies to suggest an emotional state to the viewer, so why not in a video presentation?
Modern, up-tempo music will snap people to attention at the right moment, while slow, minor-key sounds relax the brain, which is useful for reviewing content so it can slip more easily into long-term memory.
It can be a struggle to find good quality royalty free music , but here at Biteable we have a selection of great royalty free tracks (or you can upload your own if you’re that way inclined).
Music is one of the most critical (and often overlooked) aspects of any presentation. Here’s a good example of a Biteable template where the music does a great job of supporting the message.
4. Visual metaphor
Research has shown that combining pictures and text is one of the best ways to help people engage with and retain information. There’s something about how our brain works that makes text by itself far less memorable, so if you can combine something visual with your message, you’ll keep people’s attention longer and they’ll remember more of your presentation.
Talking to a group of people about taking action on something that scares them? A picture of someone diving or bungee jumping could work. Telling your boss how important that company retreat is next year? Show them an image of happy, relaxed people with their toes in the sand.
It doesn’t have to be obvious and clichéd, either. Closed doors, wide open roads, and lighting a candle all have subconscious messages that you don’t really need to explain. (Whatever you do, just don’t use the ultimate cliche: the overused ‘water ripple’ .)
5. Use questions
Questions can be a great way to open a presentation, because they encourage the audience to think for themselves. It opens them up to a realm of critical thinking, which is perfect when you’re gonna sock it to them with your impactful message.
‘Did you know 15 billion trees are cut down each year?’
‘Have you ever considered what life would be like if you didn’t have to save money?’
The art of asking questions in a presentation means you can incorporate them into your video as a great lead-in. Combined with some appropriate music, it can really get your audience thinking about the issue, and then you’ll go on to explain exactly what your solution is.
Having a laugh can really do a lot to win over an audience. There’s no need to be too serious, and even if you’re dealing with a heavy topic, lightening the mood can work wonders.
Whether you’re looking to create a funny sales video, an event presentation, or a presentation for an interview — one thing’s for sure, you can’t go wrong by including humor.
7. Repetition
Simple. Effective. Powerful.
Repetition can be used in several ways: by offering several one-word sentences in a row (the repetition is in the rhythm), or by repeating a word or a key phrase several time throughout your presentation.
In his famous Stanford speech in 2005, for example, Steve Jobs concluded by saying “Stay hungry. Stay foolish.”
Repetition is powerful. It drives home your key message and strengthens your position.
8. Motion Graphics
Motion graphics are basically animation with text as a major component, and is a staple of what we do at Biteable.
When you use moving graphics in a presentation, it instantly captures attention. If your audience is just taking their seats, or are halfway through hearing your story, there’s no doubt they’ll sit up and take notice if you introduce some cool motion graphics, like this Meeting Tips example.
Although they can sometimes feel clichéd, quotes are a great way to impart a message in a presentation. Want your audience to understand something complex? A quote from Einstein should do it. Or would you like to say something meaningful and poetic? A couple of lines of Shakespeare should convey some wisdom.
10. Audio narration
Narration can give a different mood to your presentation, especially if the voice is powerful and the words are heartfelt. Use it to change the tone or pace of your presentation and it will certainly keep your audience hooked if there’s a danger of them losing interest.
11. Go bright with color
Color can have a huge effect on how your video comes across. Don’t be afraid to experiment. The contrasts of black and white can be extremely effective, but you can also grab people’s attention with some carefully-chosen primary and secondary colors, like in our Motion Graphics template.
12. Use illustrations
Illustrations are a great way to communicate information, especially if you’ve got lots to say. Whether you want to create a crowd of people or a cool depiction of some new fancy gadget, illustrations can draw the eye and make your presentation more interesting.
13. Infographics
When you utilize infographics, you can pack in a huge amount of data and information without confusing your audience. Think pie charts, digital numbers, and ascending animated graphs. These can show your audience boring data in an exciting way.
14. Create interesting transitions
The one advantage of video over a standard presentation is that you can do all types of funky things with transitions, like a whip pan transition, when the camera quickly pans between scenes. It’s a bit like a wipe, but much faster. Check out our full article on transitions here .
15. Make it look cinematic
Adding a cinematic touch can help your audience feel receptive to your message because subconsciously, they will associate these elements with being at the cinema, eating popcorn, and generally having a good time.
16. Go retro
A cool, retro look for your presentation will make it hard to ignore. By going retro, you add a little bit of cheeky style to your message. You don’t need to go quite as retro as the template below, but taking a step back in time is a sure way to add a little bit of zing to things.
17. End on a meaningful note
Your presentation will only give your audience a lasting impression if you end it right.
It’s important to let the audience know what you want them to do next: to visit a website for more information, to ponder an idea or new direction, or to take action toward a particular goal.
An attention-grabbing visual will work really well here, along with a meaningful end to the music – a change of pace, volume, or pitch.
What’s the takeaway message? A strong CTA (call to action) will ensure your presentation is memorable and much more likely to be talked about.
Video brings your presentation alive
Of course, we’re a little biased here at Biteable, but we’ve also sat through enough mind-numbingly dull presentations to know that video offers a delightful treat for your audience. It brings your message to life in a way no other medium can.
Ready to start crafting your presentation? Check out our range of templates here .
Make stunning videos with ease.
Take the struggle out of team communication.
Try Biteable now.
- No credit card required
- No complicated design decisions
- No experience necessary

Live Streaming Your PowerPoint Presentation On YouTube: A Step-By-Step Guide

- February 12, 2023
- By Tommy I.
Are you looking for a way to share your PowerPoint presentation with a wider audience? Streaming your presentation on YouTube is a great way to do this! Live streaming your PowerPoint presentation on YouTube can be a great way to reach a larger audience without having to worry about the hassle of setting up a webinar. In this article, we’ll walk you through the steps of live streaming your PowerPoint presentation on YouTube, and discuss some tips and tricks to help make your presentation more engaging. We’ll also cover the importance of having a good internet connection, how to use YouTube’s live streaming features , and how to monetize your presentation if you choose to do so. By the end of this article, you’ll have the knowledge and tools to live stream your PowerPoint presentation on YouTube with confidence.
Can You Put A Powerpoint Presentation On Youtube?

Yes, you can put a PowerPoint presentation on YouTube. You can upload the presentation as a video file to YouTube, or you can record yourself giving the presentation and upload the video to YouTube. If you are uploading a video file, you can convert the PowerPoint file to a video format, such as MP4, and upload it to YouTube. To record the presentation, you can use a recording software to capture the audio and video of your presentation, and then upload the recording to YouTube. Once the video is uploaded, you can add titles, descriptions, and tags, as well as enable certain options, such as closed captions and end screens.
How To Show Powerpoint On Tv Wirelessly
Showing a PowerPoint presentation on a television screen wirelessly is a great way to make a presentation more engaging and memorable. The process is relatively simple and can be completed with the right equipment. First, you’ll need a device capable of streaming content, such as a laptop, tablet, or smartphone. You’ll also need a compatible streaming device, such as a media streaming device, Miracast adapter, or Chromecast. Once you have the necessary equipment, connect the streaming device to your television, then connect it to your device using the appropriate connection. Finally, open the presentation on your device, select the streaming device as the output device, and the presentation will be displayed on your television.
Youtube Presentation

Creating a YouTube presentation can be a great way to share information with an audience. It allows for a creative and engaging approach to presenting, allowing you to add visuals, audio, and multimedia to help bring your message to life. Whether you’re creating a tutorial, a product demonstration, or a speech, YouTube presentations can be a powerful way to reach an audience. With the right combination of visuals, audio, and storytelling, you can create an effective and memorable presentation that will engage viewers and keep them coming back for more.
Powerpoint Broadcast Work

Powerpoint broadcast work is a great way to spread a message or advertisement to a large audience. By creating a presentation with slides and images, you can easily present to an audience in a professional and organized manner. Furthermore, thanks to the power of the internet, you can broadcast your Powerpoint presentation to people all over the world, allowing for maximum exposure and reach. Additionally, Powerpoint broadcast work can be automated, allowing you to quickly and easily create presentations with minimal effort. Finally, it is a cost-effective way to share your message or advertisement, as it requires minimal cost in time, effort, and resources.
How To Do Live Polling In Powerpoint?
By clicking a button, you can easily generate a live poll in PowerPoint. When you click ‘Add a slide,’ you will be prompted to enter your poll text as well as the poll slide’s text. Now that you’ve gathered the necessary information, you’re ready to stage live polls with your audience.
Unlock The Power Of Live Links In Powerpoint Presentations
When you add a live link to a PowerPoint presentation, it is one of the most powerful tools available nowadays. It not only enables the audience to receive additional resources and information, but it can also be used to redirect viewers to relevant websites that provide more in-depth information on a specific topic. The added live link to a PowerPoint allows audience members to access websites faster and more easily, giving presentations a more immersive and interactive feel. Furthermore, having a live link in the presentation gives viewers an additional opportunity to learn more about the topic.
How Does Powerpoint Live Work?
Audience members can see a presentation on their devices and listen to live subtitles in their preferred language using Live Presentations in PowerPoint.
A Tool For Professional Presenters: Presenter View
PowerPoint’s Presentation View feature allows PowerPoint users to complete their presentation from the comfort of their own couches. With Presenter View , the presentation can be viewed on a monitor or laptop with a comprehensive view, while the audience only sees the slides. It allows the audience to see notes and slides that would not otherwise be displayed to the presentation. It also helps them to keep track of what they are doing while delivering the presentation. As a result, the Presentation View feature is extremely useful to presenting professionals because it allows them to move freely throughout the presentation while remaining on top of everything. Furthermore, it ensures that the audience is always engaged by using all of the features and slides that the presentation provides. The ability to create a professional, engaging presentation with Presenter View is an excellent tool for any type of presentation.
Can You Work In Real Time At Powerpoint?
You can record a presentation in real-time while it’s being presented, or you can do it in advance so that you can use the flipped model or make it available for viewing later. There are several ways to record a presentation, but I’ll show you how to do so in PowerPoint using audio and video.
Create Professional Presentations For Less With Powerpoint Designers
If you want to make a professional-looking presentation that doesn’t require a lot of effort or money, it’s a good idea to learn how to earn money by making powerpoints. With the help of the vast freelance marketplace on the Web, you can find experienced PowerPoint designers who will help you create a visually stunning presentation that will not break the bank. Furthermore, if you sign up for Microsoft 365, you can gain access to all of the program’s features for free. Because we received over 407,920 reviews from our clients, you know that we are on your side. Take advantage of this opportunity to put your best foot forward and make your presentation as appealing as possible without paying too much attention to detail.
Share Blog Post with your network
Free Exclusive Tips & News
Enter your email below to get access to our advanced tips, insights, research and industry news –
Recent Blog Posts

Our Winning Guide To Marketing Your Small Business In 2024

6 Reasons Why Your Social Media Marketing Is Failing

Art Of The Sale: How To Sell Anything With Ease

Innovative Ways To Earn More In 2024

Why Local Marketing Is So Vital For Success

The 7 Most Interesting Vape Flavors You Should Definitely Try

Living In Florida: How To Build Your Dream Home

Creating Dynamic Ad Strategies Utilizing Real-Time Data

Marketing Insurance: The Ultimate Guide

Optimizing videos with AI advancements

8 Top Marketing Tips You Need To Know

A Look At Why More Americans Are Selling Their Homes

The Ultimate Guide To Marketing Home Services

- YouTube Tags Generator
- Youtube Video Thumbnail Downloader
- Video Thumbnail Preview / Viewer
- YouTube Video Ideas Generator
- YouTube Money & Earnings Calculator
- YouTube Internal Search Engine (soon!)
- Chrome Extension
- Suggest a Feature & Win
- Pricing & Plans
- Affiliate Program
- 'The YT Beasts' Community

- SUGGESTED TOPICS
- The Magazine
- Newsletters
- Managing Yourself
- Managing Teams
- Work-life Balance
- The Big Idea
- Data & Visuals
- Reading Lists
- Case Selections
- HBR Learning
- Topic Feeds
- Account Settings
- Email Preferences
How to Make a “Good” Presentation “Great”
- Guy Kawasaki

Remember: Less is more.
A strong presentation is so much more than information pasted onto a series of slides with fancy backgrounds. Whether you’re pitching an idea, reporting market research, or sharing something else, a great presentation can give you a competitive advantage, and be a powerful tool when aiming to persuade, educate, or inspire others. Here are some unique elements that make a presentation stand out.
- Fonts: Sans Serif fonts such as Helvetica or Arial are preferred for their clean lines, which make them easy to digest at various sizes and distances. Limit the number of font styles to two: one for headings and another for body text, to avoid visual confusion or distractions.
- Colors: Colors can evoke emotions and highlight critical points, but their overuse can lead to a cluttered and confusing presentation. A limited palette of two to three main colors, complemented by a simple background, can help you draw attention to key elements without overwhelming the audience.
- Pictures: Pictures can communicate complex ideas quickly and memorably but choosing the right images is key. Images or pictures should be big (perhaps 20-25% of the page), bold, and have a clear purpose that complements the slide’s text.
- Layout: Don’t overcrowd your slides with too much information. When in doubt, adhere to the principle of simplicity, and aim for a clean and uncluttered layout with plenty of white space around text and images. Think phrases and bullets, not sentences.
As an intern or early career professional, chances are that you’ll be tasked with making or giving a presentation in the near future. Whether you’re pitching an idea, reporting market research, or sharing something else, a great presentation can give you a competitive advantage, and be a powerful tool when aiming to persuade, educate, or inspire others.
- Guy Kawasaki is the chief evangelist at Canva and was the former chief evangelist at Apple. Guy is the author of 16 books including Think Remarkable : 9 Paths to Transform Your Life and Make a Difference.
Partner Center
IMAGES
VIDEO
COMMENTS
If you're interested in making your first YouTube video, it's literally never been easier. Using software you probably already have, you can make your 1st YouTube video with PowerPoint.
In this new and updated video you'll learn 3 quick & easy ways to put a YouTube video into a Canva presentation. ️ Don't just plonk your video onto a slide,...
Learn to embed YouTube videos into your PowerPoint slides with our easy-to-follow guide. Elevate your presentations with multimedia content!
Go to "Insert," followed by "Video," where you can embed any video from YouTube's "Share" menu and play it on your own presentation. Always make sure that it is your own video. You can always choose Creative Commons videos from YouTube, Vimeo and other sites. Use PowerPoint's "Playback" option which is displayed after you ...
From dynamic transitions to eye-catching graphics, discover how to make your presentations stand out from the crowd. Watch now and unleash your creativity with Canva!
Learn how to embed a YouTube video in PowerPoint to add some add some excitement and energy to your presentation.
Adding a YouTube video to your slideshow is an effective way to make your presentation engaging for your audience. If you often work with PowerPoint, you can also learn how to insert other formats of media to your presentation like music, PDF files, or even animated GIFs .
Want to spice up your Google Slides presentation by including a YouTube video in it? If so, use Slides' built-in feature to embed your YouTube videos with customizable options. We'll show you how to do just that.
Add a video from YouTube to your PowerPoint slides and learn what you have to do if you are offline.
Record talking heads that you can embed on your slides with Canva's video presentation maker and present ideas well at your own pace.
Learn how to easily insert YouTube videos into your PowerPoint presentations with this step-by-step guide from Skillfine.
Adding video can make your Google Slides presentation more interesting. In this tutorial, you'll learn how to add video to Google Slides.
In this article, I'll show you how to can improve your YouTube presentation skills. I'm sharing 15 tips that have helped over 580 of my real-world clients and thousands of my online students. Enabling them to speak with confidence and clarity when previously they thought, "I can't speak on camera".
Video presentations are winning over audiences and helping businesses communicate their message. Learn how to create video presentations with this guide.
We'll show you the process for how to embed a YouTube video in Google slides with ease. Be prepared to present a slideshow that's anything but boring!
Create engaging presentations with an online video maker. Choose from our free presentation templates, upload your media and get your video within seconds.
Wondering how to make a video presentation with audio? Read our 8-step guide to creating video presentations with pictures and music that stand out.
Create video presentations with auto-captions, transitions, background music. With 100+ video editing tools, make the most engaging presentation video.
Learn how to make a YouTube video! This series covers how to film, edit and upload a YouTube video from step-by-step. ***** Looking for the best camera and ...
Have you found yourself watching YouTube videos and thinking, "I can do this too?" If you're confused about where to begin, don't worry—it's easy to make a YouTube video. YouTube videos can be as casual or as high-quality as you prefer. If you don't want or need to plan out your video, skip to the end of this guide for simple instructions on uploading your video to YouTube. This wikiHow ...
17 fun presentation ideas (with video!) to wow your audience Whether you're creating a sales presentation, an event presentation, or just showing your travel video to Uncle Ron, we've compiled some of the best ways to get your audience seriously hyped up about your message.
Are you looking for a way to share your PowerPoint presentation with a wider audience? Streaming your presentation on YouTube is a great way to do this! Live streaming your PowerPoint presentation on YouTube can be a great way to reach a larger audience without having to worry about the hassle of setting up a webinar.
Watch public speaking and presentation skills expert Jason Teteak give a presentation modeling exact techniques for how to do an amazing presentation.
A strong presentation is so much more than information pasted onto a series of slides with fancy backgrounds. Whether you're pitching an idea, reporting market research, or sharing something ...
In this recipe we will create a garlic & herb crusted smoked prime rib that is fit for a King!"Prime" rib doesn't mean it comes from a Prime grade meat. You can make prime rib from a Choice grade cut.
Here, in this video I will show you:How to make your presentation more amazing by using morph transitions and give Creative structure to your presentation. ...